HIN Gateway – Technical Guide for New Installation and Migration
Introduction
This document provides a comprehensive guide to the technical installation of, and migration to, the new HIN Gateway (“Stargate Appliance”).
The guide is intended for HIN customers, IT administrators, and system engineers who are responsible for deploying and configuring the new HIN Gateway and, where applicable, migrating from the existing Mail Gateway (MGW) to the new solution.
The HIN Gateway is a secure email gateway solution that enables trusted, encrypted, and policy-driven communication within the HIN Trust Circle. It acts as a central intermediary between internal email infrastructures and external communication partners, ensuring that email traffic is transmitted securely, complies with the organisation’s policies, and meets HIN’s security standards.
Overview of the mail flow
- Incoming emails are routed via the HIN Gateway, where they are validated, decrypted (if necessary) and checked against trust and security policies before being forwarded to the internal mail server.
- Outgoing emails are sent from internal systems to the HIN Gateway, where encryption, routing and policy enforcement are applied before they are transmitted to external recipients.
- Communication between HIN gateways is secured by peer certificates and WireGuard tunnels, ensuring trusted communication between domains.
Installation and migration process
The structured, step-by-step procedure described in this document covers both new HIN Gateway installations and migrations from an existing HIN Mail Gateway (MGW). Depending on the deployment scenario, individual steps may apply only to migrations.
- Preparation and deployment planning, including fallback planning where applicable
- Installation and configuration of the HIN Gateway
- Domain activation and certificate validation
- Integration into the existing mail environment and routing configuration
- Testing, transition to production and post-deployment validation
- For migrations: retirement of the existing MGW after successful validation
Migration
HIN's objective is to ensure a secure, smooth and fully validated deployment with minimal disruption to operations and uninterrupted continuity of email services. In migration scenarios, the existing MGW should remain available as a fallback option until the HIN Gateway has been successfully validated in production. It should only be decommissioned once the migration has been completed and stable operation has been confirmed.
Frequently asked questions
Can I perform the installation or migration on my own?
Yes, the installation or migration can be completed entirely by the customer.
For migration scenario the only exceptions is "Step 1.3 - Export private key(s)". For security reasons and to keep your private key safe, you must contact HIN Support or join the planned migration call to receive the code required to export the private key from the currently operating Mail Gateway.
If the installation or migration cannot be completed successfully, please join the planned support call with our engineers.
Will there be any outage in email delivery during the setup process?
Migration: Between "Step 1.5 - Shutdown existing MGW VM" and "Step 18 - Configure mail server", all emails will be queued on the mail server. Once "Step 18 - Configure mail server" has been completed, the queued emails will be sent out or delivered to the mailbox.
New instalation: While you are configuring the email flow rules, all emails will be queued on the mail server. Once "Step 18 - Configure mail server" has been completed, the queued emails will be sent out or delivered to the mailbox.
Will any emails be lost during the installation and migration?
No, no emails will be lost during the installation and migration. Some emails might be delaied.
Overview of the installation steps
| Step | Topic | Responsibility | Migration | New installation |
|---|---|---|---|---|
| 0 | Check prerequisites | Customer | Yes | Yes |
| 1.1 | Smoke test | Customer | Yes | N/A |
| 1.2 | Backing up the existing MGW | Customer | Yes | N/A |
| 1.3 | Export private key(s) | Customer / HIN | Yes | N/A |
| 1.4 | Contingency plan / fallback scenario | Customer | Yes | N/A |
| 1.5 | Shutdown existing MGW VM | Customer | Yes | N/A |
| 2 | WireGuard | Customer | Yes | Yes |
| 3 | Select target VM | Customer | Yes | Yes |
| 4 | Load VM image | Customer | Yes | Yes |
| 5 | Network connection to the VM | Customer | Yes | Yes |
| 6 | Access via the browser | Customer | Yes | Yes |
| 7 | Enter activation code | Customer | Yes | Yes |
| 8 | Mesh network setup | Customer | Yes | Yes |
| 9 | Establishing secure mesh network | Customer | Yes | Yes |
| 10 | Login to Keycloak | Customer | Yes | Yes |
| 11 | Update password | Customer | Yes | Yes |
| 12 | Update account information | Customer | Yes | Yes |
| 13 | Initial configuration and domain setup | Customer | Yes | Yes |
| 14 | Configure mail transport | Customer | Yes | Yes |
| 15 | Configure whitelist headers | Customer | Yes | Yes |
| 16 | Peer certificates | HIN | Yes | Yes |
| 17 | Validate peer certificates | Customer | Yes | Yes |
| 18 | Configure mail server | Customer | Yes | Yes |
| 19 | Test and validate | Customer | Yes | Yes |
| 20 | Change the password of the VM | Customer | Yes | Yes |
| 21 | Take existing MGW out of service | Customer | Yes | N/A |
| Annex 1 | Backing up and restoring the appliance settings | Customer | Yes | N/A |
Detailed steps
Step 0 - Check prerequisites
Please ensure that all necessary preparatory steps have been completed before the HIN Gateway migration activities begin.
The following items must be available or confirmed before the installation:
-
Credentials will be delivered to you by HIN
- VM credential
- Keycloak credential
- Activation code
-
Export of private key Note: Applicable only for migration case
- If you are working on a Windows machine that has access to the Mail Gateway VM via port 22, we can support you during the call in enabling the private key export from the MGW.
- If you do not have access to such a machine, please contact HIN Support by email or phone (support@hin.ch / 0848 830 740) to help you establish a support connection via System Administration → Support Connection → Connect.
- Download latest version of VM image
- Firewall:
- Allow traffic: any-to-HIN Gateway and HIN Gateway-to-any
- WireGuard, please refer to Server Requirements - Inbound Network Access:
- Configure the WireGuard port
19818(TCP/UDP) in your firewall- Incoming and outgoing traffic
- Configure the WireGuard port
- WireGuard, please refer to Server Requirements - Inbound Network Access:
- Allow traffic: your administrative machine-to-HIN Gateway VM
- Installation requirements:
- HTTPS port
443- Incoming and outgoing traffic
- Keycloak port
8180- Incoming and outgoing traffic
- HTTPS port
- Troubleshooting requirements (optional needed to see logs, modify all parameters):
- SSH port
22- Incoming and outgoing traffic
- Dozzle port
8190- Incoming and outgoing traffic
- SSH port
- Installation requirements:
- Allow traffic: any-to-HIN Gateway and HIN Gateway-to-any
- DHCP access should be available for "Step 5 - Network connection to the VM" (recommended).
- Backup requirements - see "Annex 1 - Backing up and restoring the appliance settings". Note: Applicable only for migration case
- Note: Applicable only for migration case - Confirmation that the existing MGW will not be deleted until acceptance has been completed.
- Access to DNS, mail server connectors, transport rules, and relay settings.
Why WireGuard?
The WireGuard port fulfils two important functions:
- The HIN Gateway uses this port to obtain peer certificates from the HIN CA.
- It uses this port to establish a secure tunnel to other HIN Gateways, through which secure data exchange (e.g. email traffic) takes place.
!!! tip "Private key export" - Applicable only for migration case If you are working on a Windows machine that has access to the Mail Gateway VM via port 22, we can support you during the call in enabling the private key export from the MGW.
If you do not have access to such a machine, please contact HIN Support by email or phone (**support@hin.ch** / **0848 830 740**) to help you establish a support connection via **System Administration → Support Connection → Connect**.
Step 1.1 - Smoke test
Info
This step applies only for single and multi domain migrations
Send test emails to the following recipients, using mailboxes to which you have access so that successful delivery can be verified:
- An HIN email address or an email address within your HIN Community domain, for example: user@hin.ch
- An external email address outside the HIN Community, for example: Bluewin, Gmail, Yahoo, or GMX
For the external recipient, send an email from the HIN Community with (confidential) included in the subject line.
Test mail flow in both directions:
- From the HIN trusted domain to the external email address
- From the external email address to the HIN Community
Verify that all test emails are delivered successfully and that the subject, message content, and attachments (if applicable) are received correctly.
Step 1.2 - Backing up the existing MGW
Info
This step applies only for single and multi domain migrations
Create a backup of the existing MGW appliance and ensure that the VM is retained until the migration has been successfully completed and formally accepted. For more information, see "Annex 1 - Backing up and restoring the appliance settings".
Check current MGW routing configuration
Before shutting down the existing MGW, check the following configuration values and note them down. You will likely need them later when configuring the HIN Gateway:
- Log in to the MGW and go to "Mail System → Outgoing server" and check whether anything is configured there.
- For each domain hosted on the MGW, go to
Mail System → <domain> → Forwarding serverandMail System → <domain> → Send ALL outgoing mails from this domain to the following SMTP server, and record the current values.
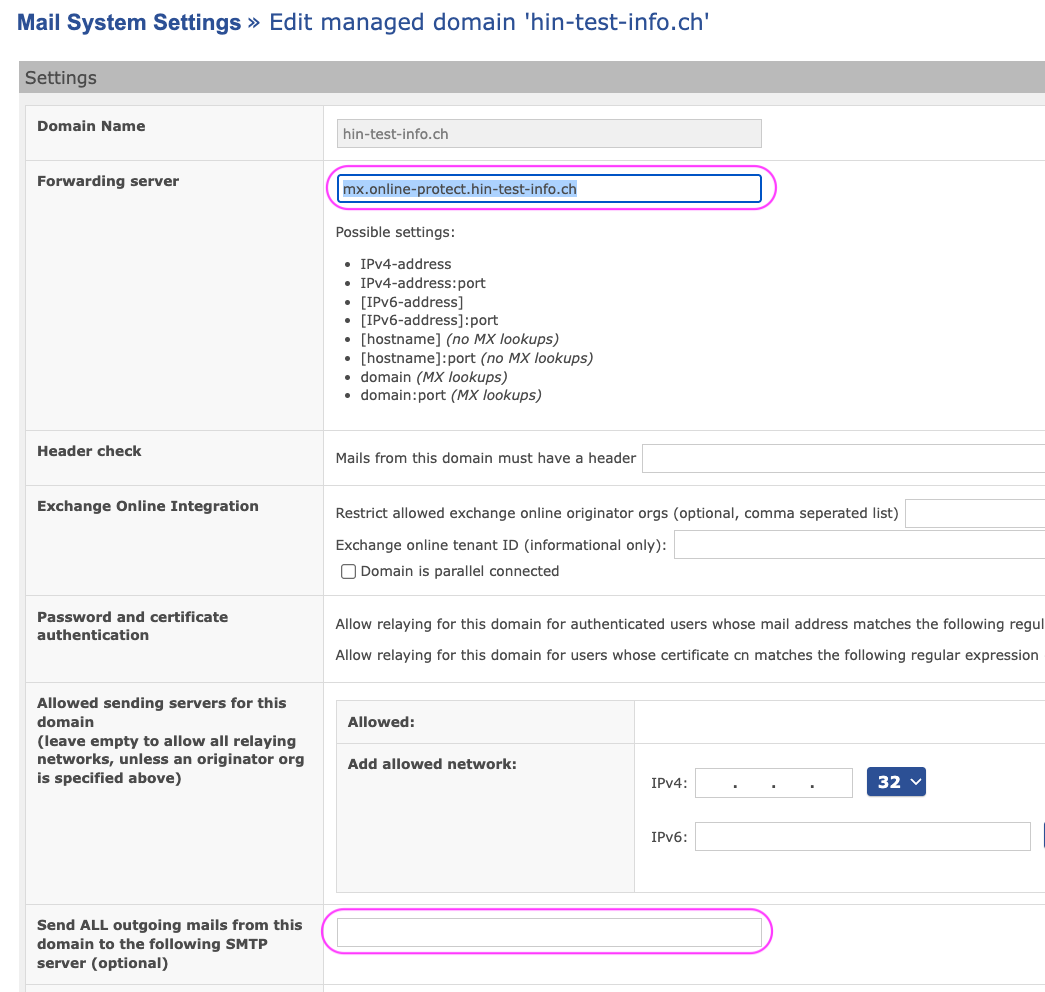
MGW header check
If you use the Header check option in the MGW, note down the configured value as well. You can set up the same header check later in the HIN Gateway.
Step 1.3 - Export private key(s)



Info
This step applies only for single and multi domain migrations
For multi-domain migration perform the operation for each domain
HIN assistance required
An unlock code is required for this step. The code is provided by a HIN Support Engineer.
If you would like to continue the installation on your own, please contact HIN Support to request the unlock code. Otherwise, the unlock code will be provided during the planned migration call.
- Log into the existing MGW webGUI.
- Open "Mail System".

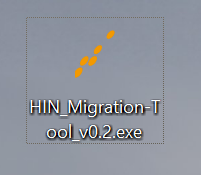
- Run the application by clicking on
HIN_Migration-Tool_v*.exeif you want to install it yourself. Alternatively, you can wait until the migration call, where the support engineer will assist you with the installation.
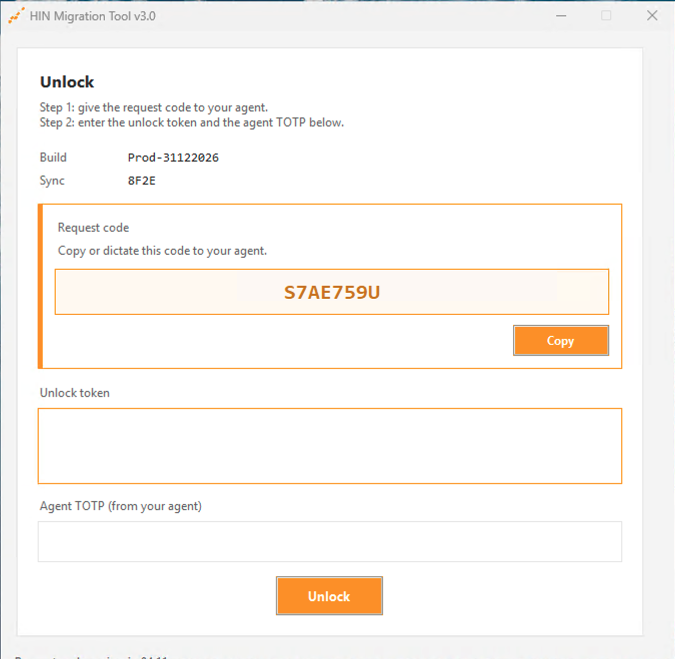
- Enter the unlock code that the support engineer provides to you.
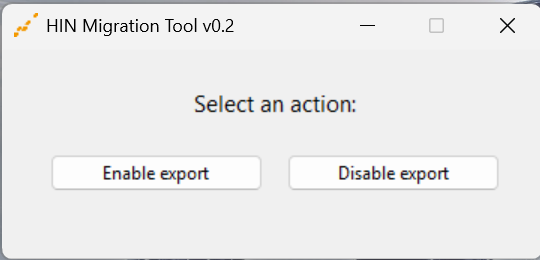
- Select "Enable export".
- Enter the MGW IP address.
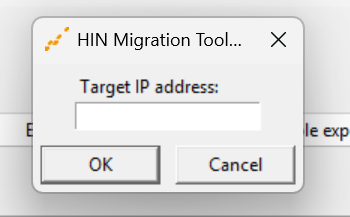
- Wait for confirmation.
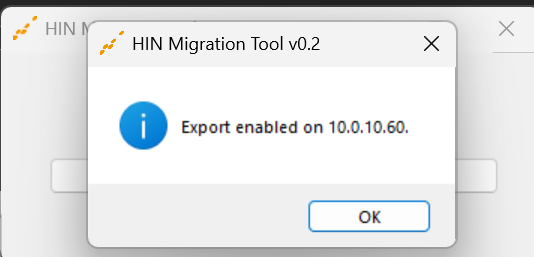
- Select the trusted domain in the MGW webGUI.

- Scroll down and select the managed fingerprint.

- Scroll down to the "PKCS12 download" category (you may optionally enter a password to encrypt the key). Press "Download PKCS12" and save the
*.p12file on the computer.

- Return to the
HIN_Migration-Tool_v*.exeapplication and disable the Export button.
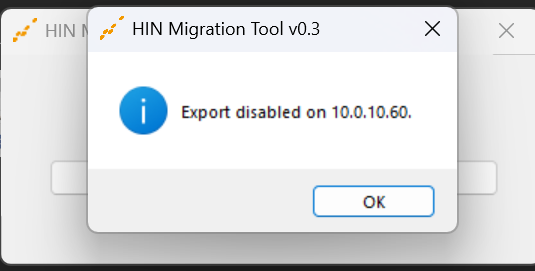
Step 1.4 - Contingency plan / fallback scenario
Info
This step applies only for single and multi domain migrations
Rollback scenario - if a rollback is required:
- Stop the new HIN Gateway.
- Power on the existing MGW.
- Verify that inbound and outbound email traffic is functioning correctly via the existing MGW.
- For multi-domain migration perform the verification operation for each domain
Step 1.5 - Shutdown existing MGW VM
Info
This step applies only for single and multi domain migrations
Shut down the existing MGW VM.
Warning
This step will interrupt the mail flow. During the interruption, emails will be queued on the mail server and delivered after the installation has been completed (see "Step 18 - Configure mail server").
Step 2 - WireGuard
Ensure you have configured the WireGuard port 19818 (TCP/UDP) in your firewall:
- Incoming and outgoing traffic
- Allow traffic: any-to-HIN Gateway and HIN Gateway-to-any
Step 3 - Select target VM
Select one of the available virtual images and provision it as described in the installation guide on the HIN Gateway service page:
Info
For security and supportability reasons, ensure that your hypervisor is not running an end-of-life version. The HIN Gateway appliance is supported on the latest hypervisor release and the immediately preceding major version.
- VM Image Installation:
- Configuration of Microsoft Exchange
Step 4 - Load VM image
Upload the selected VM image to your hypervisor.
Second disk required — the Data Disk
The appliance uses two disks: the OS disk from the image, and a separate Data Disk that holds all configuration, secrets, mail, and databases. Keeping them apart lets an image upgrade replace the OS without touching your data.
The VMware OVA already includes this disk. On every other platform (Proxmox, Hyper-V, Azure, Cloudscale) the image is a single OS disk, so attach a second, blank disk of at least 30 GB before the first boot.
Do not format or partition it yourself. On first boot the appliance formats the blank disk (label VEREIGN-DATA) and mounts it at /var/data. Without it, the first boot fails its health check and rolls back.
Step 5 - Network connection to the VM
Ensure that the VM has a network connection and that a static IP address has been assigned to it.
Option A: Configure the IP address of the virtual machine directly in the hypervisor you are using.
Option B: You can configure your router's DHCP server to always assign the same IP address based on the VM's MAC address.
Option C: Log in locally via the VM console and manually configure a static IP address. NOTE: The VM image runs an automatic installation during the first boot. If the network is not configured at this stage, the installation will fail because the server’s IP address cannot be determined.
Add an IP address on Linux:
-
Run the "nmtui" command in the console
-
Use the arrow keys to navigate, then press "Enter" to select the "Ethernet connection" for which you want to change the IP address.
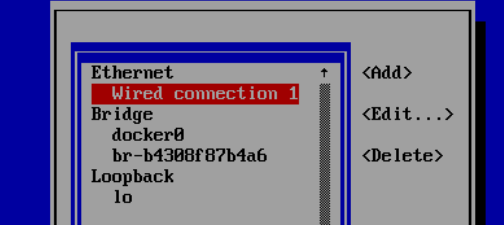
- Navigate to "IPv4 Configuration" and change the setting from "Automatic" to "Manual".
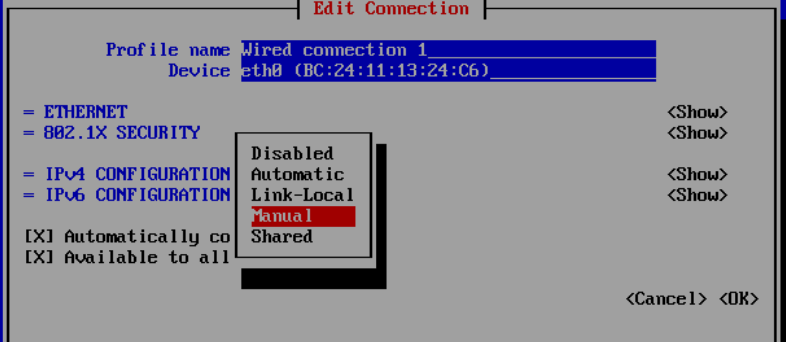
- Use the arrow keys to navigate to the fields where you can enter the IP address, gateway, and DNS server. Then select "OK".
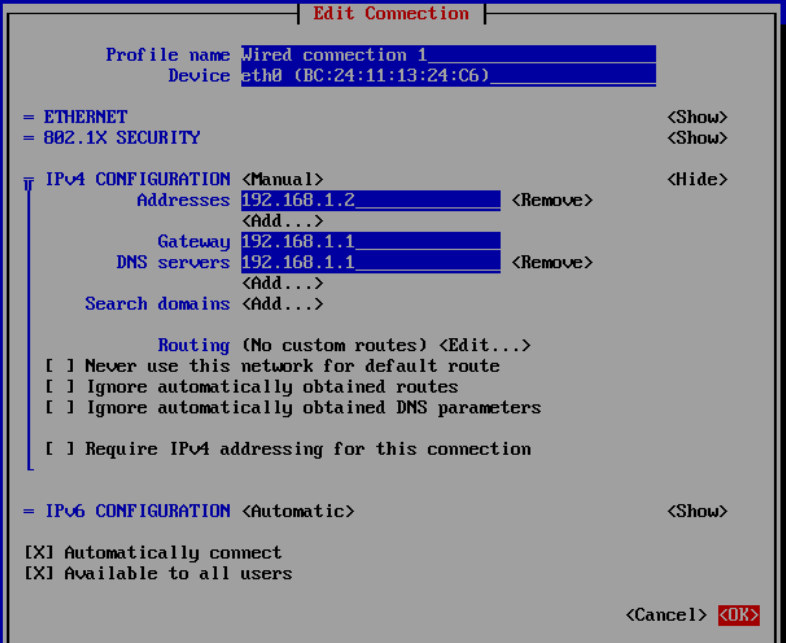
-
After saving the IP address configuration, run the following command in the console:
Cloud-init overrides VM network settings after reboot
This applies to the legacy image only. The bootc appliance - now the default - does not use cloud-init to manage networking, so it is not affected and does not ship the cloud-init-net-* aliases used below.
On the legacy image (typically on VMware/ESXi) cloud-init has no datasource, falls back to "DHCP the first NIC", and re-renders the network config on every boot - so a static address set with nmtui reverts after a reboot. An alias fixes this in one step by disabling only cloud-init's network rendering, so an address you then set on the existing profile persists:
- Stop cloud-init re-rendering the network each boot:
- Run
nmtui, edit the existingcloud-init <iface>connection, and set the static IP, gateway and DNS there. Do not add a second profile for the same interface - cloud-init's carries a higher autoconnect priority and would win. - Reboot and confirm the address survives:
cloud-init-net-enable reverts to the default cloud-init-managed networking. Without the alias, step 1 is the same drop-in by hand:
Tip
If you used Option C and configured the network manually, you must run the following commands:
The installation script automatically detects the server's IP address from the default route on every run - no manual edit of customer-config.sh is needed. Any reachable IP address, whether public or private, is sufficient. The actual public endpoint is configured later through the dashboard.
Behind NAT or a floating IP?
If your server is reached on a different public or floating IP than its own network interface (common with NAT), set SERVER_STATIC_IP to that reachable IP in customer-config.sh before running install.sh. Otherwise leave it empty so it auto-detects.
After the scripts have completed successfully, proceed to "Step 6 – Access via the browser"
Question
If you do not have the HIN admin credentials, please contact HIN Support by email or phone (support@hin.ch / 0848 830 740). Please refer to Support Section.
Step 6 - Access via the browser
Open a browser and enter the IP address configured for the VM. You should see the initial setup screen.
Step 7 - Enter activation code
Select your preferred language and enter the activation code that you received via email from HIN. Click on "Next".
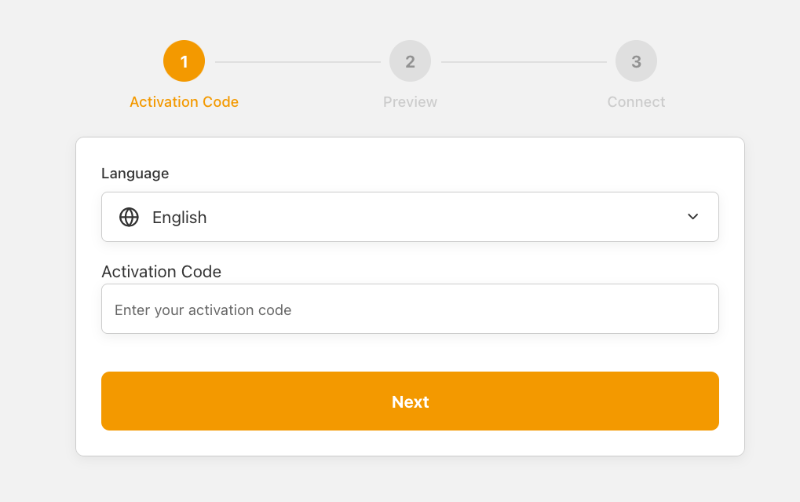
I do not have an activation code
If you do not have the activation code, please contact HIN Support by email or phone (support@hin.ch / 0848 830 740). Please refer to Support Section.
Step 8 - Mesh network setup
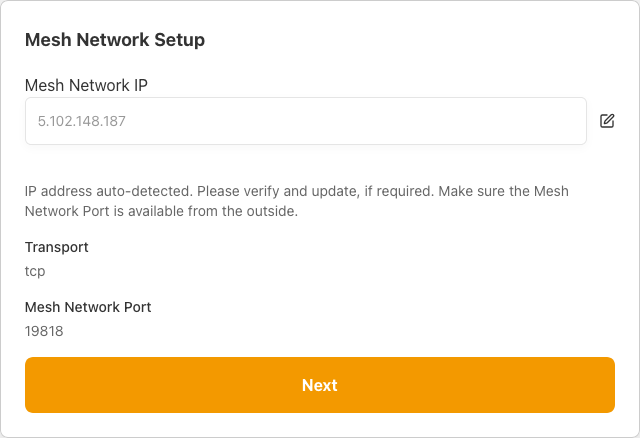
Verify the mesh network configuration:
- IP address - The public IP of the outgoing traffic (auto-detected).
- Transport - The transport protocol (default:
tcp). - Port - The WireGuard port (default:
19818).
What is public IP?
This is an IP address that Machine will use to be accessible via internet. This is not internal Machine IP address after Firewall or NAT, e.g. 10.0.0.0/8, 172.16.0.0/12 or 192.168.0.0/16.
Confirm that the values are correct and click "Next".
Step 9 - Establishing secure mesh network
The system will now establish the secure mesh network connection. This step connects the HIN Gateway to the mesh network and synchronises certificates.
Wait until the process completes. The status indicators will show "Up" when the connection is successfully established. Click "Finish".
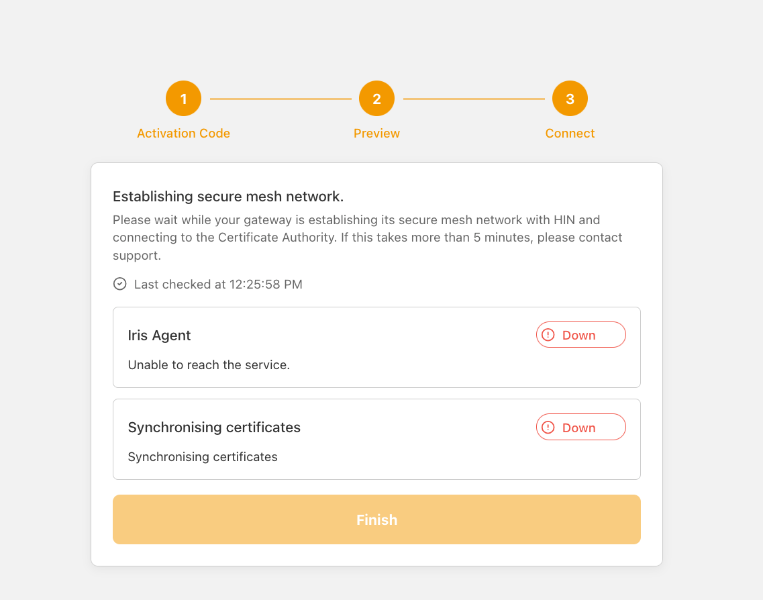
If the connection fails
If the Iris Agent or certificate synchronisation status remains "Down":
- Verify that port
19818(TCP/UDP) is open in your firewall (see "Step 2 - WireGuard"). - Verify that the IP address in "Step 8 - Mesh network setup" is correct and reachable from the internet.
- Restart the process or contact HIN Support by email or phone (support@hin.ch / 0848 830 740).
Step 10 - Login to Keycloak
Warning
Port 8180 needs to be open for Keycloak. It does not need to be accessible from the internet to the whole world. Rather, it should be accessible between your administrative machine and the VM you are installing. Otherwise, you will not be able to connect to Keycloak and proceed with the installation.
What to do if I see a connection error
Please check if port 8180 is open from your machine to the VM. As soon as you update the configuration, go back to the UI at https://<VM IP address> and click the "Login" button.
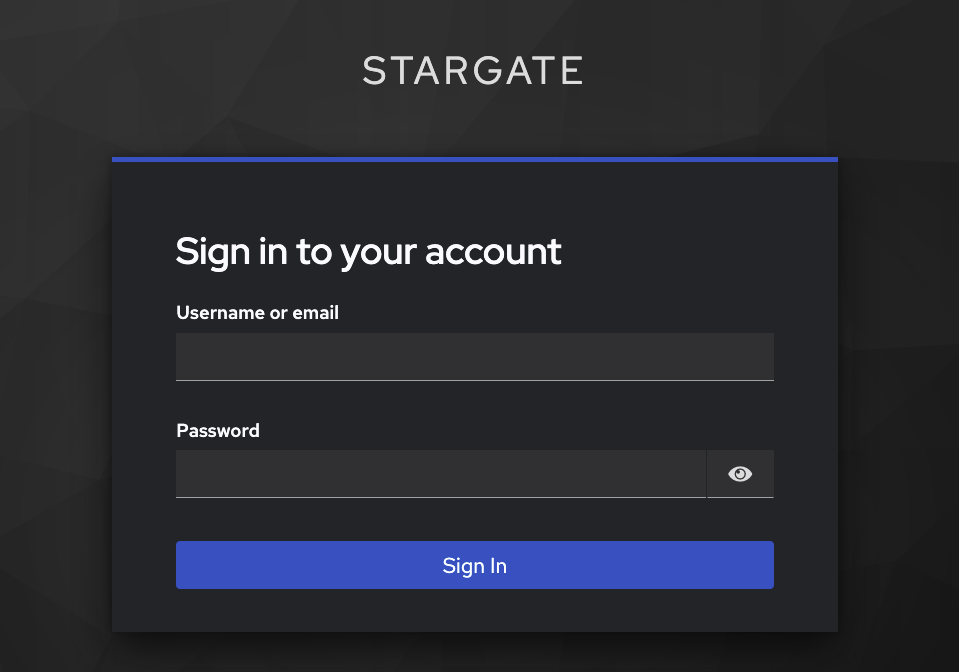
Once the mesh network is established, you will be redirected to the Keycloak login page. Enter the username and password received from HIN.
Question
If you do not have these login details, please contact HIN Support by email or phone (support@hin.ch / 0848 830 740). Please refer to Support Section.
Step 11 - Update password
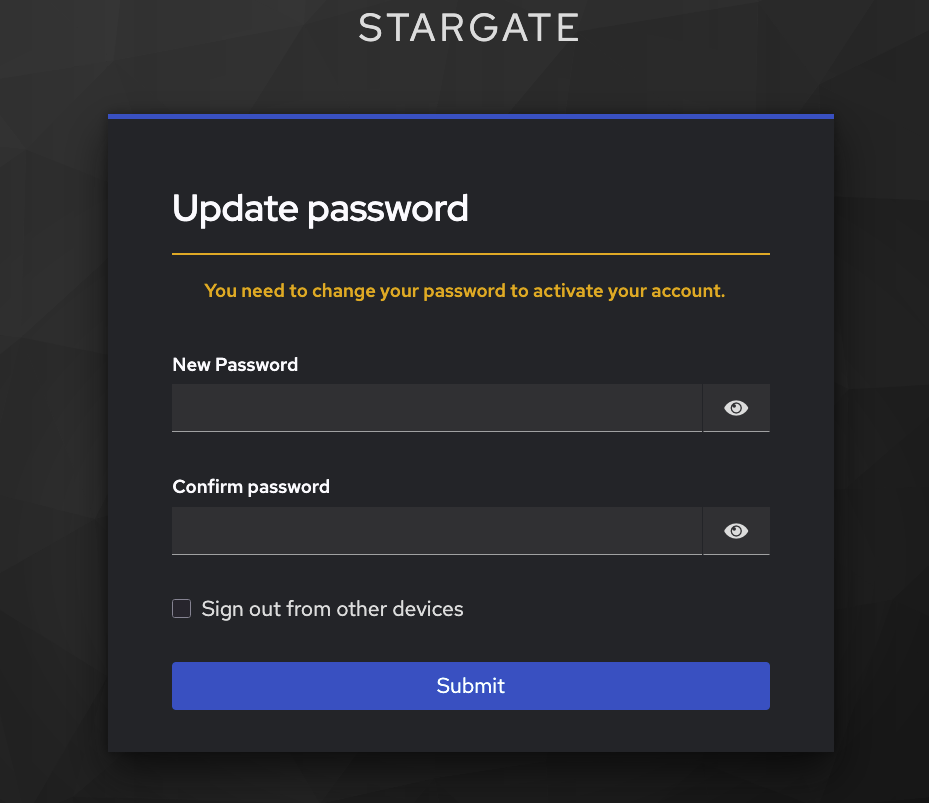
On first login, you will be prompted to change your password. Enter a new secure password and confirm it.
Please make sure you remember the password!
Step 12 - Update account information
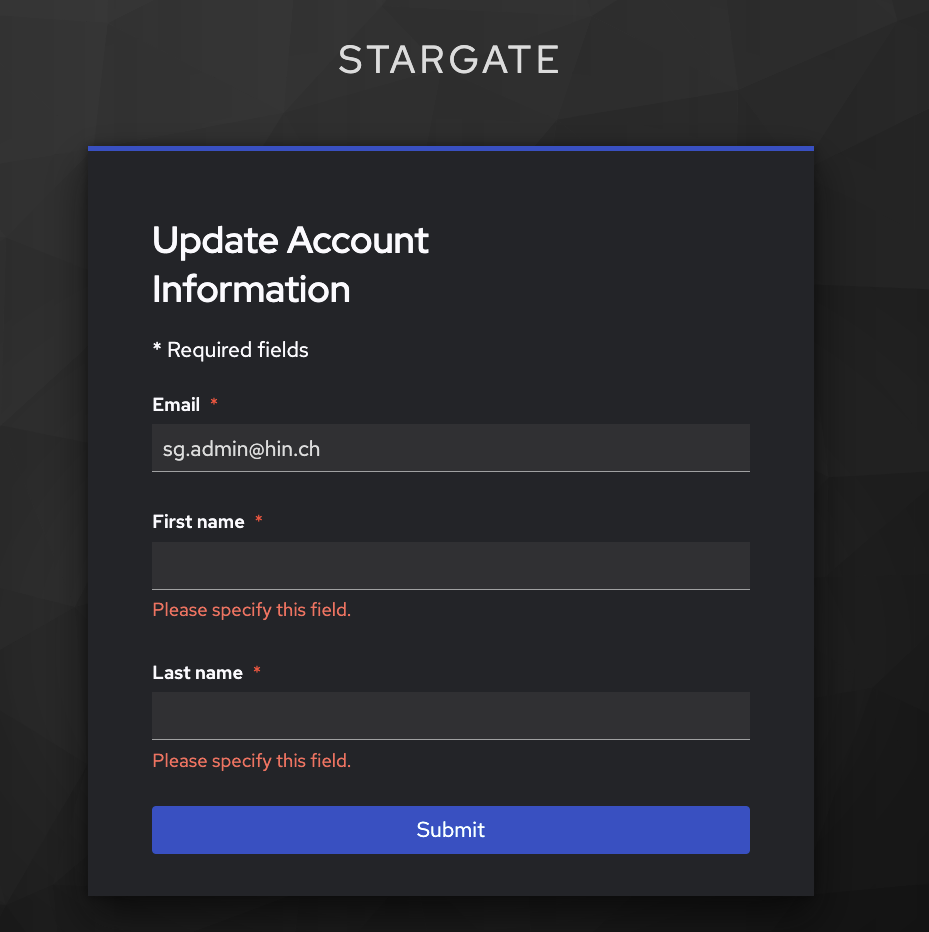
Complete your account profile by entering your first name and last name. The email address is pre-filled. Click "Submit" to continue.
Step 13 - Initial configuration and domain setup
Info
For multi-domain migration perform the operation for each domain domain you are activating at that moment.
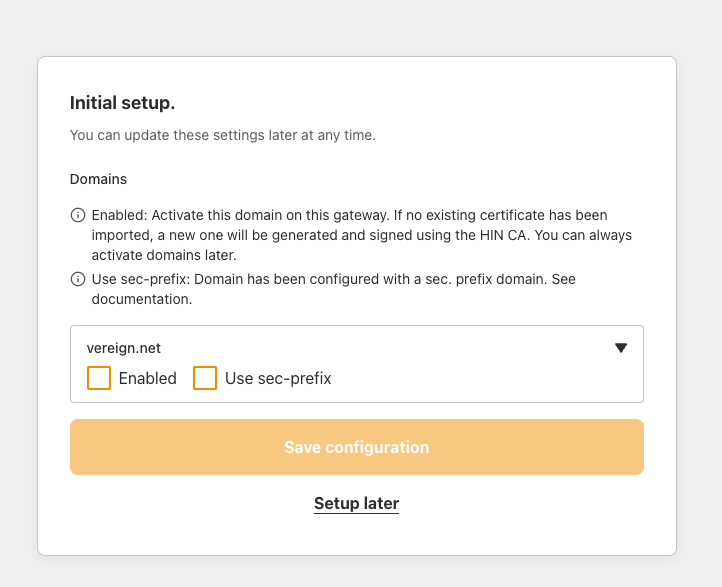
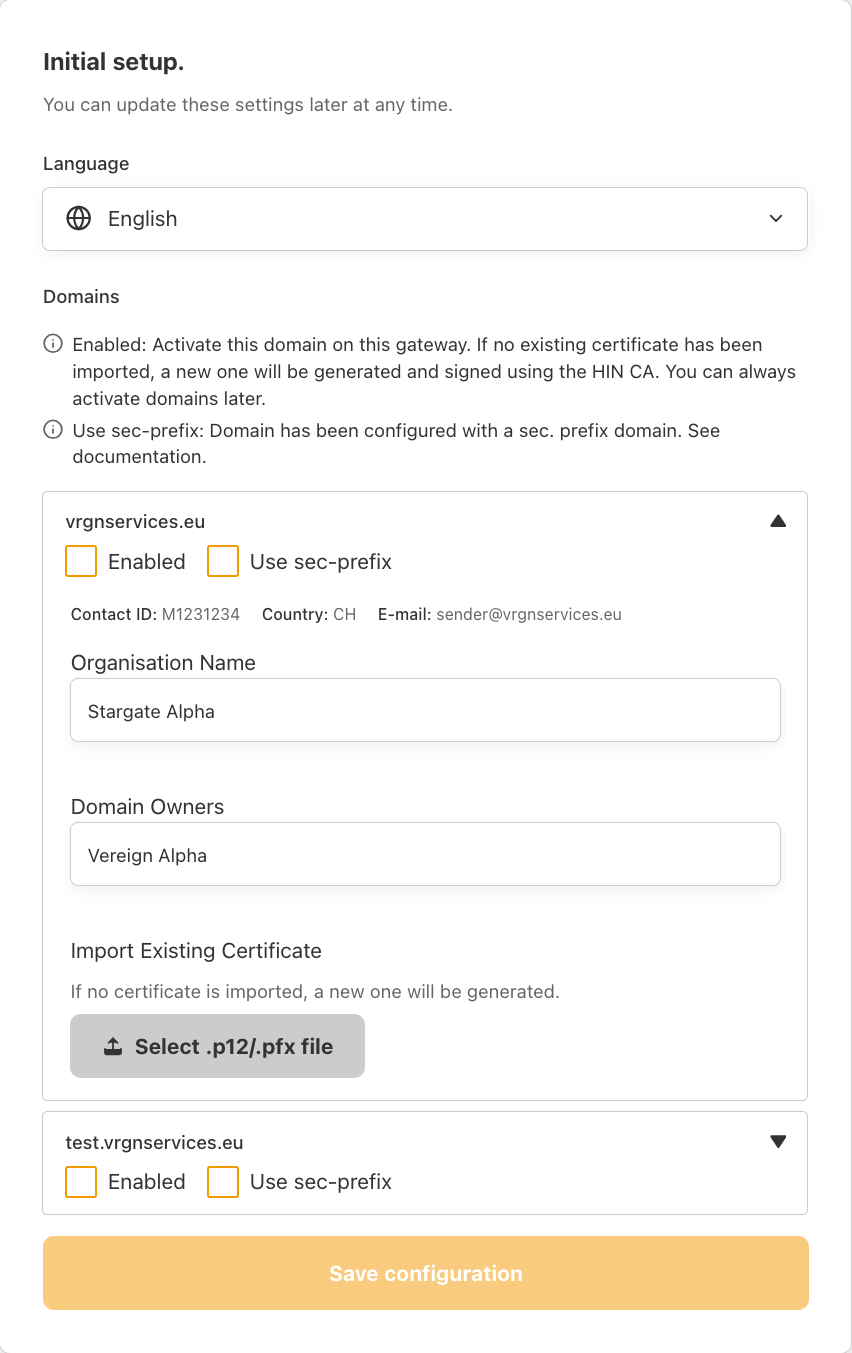
On this screen, configure your initial settings:
- Verify that all your current trusted domain(s) within the HIN Community are displayed correctly.
- Select which trusted domain(s) should be Enabled to obtain peer certificates from the HIN Certification Authority (HIN CA).
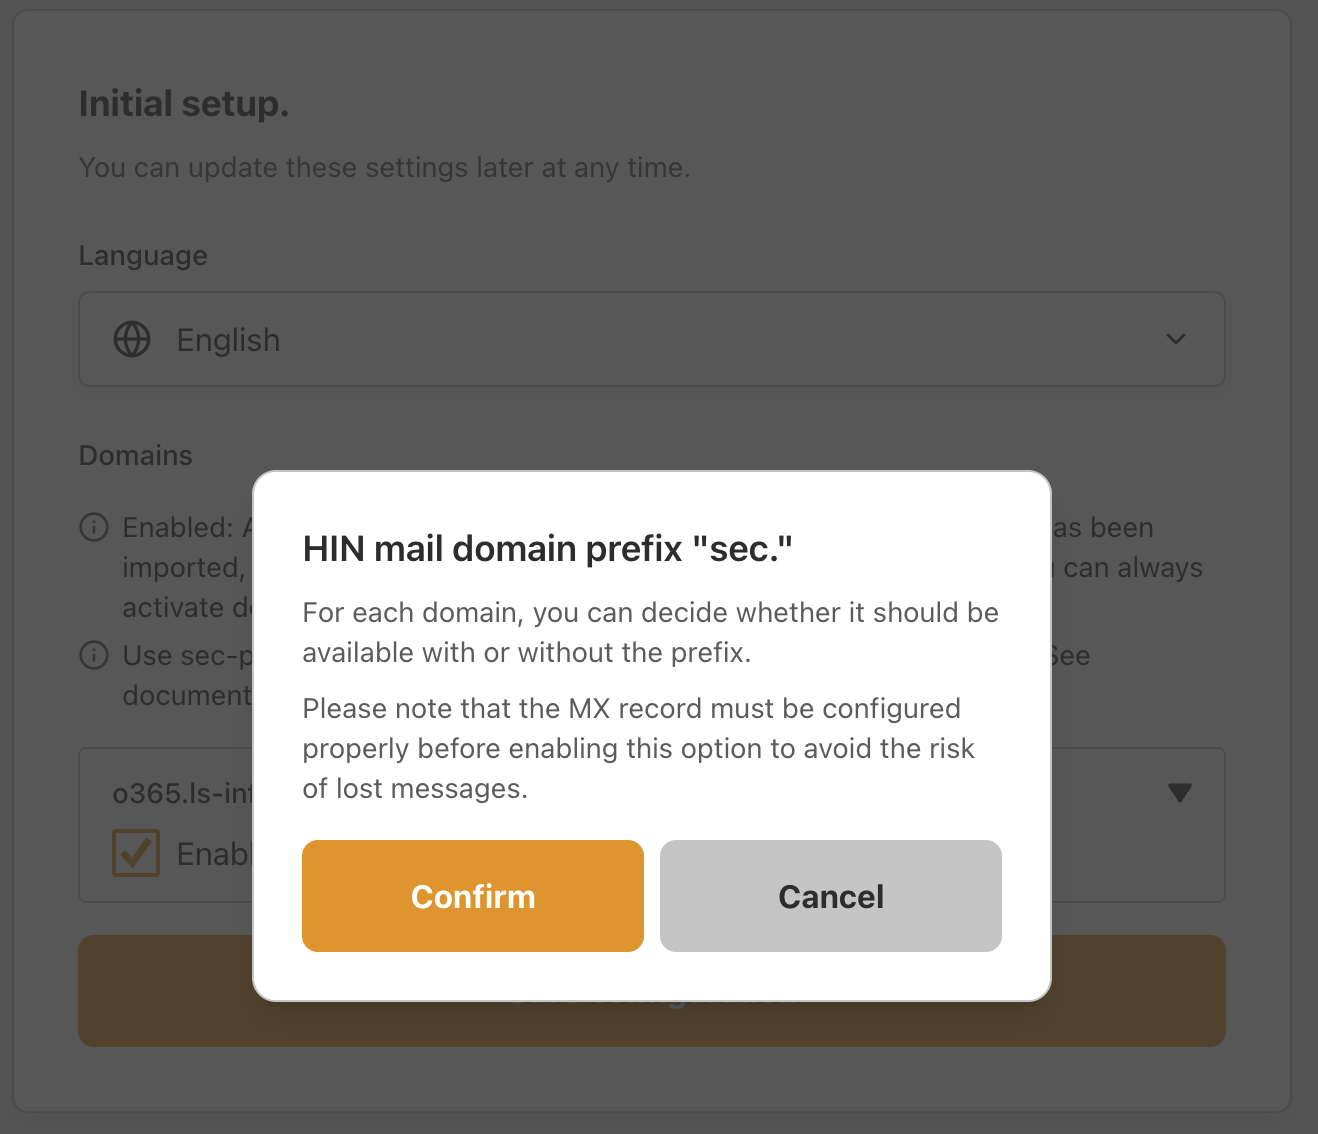
- Indicate for which domain(s) the
sec.<domain>prefix is already configured ("Use sec-prefix").
How to check if my domain is set up with a Security Prefix?
You can open our online tool in your browser: https://trust.hin.ls-infra.me/, enter sec.<domain>, and click the Check button. If you see the message:
✅ This domain is encrypted.
Then your domain is set up with a Security Prefix, and you have to enable the Use sec-prefix option.
- Verify that the organization name and domain owners are correct.
- Import the existing S/MIME certificate file (
.p12/.pfx) from the existing MGW:- Expand the domain and select the P12/PFX File option.
- If no password has been set for the certificate file, leave the password field empty.
- Click "Import Certificate".
- After the certificate has been imported, the message Certificate imported successfully is displayed.
- Click "Save Configuration" at the end of the page to save the changes.
Warning
- At least one domain must be Enabled to continue with the onboarding process. The "Save configuration" button will only become active once this requirement is met.
- If you notice that not all trusted domains are displayed or that the organisational information is incorrect, please contact HIN Support by email or phone (support@hin.ch / 0848 830 740).
Import your existing private key
Note: applicable for migration scenario!
If you do not import the private key from your existing MGW, a new key will be issued. This may result in messages not being decryptable for up to 6 hours, which could lead to data loss.
| Setting | Description |
|---|---|
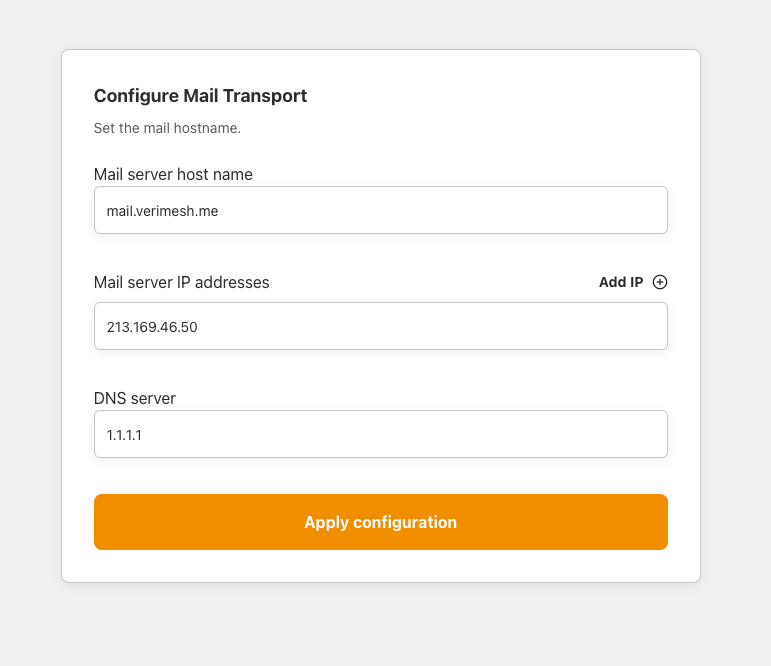
| Mail server host name | The FQDN of this mail gateway instance (e.g. mail.example.com). |
| Mail server IP addresses | The public IP address(es) of this server. Add additional IPs if the server is reachable on multiple addresses. |
| DNS | DNS of the host which will be used to resolve MX and other DNS records |
Multi-domain gradual migration scenario
During the migration support session, HIN engineers will assist the customer with the migration of one domain. Once the first domain has been successfully migrated, the customer is responsible for migrating any remaining domains independently.
Step 14 - Configure mail transport
You will be logged at the HIN gateway dashboard at Domains page
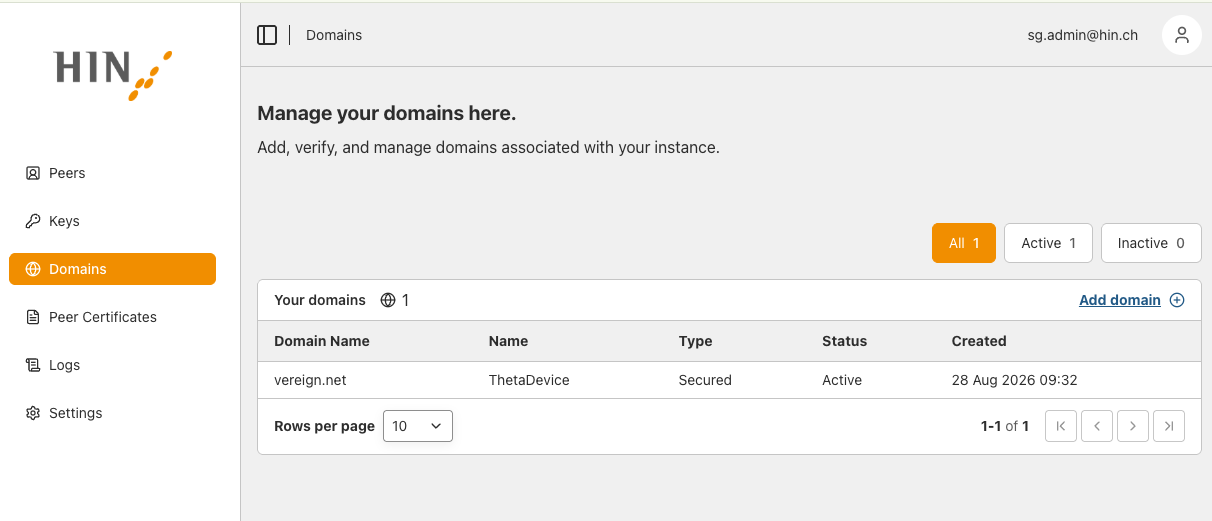
Domains page
Info
For multi-domain migration perform the operation for each active domain.
Under the Domains menu, for each available domain you can configure specific transport route:
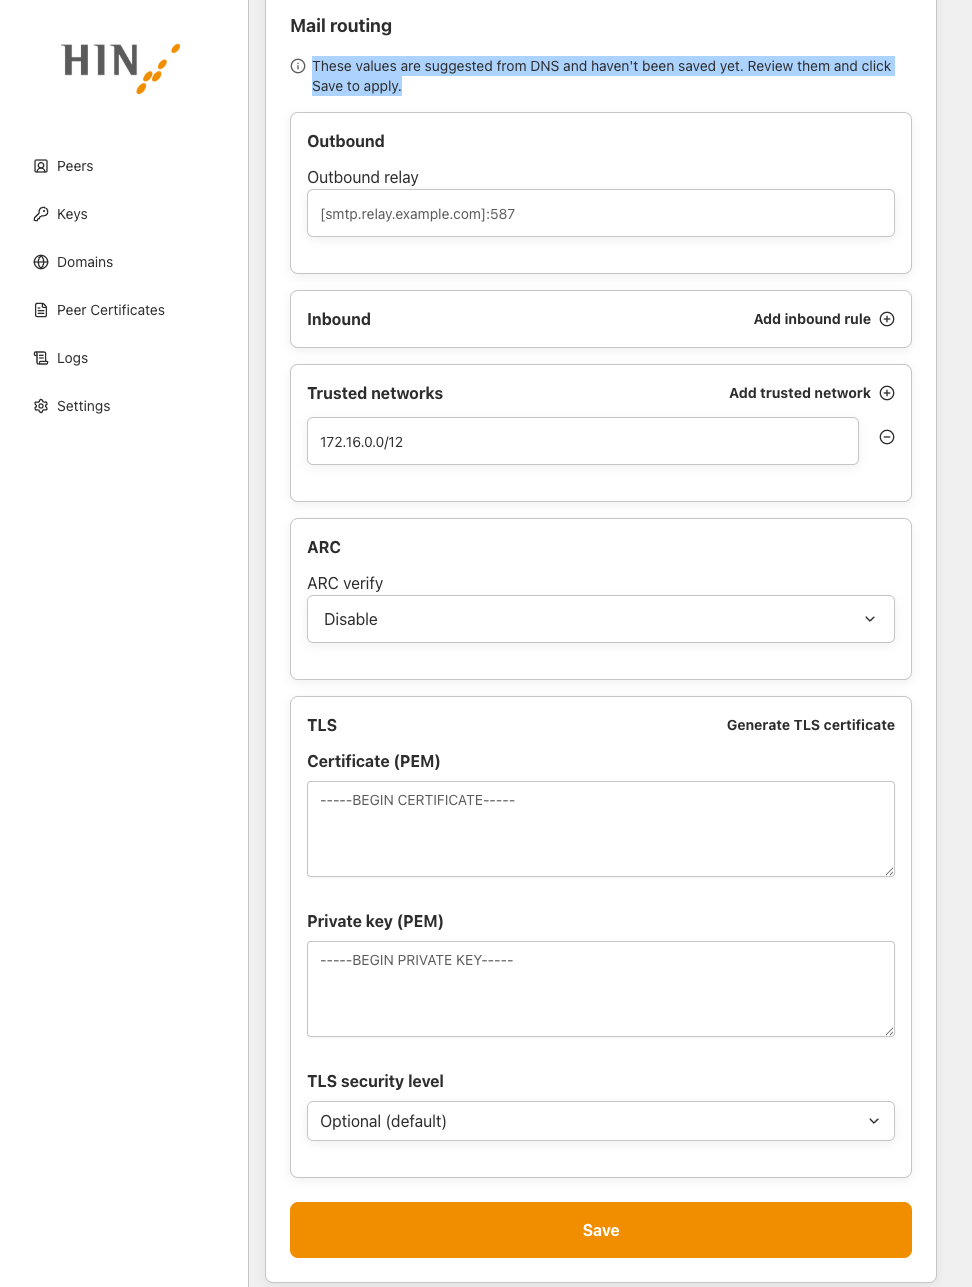
| Setting | Description |
|---|---|
| Inbound relay | The SMTP relay for inbound delivery for selected domain |
| Outbound relay | The SMTP relay for outbound delivery for selected domain. This setting corespond to Forwarding server setting from old MGW |
| Trusted networks | Additional networks allowed to relay through this gateway. For more information please check on "Step 18 - Configure mail server" |
| Configure TLS | TLS certificate settings for SMTP connections and from the Generate TLS certificate button you can generate TLS certificate |
| Email authentication | For all settings under Email authentication section please refer to Email authentication (DKIM ARC SPF DMARC) section |
How to test TLS connection?
You can always test if configured TLS Certificate was applied on your connection to HIN Gateway or not. Execute following command directly from HIN Gateway Terminal:
Or, directly from your local machine:
In output you will see all data related to your TLS connection and used Certificate.
How to convert pfx to pem TLS Certificate?
Use openssl command:
E.g.:
Additional actions:
- Add additional domains by clicking "Add domain", if required.
- if domain is not not HIN secured, it will apper in the
Domainslist as Type: Routed - which mean it can be managed only locally
- if domain is not not HIN secured, it will apper in the
Note
Ensure that all relay host and domain configurations are correct before proceeding.
Once the configuration has been reviewed and completed, click "Save" to continue.
Settings page
On this page under Settings menu, configure your global mail transport settings for the secure mail relay setup which are common for the whole instance. Detailed configuration for each domain can be performed under Domains -> $domain
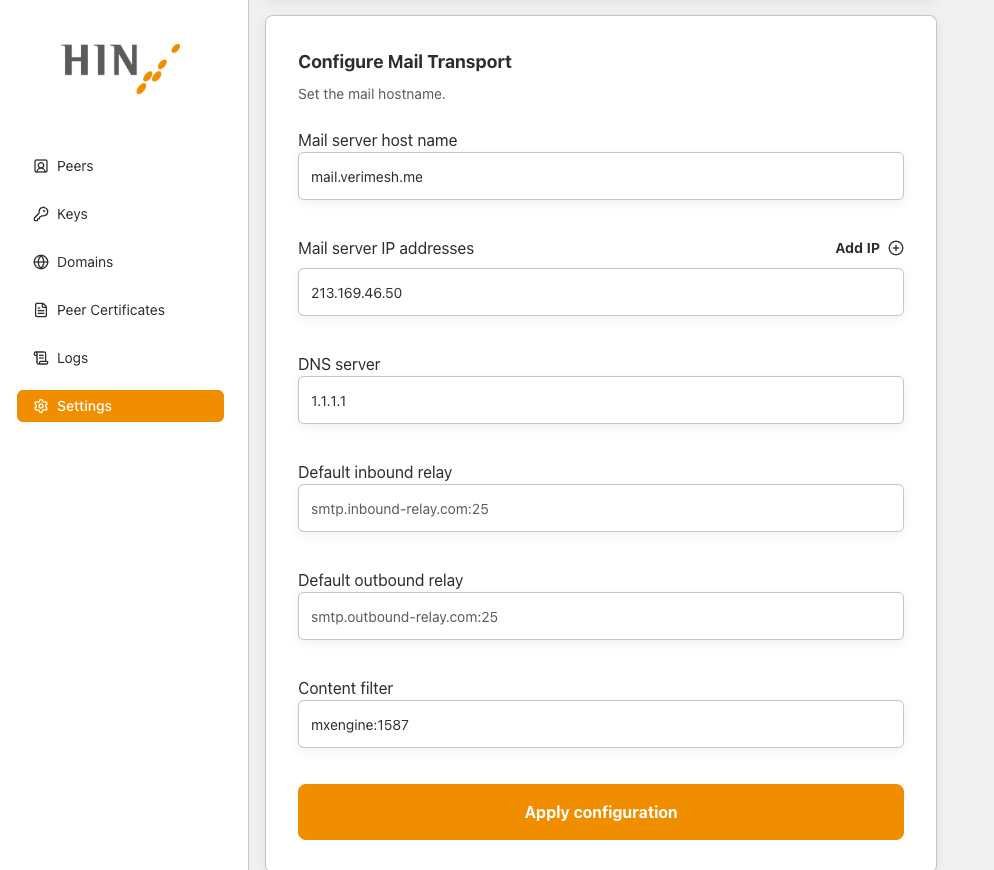
The following settings are available Settings menu:
| Setting | Description |
|---|---|
| Mail server host name | The FQDN of this mail gateway instance (e.g. mail.example.com). |
| Mail server IP addresses | The public IP address(es) of this server. Add additional IPs if the server is reachable on multiple addresses. |
| DNS | DNS of the host which will be used to resolve MX and other DNS records |
| Default inbound relay | The default SMTP relay for inbound delivery |
| Default outbound relay | The default SMTP relay for outbound delivery |
Step 15 - Configure whitelist headers
Info
For multi-domain perform the operation for each active domain.
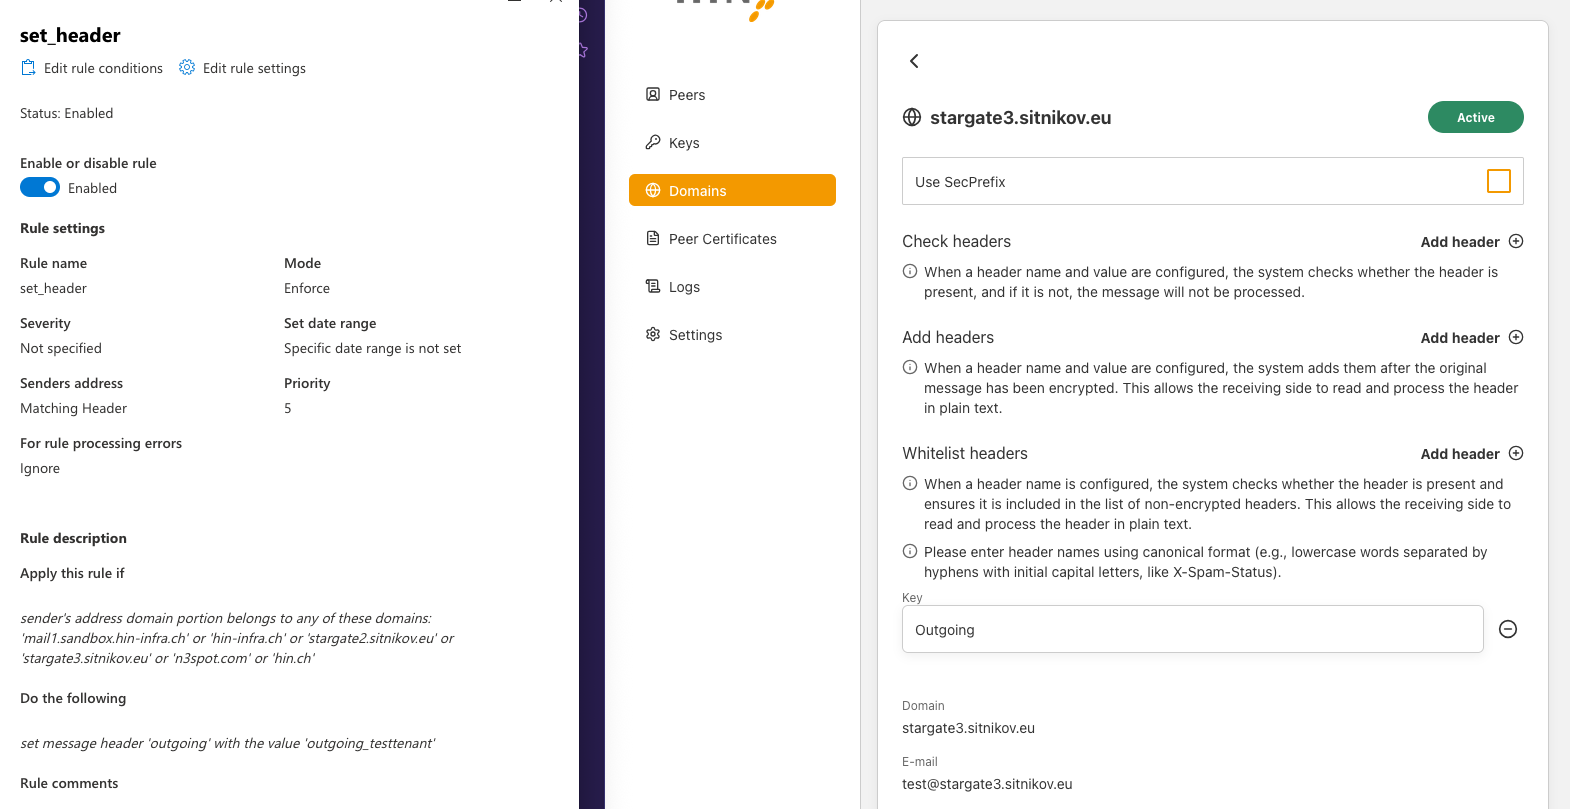
Click "Domains" -> "Select domain", then select "Whitelist headers".
Enter the key exactly as configured in the mail server.
Step 16 - Peer certificates
Peer certificates are issued by the HIN Certification Authority (HIN CA) for enabled domains.
Once the onboarding is complete, navigate to the Peer certificates section in the dashboard and click the "Sync certificates" button to synchronise your peer certificates from the HIN CA.
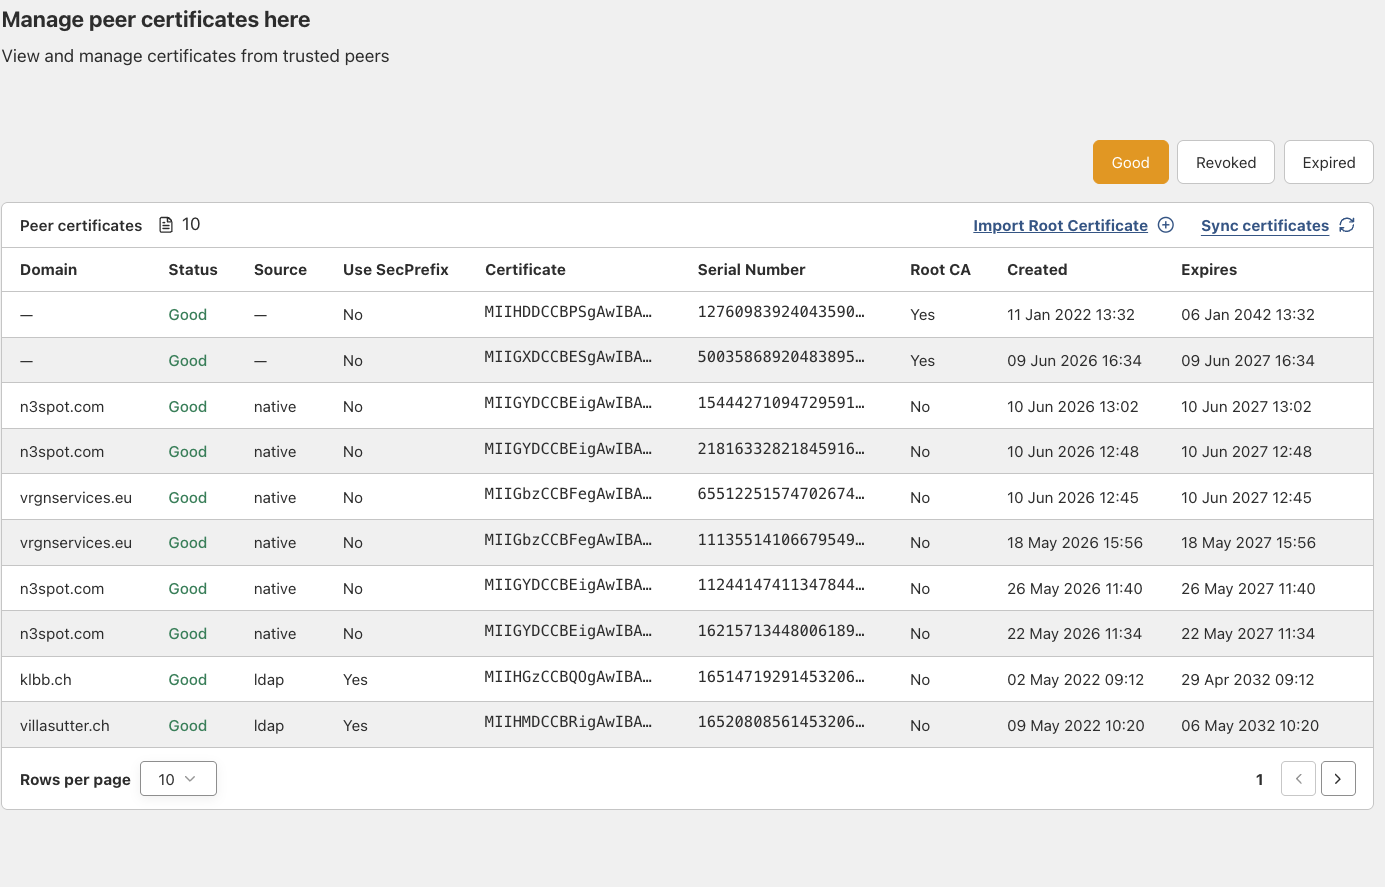
Step 17 - Validate peer certificates
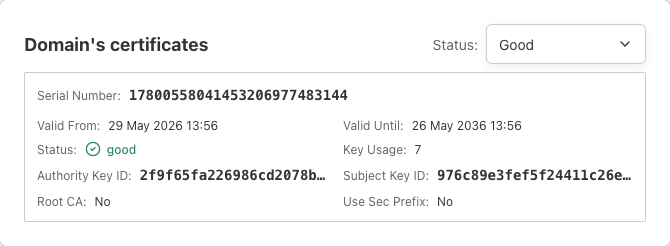
Ensure that your domain has received its policy-based peer certificate at the bottom of "Domains" -> "domainName" . The status of each domain must be "Good".
Question
Contact HIN Support by email or phone (support@hin.ch / 0848 830 740) if you encounter any issues.
Step 18 - Configure mail server and HIN Gateway
If you followed the recommended approach by exporting the private key, importing it into the HIN Gateway, and keeping the same IP address as the existing MGW, no changes are required on the email server.
Otherwise, configure your mail server or the associated components so that traffic is routed via the new HIN Gateway. Check and update the following settings, if required:
Email server
- SMTP relay / smart host
- Connectors
- Transport rules
- Routing domains
See Exchange Integration for detailed instructions.
HIN Gateway config
Domains page
Info
For multi-domain migration perform the operation for each active domain.
Under the Domains menu, for each available domain you can configure specific transport route:
| Setting | Description |
|---|---|
| Inbound relay | The SMTP relay for inbound delivery for selected domain |
| Outbound relay | The SMTP relay for outbound delivery for selected domain. This setting corespond to Forwarding server setting from old MGW |
| Trusted networks | Additional networks allowed to relay through this gateway. For more information please check on "Step 18 - Configure mail server" |
| Configure TLS | TLS certificate settings for SMTP connections and from the Generate TLS certificate button you can generate TLS certificate |
| Email authentication | For all settings under Email authentication section please refer to Email authentication (DKIM ARC SPF DMARC) section |
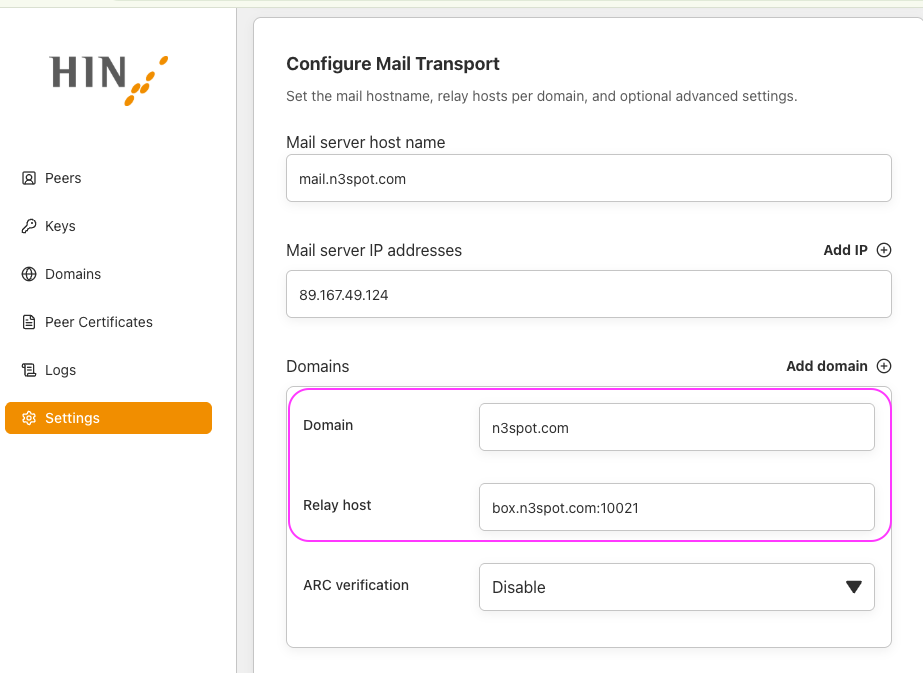
- Note: for migration scenarion: Go to the page for each domain, add a Outbound host using the value you recorded from the MGW's
Forwarding serverfield in "Step 1.2 - Backing up the existing MGW".
-
If you are using Microsoft 365 / Exchange Online, add its published outbound IP ranges to
Trusted networksso the HIN Gateway trusts and relays mail coming from Exchange Online:
Settings page
On this page under Settings menu, configure your global mail transport settings for the secure mail relay setup which are common for the whole instance. Detailed configuration for each domain can be performed under Domains -> $domain
The following settings are available Settings menu:
| Setting | Description |
|---|---|
| Mail server host name | The FQDN of this mail gateway instance (e.g. mail.example.com). |
| Mail server IP addresses | The public IP address(es) of this server. Add additional IPs if the server is reachable on multiple addresses. |
| DNS | DNS of the host which will be used to resolve MX and other DNS records |
| Default inbound relay | The default SMTP relay for inbound delivery |
| Default outbound relay | The default SMTP relay for outbound delivery |
Step 19 - Test and validate
Outgoing:
- Verify that the mail server is configured to send emails to the HIN Gateway using an SMTP relay or Exchange connector.
- Verify that the HIN Gateway can send emails to recipients outside the HIN Community.
- Verify that the HIN Gateway can send emails to recipients inside the HIN Community via WireGuard.
- Send an email from the HIN Community to an external email address (for example, Bluewin, Gmail, Yahoo, or GMX) with (confidential) included in the subject line, and verify that it is delivered successfully.
Incoming:
- Verify that encrypted emails can be received from the HIN Community via WireGuard. A sender from the
hin.chdomain is the easiest test path. - Verify that encrypted emails can be received from the HIN Community via SMTP using S/MIME.
- Verify that replies from senders outside the HIN Community to an initial secure email (HIN Mail-SEAL) can reach the HIN Gateway.
- Verify that plain-text emails can be received from external senders outside the HIN Community.
- Send an email from an external email address to the HIN Community and verify that it is received successfully.
Confirm:
- Emails are delivered successfully in both directions between the HIN trusted domain and external email addresses.
- Encryption is applied where required.
- There are no unexpected delays or bounces.
- Logging is successful.
Complete the Acceptance Report and return it to your HIN representative.
Step 20 - Change the password of the VM
Please make sure that the VM credentials which were provided to you initially are changed to your own defined password, and keep them in a secured and safe place.
Step 21 - Take existing MGW out of service
Info
This step applies only for single and multi domain migrations
Warning
Do not delete the existing MGW VM immediately - keep it safe until everything is up and running.
- Ensure there is no active traffic - check:
- No domains are pointing to the MGW (DNS, SMTP, connectors).
- No emails are being forwarded via the old appliance.
- Archive logs - export and save:
- Email logs
- Security/audit logs
- Required for compliance and troubleshooting
- Clean-up (optional) - remove:
- Firewall rules
- DNS entries
- Routing configurations that reference the existing MGW
Annex 1 - Backing up and restoring the appliance settings
Info
This step applies only for single and multi domain migrations
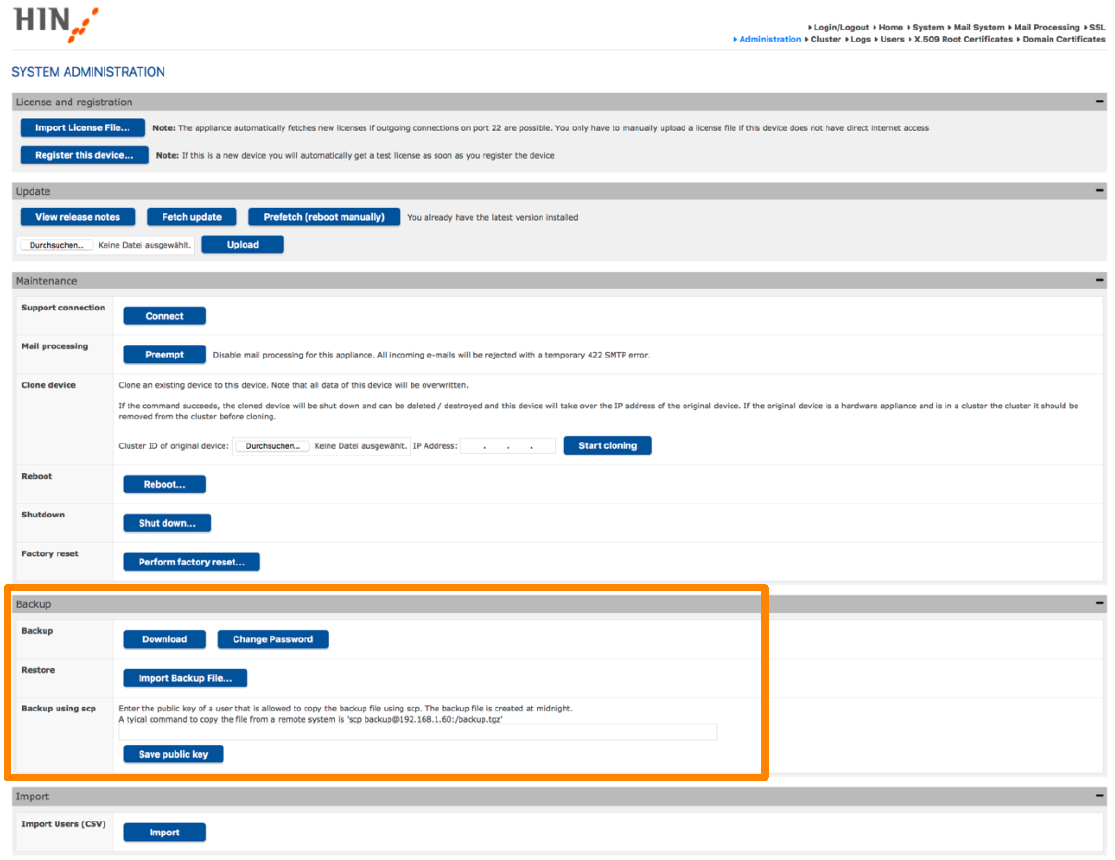
To back up or restore the settings of your HIN appliance, click the "Administration" menu in the web administration portal.
Backing up settings
Before you create a backup of the current HIN appliance settings, you must set a backup password. This password is required if you need to restore the backup later.
- To set or change the backup password, click "Change Password".
- To create and download a backup file, click "Download".
Changing the backup password
To change the password for future backups, click "Change Password".
Note
The new password only applies to backups created after the password has been changed. Existing backup files remain protected by the password that was set when they were created.
Restoring settings
To restore appliance settings from a backup file, click "Import Backup File...".
In the dialog window, select the required backup file and enter the password associated with that backup. The appliance settings will then be restored from the selected backup file.
Backup using SCP
The MGW supports backing up the appliance via SCP.
To use this option, the public key of the system that will access the MGW must be stored under "Backup using SCP". The backup is generated automatically every day at midnight and is stored on the MGW as backup.tgz.
Using the configured public key, the backup file can be retrieved via SCP with the operating system user backup. A typical SCP command to retrieve the backup file is:
This command downloads the file backup.tgz from the MGW to the current local directory.
Note
If you enter a new public key, the existing key will be replaced.