Stargate Deployment Information¶
🇩🇪 Hinweis zu Übersetzungen | 🇫🇷 Remarque concernant les traductions
🇮🇹 Avvertenza sulle traduzioni | 🇬🇧 Translation notice
Für verlässliche Informationen nutzen Sie bitte die offiziellen Übersetzungen über den Sprachschalter . Automatische Browser-Übersetzungen können Inhalte verfälschen.
Pour obtenir des informations fiables, veuillez utiliser les traductions officielles accessibles via le sélecteur de langue . Les traductions automatiques du navigateur peuvent déformer le contenu.
Per informazioni affidabili, utilizzare le traduzioni ufficiali accessibili tramite il selettore della lingua . Le traduzioni automatiche del browser possono alterare i contenuti.
For reliable information, please use the official translations available via the language selector . Automatic browser translations may distort the content.

Pre-Requisites¶
Please ensure that all necessary preparatory steps have been completed before the HIN Gateway migration or new installation activities begin.
The following items must be available or confirmed before the installation:
-
Credentials will be delivered to you by HIN
- VM credential
- Keycloak credential
- Activation code
-
Export of private key(s)
Info
Export of private keys is only for customers moving from existing MGW to a new HIN Gateway
- If you are working on a Windows machine that has access to the Mail Gateway VM via port 22, we can support you during the call in enabling the private key export from the MGW.
- If you do not have access to such a machine, please contact HIN Support by email or phone (support@hin.ch / 0848 830 740) to help you establish a support connection via System Administration → Support Connection → Connect.
For customers with multiple domains
Note: applicable for all multi-domain migration scenarios!
To reduce the time required to execute the migration, we encourage customers to complete the following steps before the planned migration date and session:
- Export the private key for each domain.
- Identify and document the incoming and outgoing mail flow for each domain.
Please contact HIN Support to obtain the unlock code required to export the private keys.
- Download latest version of VM image
- Firewall requirements for WireGuard.
Configure the WireGuard port 19818 (TCP/UDP) in your firewall:
- Incoming and outgoing traffic
- Allow traffic: any-to-HIN Gateway and HIN Gateway-to-any
-
DHCP access should be available. For more information see "Installation Guidelines".
-
Backup requirements - see "Annex 1 - Backing up and restoring the appliance settings".
Info
Backup requirements is only for customers moving from existing MGW to a new HIN Gateway
- Confirmation that the existing MGW will not be deleted until acceptance has been completed.
Info
Keeping the existing MGW available till acceptance report have been completed is only for customers moving from existing MGW to a new HIN Gateway
- Access to DNS, mail server connectors, transport rules, and relay settings.
Deployment Information¶
Installation Options¶
- VM image installation:
🖨️
You can get this documentation printed or saved as PDF, please visit our Print page view.
Exchange Integration¶
- Exchange integration - Configure Microsoft Exchange (Online and On-Premises) connectors and transport rules to route mail through Stargate
Server Requirements¶
| Minimum | Recommended | |
|---|---|---|
| CPU, Cores | 4 | 6 |
| RAM, GB | 8 | 12 |
| SSD, GB | 60 | 60 |
Common Requirements¶
- Root access: Must be run as root or with
sudo - Supported distributions:
- RHEL 8, 9 and 10 compatible distributions such as Alma Linux, Rocky Linux, CentOS Stream
- Ubuntu 22 and 24
- Debian 11, 12 and 13
- Real IPv4 address
- Valid DNS records. Your domain must have:
- MX records pointing to your mail servers
- SPF record defining allowed sending networks
- Server must be able to resolve DNS (MX, SPF, A records)
- Used for mail routing and SPF-based network allowlisting
Inbound Network Access (firewall must allow)¶
| Port | Protocol | Purpose |
|---|---|---|
25 |
TCP | SMTP - receiving mail from external servers |
19818 |
UDP+TCP | WireGuard - encrypted tunnel for agent-to-agent communication. Read our Security Assessment WireGuard |
Inbound VM Access (your administrative machine to the HIN Gateway VM)¶
Info
These firewall rules should be applied only between your administrative machine and the HIN Gateway VM. There is no need to expose these ports to the Internet.
| Port | Protocol | Purpose |
|---|---|---|
80 |
TCP | Redirects HTTP traffic to HTTPS |
443 |
TCP | Used to manage the HIN Gateway through the web dashboard |
8180 |
TCP | Used by Keycloak to authenticate users for the HIN Gateway dashboard |
8190 |
TCP | Optional. Required for troubleshooting and viewing logs |
22 |
TCP | Optional. Required for troubleshooting and modifying configuration |
Outbound Network Access (server must reach)¶
| Destination | Port | Protocol | Purpose |
|---|---|---|---|
registry-1.docker.io, auth.docker.io, production.cloudflare.docker.com |
443 |
TCP | Docker Hub image registry |
quay.io |
443 |
TCP | Container registry (Keycloak, oauth2-proxy) |
github.com |
443 |
TCP | Policy repository (policy-sync) |
| Your own Loki endpoint (e.g. loki.example.com) | 443 | TCP | Optional. Only needed if you provide your own Loki instance the stack should ship logs to (Alloy → Loki) |
| Update Server of alpine, almalinux, etc. | 80 |
TCP | Various Update servers |
| Destination mail servers | 25 |
TCP | Outbound mail delivery (via MX lookup) |
| Standard DNS queries and responses | 53 |
UDP + TCP | DNS resolve |
| NTP servers | 123 |
UDP | NTP synchronizes the clocks of computers, servers, network devices, and virtual machines with accurate time sources |
| WireGuard peers (HIN network) | 19818 |
UDP+TCP | WireGuard - encrypted tunnel for agent-to-agent communication |
witness-{1,2,3}.verify-mail.hin-infra.ch |
443 |
TCP | HIN KERI witness pool - required for agent identity verification (idagent / watcher) |
app.hin.ch |
443 |
TCP | HIN member / mail-domain list (mxengine) |
apisix.verify-mail.hin-infra.ch |
443 |
TCP | HIN gateway registration during onboarding (dashboard) |
Firewall note
Depending on your firewall or NAT configuration, you may need to explicitly allow traffic for the required ports. Refer to your firewall and NAT documentation for details.
The VM must be able to accept incoming connections on the required service ports and send responses back to the requester. With a stateful firewall (such as iptables using conntrack), return traffic is automatically allowed by the ESTABLISHED,RELATED rules.
Example iptables configuration:
# Allow return traffic for established connections
iptables -A INPUT -m conntrack --ctstate ESTABLISHED,RELATED -j ACCEPT
iptables -A OUTPUT -m conntrack --ctstate ESTABLISHED,RELATED -j ACCEPT

# Allow inbound TCP connections to the open ports
iptables -A INPUT -p tcp -m multiport --dports 25,19818 -j ACCEPT

# Allow outbound TCP connections to the open ports
iptables -A OUTPUT -p tcp -m multiport --dports 25,19818 -j ACCEPT

# Allow inbound UDP port 19818 for Wireguard
iptables -A INPUT -p udp --dport 19818 -j ACCEPT

# Allow outbound UDP port 19818 for Wireguard
iptables -A OUTPUT -p udp --dport 19818 -j ACCEPT

# Additional Services that VM shall be able to reach
# DNS
iptables -A OUTPUT -p udp --dport 53 -j ACCEPT
iptables -A OUTPUT -p tcp --dport 53 -j ACCEPT

# NTP
iptables -A OUTPUT -p udp --dport 123 -j ACCEPT

# HTTP
iptables -A OUTPUT -p tcp --dport 80 -j ACCEPT

# HTTPS
iptables -A OUTPUT -p tcp --dport 443 -j ACCEPT
Contact us¶
Support
For any questions or issues related to the deployment and operation of the HIN Mail (Stargate) appliance, please contact HIN support.
Please include relevant information such as the customer name, appliance version, and screenshots/logs where applicable, to help us process your request efficiently.


Installation Guides
HIN Gateway – Technical Guide for New Installation and Migration¶
Introduction¶
This document provides a comprehensive guide to the technical installation of, and migration to, the new HIN Gateway (“Stargate Appliance”).
The guide is intended for HIN customers, IT administrators, and system engineers who are responsible for deploying and configuring the new HIN Gateway and, where applicable, migrating from the existing Mail Gateway (MGW) to the new solution.
The HIN Gateway is a secure email gateway solution that enables trusted, encrypted, and policy-driven communication within the HIN Trust Circle. It acts as a central intermediary between internal email infrastructures and external communication partners, ensuring that email traffic is transmitted securely, complies with the organisation’s policies, and meets HIN’s security standards.
Overview of the mail flow¶
- Incoming emails are routed via the HIN Gateway, where they are validated, decrypted (if necessary) and checked against trust and security policies before being forwarded to the internal mail server.
- Outgoing emails are sent from internal systems to the HIN Gateway, where encryption, routing and policy enforcement are applied before they are transmitted to external recipients.
- Communication between HIN gateways is secured by peer certificates and WireGuard tunnels, ensuring trusted communication between domains.
Installation and migration process¶
The structured, step-by-step procedure described in this document covers both new HIN Gateway installations and migrations from an existing HIN Mail Gateway (MGW). Depending on the deployment scenario, individual steps may apply only to migrations.
- Preparation and deployment planning, including fallback planning where applicable
- Installation and configuration of the HIN Gateway
- Domain activation and certificate validation
- Integration into the existing mail environment and routing configuration
- Testing, transition to production and post-deployment validation
- For migrations: retirement of the existing MGW after successful validation
Migration
HIN's objective is to ensure a secure, smooth and fully validated deployment with minimal disruption to operations and uninterrupted continuity of email services. In migration scenarios, the existing MGW should remain available as a fallback option until the HIN Gateway has been successfully validated in production. It should only be decommissioned once the migration has been completed and stable operation has been confirmed.
Frequently asked questions¶
Can I perform the installation or migration on my own?
Yes, the installation or migration can be completed entirely by the customer.
For migration scenario the only exceptions is "Step 1.3 - Export private key(s)". For security reasons and to keep your private key safe, you must contact HIN Support or join the planned migration call to receive the code required to export the private key from the currently operating Mail Gateway.
If the installation or migration cannot be completed successfully, please join the planned support call with our engineers.
Will there be any outage in email delivery during the setup process?
Migration: Between "Step 1.5 - Shutdown existing MGW VM" and "Step 18 - Configure mail server", all emails will be queued on the mail server. Once "Step 18 - Configure mail server" has been completed, the queued emails will be sent out or delivered to the mailbox.
New instalation: While you are configuring the email flow rules, all emails will be queued on the mail server. Once "Step 18 - Configure mail server" has been completed, the queued emails will be sent out or delivered to the mailbox.
Will any emails be lost during the installation and migration?
No, no emails will be lost during the installation and migration. Some emails might be delaied.
Overview of the installation steps¶
| Step | Topic | Responsibility | Migration | New installation |
|---|---|---|---|---|
| 0 | Check prerequisites | Customer | Yes | Yes |
| 1.1 | Smoke test | Customer | Yes | N/A |
| 1.2 | Backing up the existing MGW | Customer | Yes | N/A |
| 1.3 | Export private key(s) | Customer / HIN | Yes | N/A |
| 1.4 | Contingency plan / fallback scenario | Customer | Yes | N/A |
| 1.5 | Shutdown existing MGW VM | Customer | Yes | N/A |
| 2 | WireGuard | Customer | Yes | Yes |
| 3 | Select target VM | Customer | Yes | Yes |
| 4 | Load VM image | Customer | Yes | Yes |
| 5 | Network connection to the VM | Customer | Yes | Yes |
| 6 | Access via the browser | Customer | Yes | Yes |
| 7 | Enter activation code | Customer | Yes | Yes |
| 8 | Mesh network setup | Customer | Yes | Yes |
| 9 | Establishing secure mesh network | Customer | Yes | Yes |
| 10 | Login to Keycloak | Customer | Yes | Yes |
| 11 | Update password | Customer | Yes | Yes |
| 12 | Update account information | Customer | Yes | Yes |
| 13 | Initial configuration and domain setup | Customer | Yes | Yes |
| 14 | Configure mail transport | Customer | Yes | Yes |
| 15 | Configure whitelist headers | Customer | Yes | Yes |
| 16 | Peer certificates | HIN | Yes | Yes |
| 17 | Validate peer certificates | Customer | Yes | Yes |
| 18 | Configure mail server | Customer | Yes | Yes |
| 19 | Test and validate | Customer | Yes | Yes |
| 20 | Change the password of the VM | Customer | Yes | Yes |
| 21 | Take existing MGW out of service | Customer | Yes | N/A |
| Annex 1 | Backing up and restoring the appliance settings | Customer | Yes | N/A |
Detailed steps¶
Step 0 - Check prerequisites¶
Please ensure that all necessary preparatory steps have been completed before the HIN Gateway migration activities begin.
The following items must be available or confirmed before the installation:
-
Credentials will be delivered to you by HIN
- VM credential
- Keycloak credential
- Activation code
-
Export of private key Note: Applicable only for migration case
- If you are working on a Windows machine that has access to the Mail Gateway VM via port 22, we can support you during the call in enabling the private key export from the MGW.
- If you do not have access to such a machine, please contact HIN Support by email or phone (support@hin.ch / 0848 830 740) to help you establish a support connection via System Administration → Support Connection → Connect.
- Download latest version of VM image
- Firewall:
- Allow traffic: any-to-HIN Gateway and HIN Gateway-to-any
- WireGuard, please refer to Server Requirements - Inbound Network Access:
- Configure the WireGuard port
19818(TCP/UDP) in your firewall- Incoming and outgoing traffic
- Configure the WireGuard port
- WireGuard, please refer to Server Requirements - Inbound Network Access:
- Allow traffic: your administrative machine-to-HIN Gateway VM
- Installation requirements:
- HTTPS port
443- Incoming and outgoing traffic
- Keycloak port
8180- Incoming and outgoing traffic
- HTTPS port
- Troubleshooting requirements (optional needed to see logs, modify all parameters):
- SSH port
22- Incoming and outgoing traffic
- Dozzle port
8190- Incoming and outgoing traffic
- SSH port
- Installation requirements:
- Allow traffic: any-to-HIN Gateway and HIN Gateway-to-any
- DHCP access should be available for "Step 5 - Network connection to the VM" (recommended).
- Backup requirements - see "Annex 1 - Backing up and restoring the appliance settings". Note: Applicable only for migration case
- Note: Applicable only for migration case - Confirmation that the existing MGW will not be deleted until acceptance has been completed.
- Access to DNS, mail server connectors, transport rules, and relay settings.
Why WireGuard?
The WireGuard port fulfils two important functions:
- The HIN Gateway uses this port to obtain peer certificates from the HIN CA.
- It uses this port to establish a secure tunnel to other HIN Gateways, through which secure data exchange (e.g. email traffic) takes place.
!!! tip "Private key export" - Applicable only for migration case If you are working on a Windows machine that has access to the Mail Gateway VM via port 22, we can support you during the call in enabling the private key export from the MGW.
If you do not have access to such a machine, please contact HIN Support by email or phone (**support@hin.ch** / **0848 830 740**) to help you establish a support connection via **System Administration → Support Connection → Connect**.
Step 1.1 - Smoke test¶
Info
This step applies only for single and multi domain migrations
Send test emails to the following recipients, using mailboxes to which you have access so that successful delivery can be verified:
- An HIN email address or an email address within your HIN Community domain, for example: user@hin.ch
- An external email address outside the HIN Community, for example: Bluewin, Gmail, Yahoo, or GMX
For the external recipient, send an email from the HIN Community with (confidential) included in the subject line.
Test mail flow in both directions:
- From the HIN trusted domain to the external email address
- From the external email address to the HIN Community
Verify that all test emails are delivered successfully and that the subject, message content, and attachments (if applicable) are received correctly.
Step 1.2 - Backing up the existing MGW¶
Info
This step applies only for single and multi domain migrations
Create a backup of the existing MGW appliance and ensure that the VM is retained until the migration has been successfully completed and formally accepted. For more information, see "Annex 1 - Backing up and restoring the appliance settings".
Check current MGW routing configuration
Before shutting down the existing MGW, check the following configuration values and note them down. You will likely need them later when configuring the HIN Gateway:
- Log in to the MGW and go to "Mail System → Outgoing server" and check whether anything is configured there.
- For each domain hosted on the MGW, go to
Mail System → <domain> → Forwarding serverandMail System → <domain> → Send ALL outgoing mails from this domain to the following SMTP server, and record the current values.
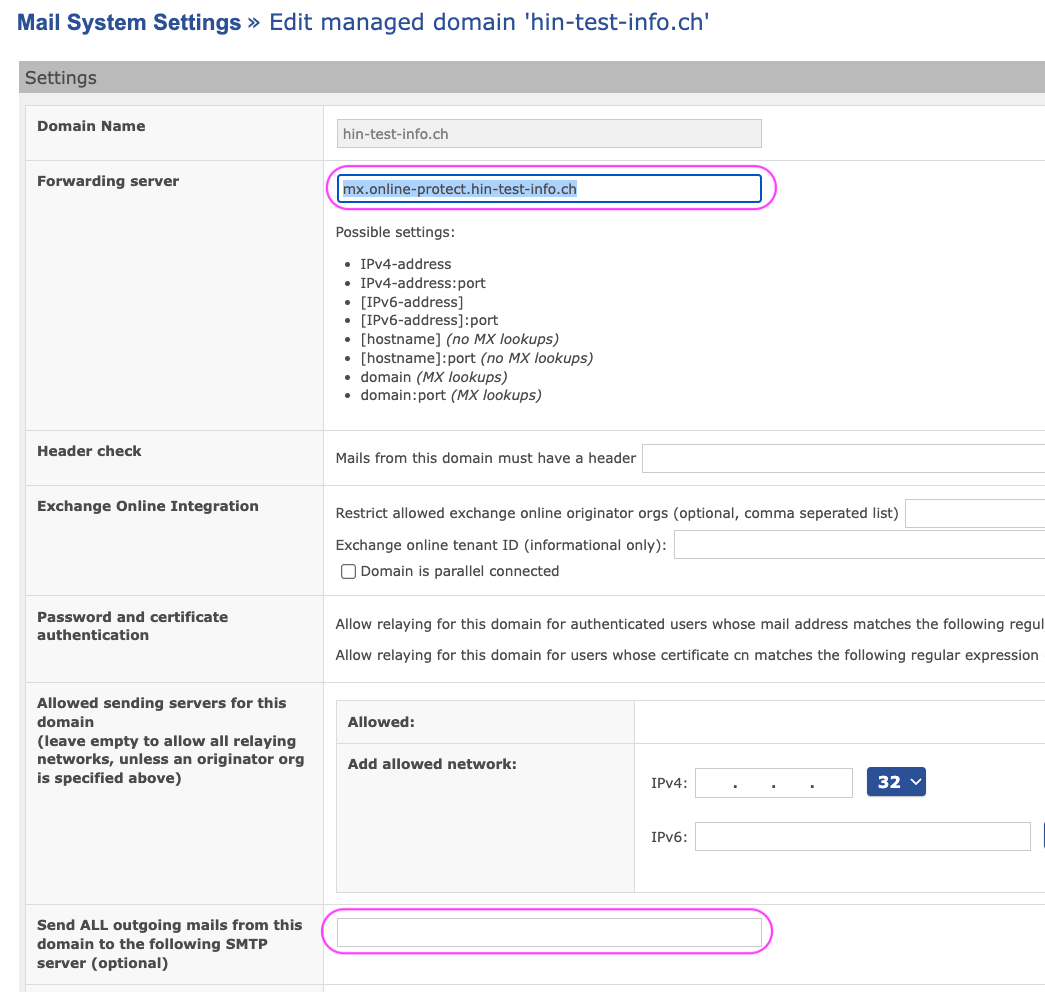
MGW header check
If you use the Header check option in the MGW, note down the configured value as well. You can set up the same header check later in the HIN Gateway.
Step 1.3 - Export private key(s)¶



Info
This step applies only for single and multi domain migrations
For multi-domain migration perform the operation for each domain
HIN assistance required
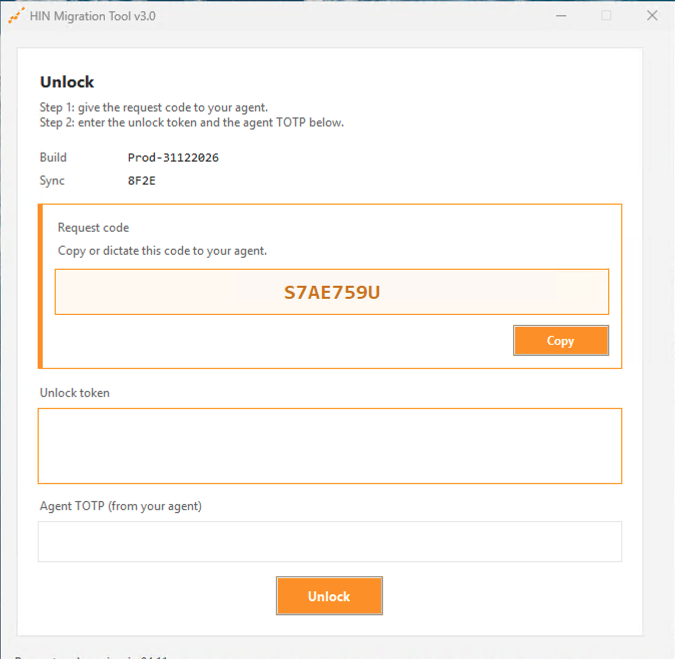
An unlock code is required for this step. The code is provided by a HIN Support Engineer.
If you would like to continue the installation on your own, please contact HIN Support to request the unlock code. Otherwise, the unlock code will be provided during the planned migration call.
- Log into the existing MGW webGUI.
- Open "Mail System".

- Run the application by clicking on
HIN_Migration-Tool_v*.exeif you want to install it yourself. Alternatively, you can wait until the migration call, where the support engineer will assist you with the installation.
- Enter the unlock code that the support engineer provides to you.
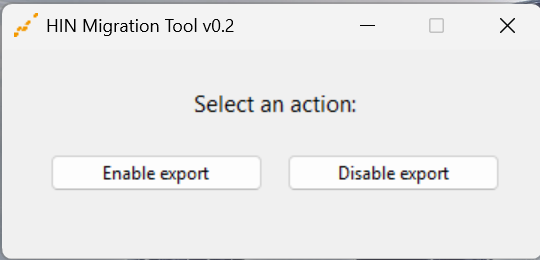
- Select "Enable export".
- Enter the MGW IP address.
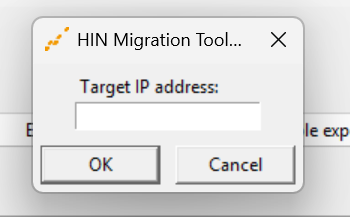
- Wait for confirmation.
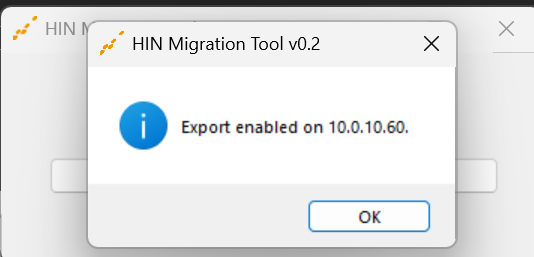
- Select the trusted domain in the MGW webGUI.

- Scroll down and select the managed fingerprint.

- Scroll down to the "PKCS12 download" category (you may optionally enter a password to encrypt the key). Press "Download PKCS12" and save the
*.p12file on the computer.

- Return to the
HIN_Migration-Tool_v*.exeapplication and disable the Export button.
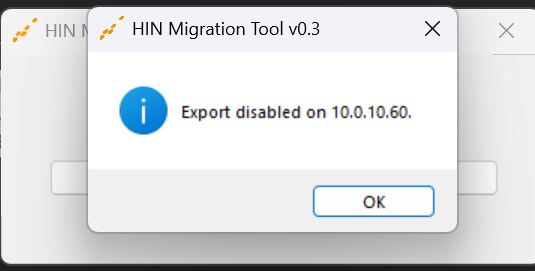
Step 1.4 - Contingency plan / fallback scenario¶
Info
This step applies only for single and multi domain migrations
Rollback scenario - if a rollback is required:
- Stop the new HIN Gateway.
- Power on the existing MGW.
- Verify that inbound and outbound email traffic is functioning correctly via the existing MGW.
- For multi-domain migration perform the verification operation for each domain
Step 1.5 - Shutdown existing MGW VM¶
Info
This step applies only for single and multi domain migrations
Shut down the existing MGW VM.
Warning
This step will interrupt the mail flow. During the interruption, emails will be queued on the mail server and delivered after the installation has been completed (see "Step 18 - Configure mail server").
Step 2 - WireGuard¶
Ensure you have configured the WireGuard port 19818 (TCP/UDP) in your firewall:
- Incoming and outgoing traffic
- Allow traffic: any-to-HIN Gateway and HIN Gateway-to-any
Step 3 - Select target VM¶
Select one of the available virtual images and provision it as described in the installation guide on the HIN Gateway service page:
Info
For security and supportability reasons, ensure that your hypervisor is not running an end-of-life version. The HIN Gateway appliance is supported on the latest hypervisor release and the immediately preceding major version.
- VM Image Installation:
- Configuration of Microsoft Exchange
Step 4 - Load VM image¶
Upload the selected VM image to your hypervisor.
Second disk required — the Data Disk
The appliance uses two disks: the OS disk from the image, and a separate Data Disk that holds all configuration, secrets, mail, and databases. Keeping them apart lets an image upgrade replace the OS without touching your data.
The VMware OVA already includes this disk. On every other platform (Proxmox, Hyper-V, Azure, Cloudscale) the image is a single OS disk, so attach a second, blank disk of at least 30 GB before the first boot.
Do not format or partition it yourself. On first boot the appliance formats the blank disk (label VEREIGN-DATA) and mounts it at /var/data. Without it, the first boot fails its health check and rolls back.
Step 5 - Network connection to the VM¶
Ensure that the VM has a network connection and that a static IP address has been assigned to it.
Option A: Configure the IP address of the virtual machine directly in the hypervisor you are using.
Option B: You can configure your router's DHCP server to always assign the same IP address based on the VM's MAC address.
Option C: Log in locally via the VM console and manually configure a static IP address. NOTE: The VM image runs an automatic installation during the first boot. If the network is not configured at this stage, the installation will fail because the server’s IP address cannot be determined.
Add an IP address on Linux:
-
Run the "nmtui" command in the console
-
Use the arrow keys to navigate, then press "Enter" to select the "Ethernet connection" for which you want to change the IP address.
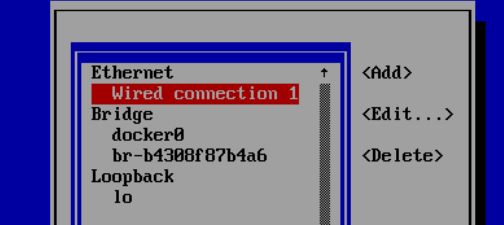
- Navigate to "IPv4 Configuration" and change the setting from "Automatic" to "Manual".
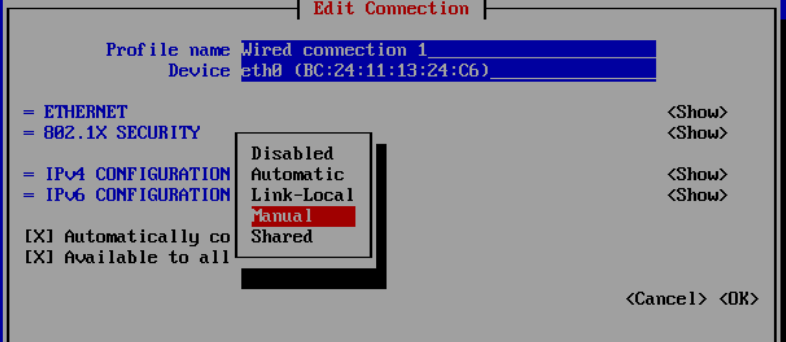
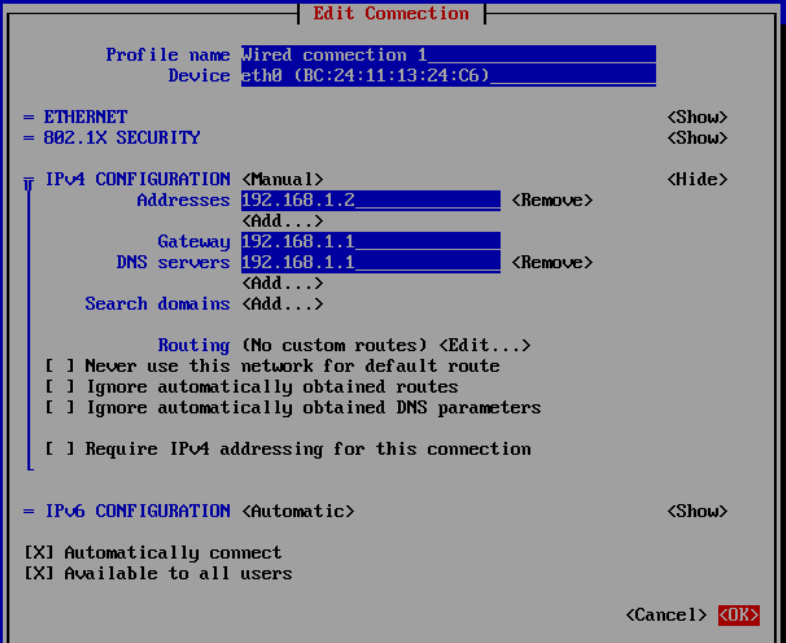
- Use the arrow keys to navigate to the fields where you can enter the IP address, gateway, and DNS server. Then select "OK".
-
After saving the IP address configuration, run the following command in the console:
Cloud-init overrides VM network settings after reboot
This applies to the legacy image only. The bootc appliance - now the default - does not use cloud-init to manage networking, so it is not affected and does not ship the cloud-init-net-* aliases used below.
On the legacy image (typically on VMware/ESXi) cloud-init has no datasource, falls back to "DHCP the first NIC", and re-renders the network config on every boot - so a static address set with nmtui reverts after a reboot. An alias fixes this in one step by disabling only cloud-init's network rendering, so an address you then set on the existing profile persists:
- Stop cloud-init re-rendering the network each boot:
- Run
nmtui, edit the existingcloud-init <iface>connection, and set the static IP, gateway and DNS there. Do not add a second profile for the same interface - cloud-init's carries a higher autoconnect priority and would win. - Reboot and confirm the address survives:
cloud-init-net-enable reverts to the default cloud-init-managed networking. Without the alias, step 1 is the same drop-in by hand:
Tip
If you used Option C and configured the network manually, you must run the following commands:
The installation script automatically detects the server's IP address from the default route on every run - no manual edit of customer-config.sh is needed. Any reachable IP address, whether public or private, is sufficient. The actual public endpoint is configured later through the dashboard.
Behind NAT or a floating IP?
If your server is reached on a different public or floating IP than its own network interface (common with NAT), set SERVER_STATIC_IP to that reachable IP in customer-config.sh before running install.sh. Otherwise leave it empty so it auto-detects.
After the scripts have completed successfully, proceed to "Step 6 – Access via the browser"
Question
If you do not have the HIN admin credentials, please contact HIN Support by email or phone (support@hin.ch / 0848 830 740). Please refer to Support Section.
Step 6 - Access via the browser¶
Open a browser and enter the IP address configured for the VM. You should see the initial setup screen.
Step 7 - Enter activation code¶
Select your preferred language and enter the activation code that you received via email from HIN. Click on "Next".
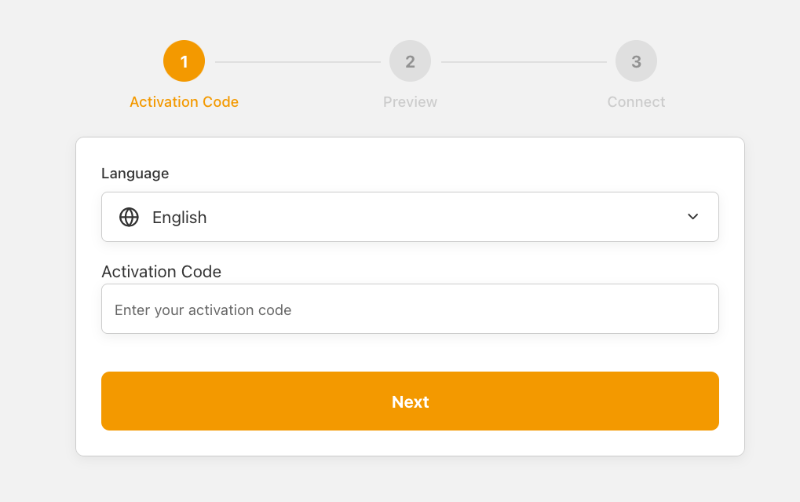
I do not have an activation code
If you do not have the activation code, please contact HIN Support by email or phone (support@hin.ch / 0848 830 740). Please refer to Support Section.
Step 8 - Mesh network setup¶
Verify the mesh network configuration:
- IP address - The public IP of the outgoing traffic (auto-detected).
- Transport - The transport protocol (default:
tcp). - Port - The WireGuard port (default:
19818).
What is public IP?
This is an IP address that Machine will use to be accessible via internet.
This is not internal Machine IP address after Firewall or NAT, e.g. 10.0.0.0/8, 172.16.0.0/12 or 192.168.0.0/16.
Confirm that the values are correct and click "Next".
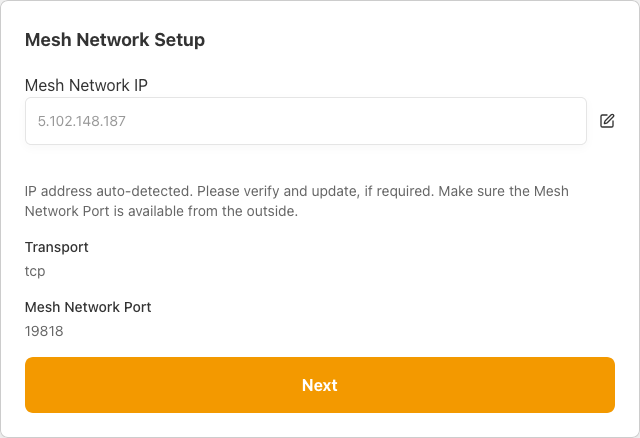
Step 9 - Establishing secure mesh network¶
The system will now establish the secure mesh network connection. This step connects the HIN Gateway to the mesh network and synchronises certificates.
Wait until the process completes. The status indicators will show "Up" when the connection is successfully established. Click "Finish".
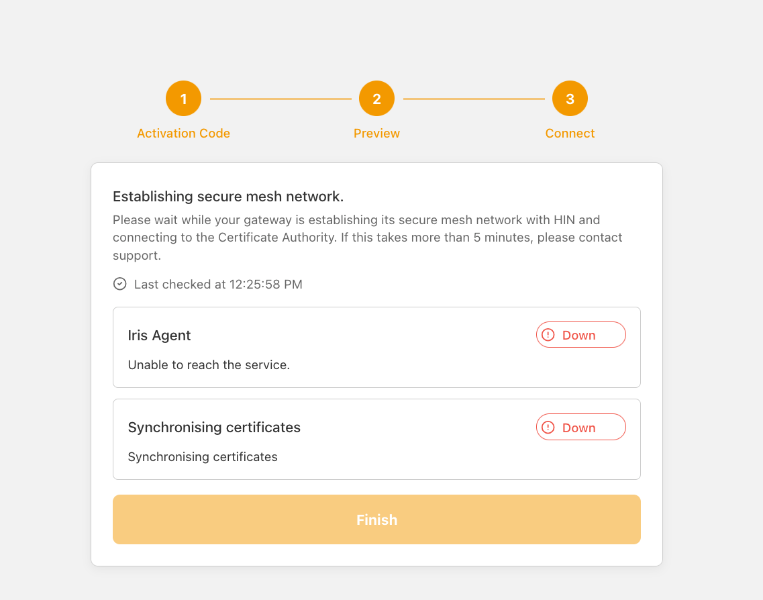
If the connection fails
If the Iris Agent or certificate synchronisation status remains "Down":
- Verify that port
19818(TCP/UDP) is open in your firewall (see "Step 2 - WireGuard"). - Verify that the IP address in "Step 8 - Mesh network setup" is correct and reachable from the internet.
- Restart the process or contact HIN Support by email or phone (support@hin.ch / 0848 830 740).
Step 10 - Login to Keycloak¶
Warning
Port 8180 needs to be open for Keycloak. It does not need to be accessible from the internet to the whole world. Rather, it should be accessible between your administrative machine and the VM you are installing. Otherwise, you will not be able to connect to Keycloak and proceed with the installation.
What to do if I see a connection error
Please check if port 8180 is open from your machine to the VM. As soon as you update the configuration, go back to the UI at https://<VM IP address> and click the "Login" button.
Once the mesh network is established, you will be redirected to the Keycloak login page. Enter the username and password received from HIN.
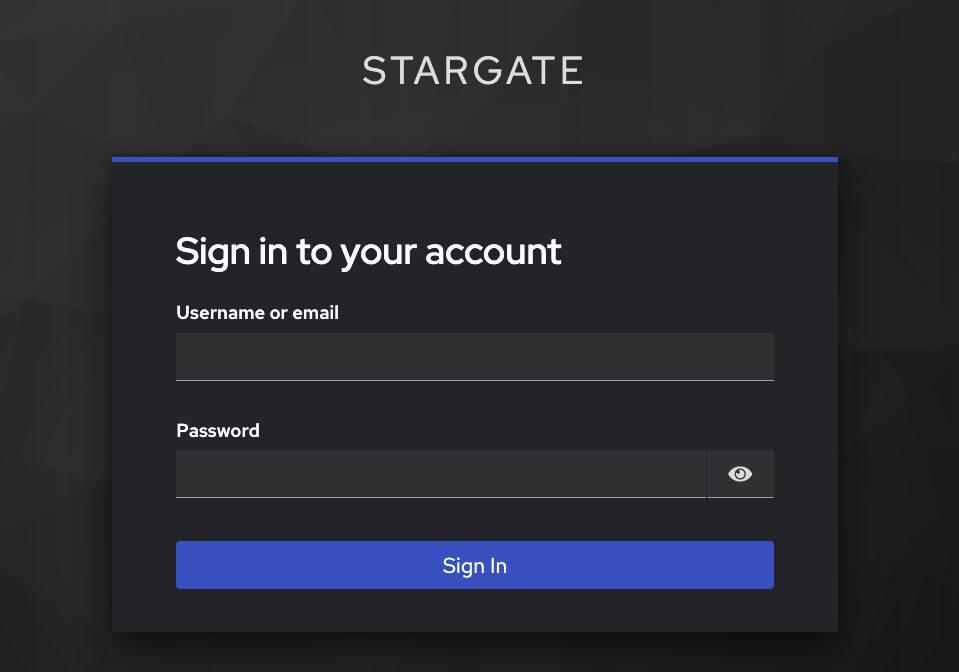
Question
If you do not have these login details, please contact HIN Support by email or phone (support@hin.ch / 0848 830 740). Please refer to Support Section.
Step 11 - Update password¶
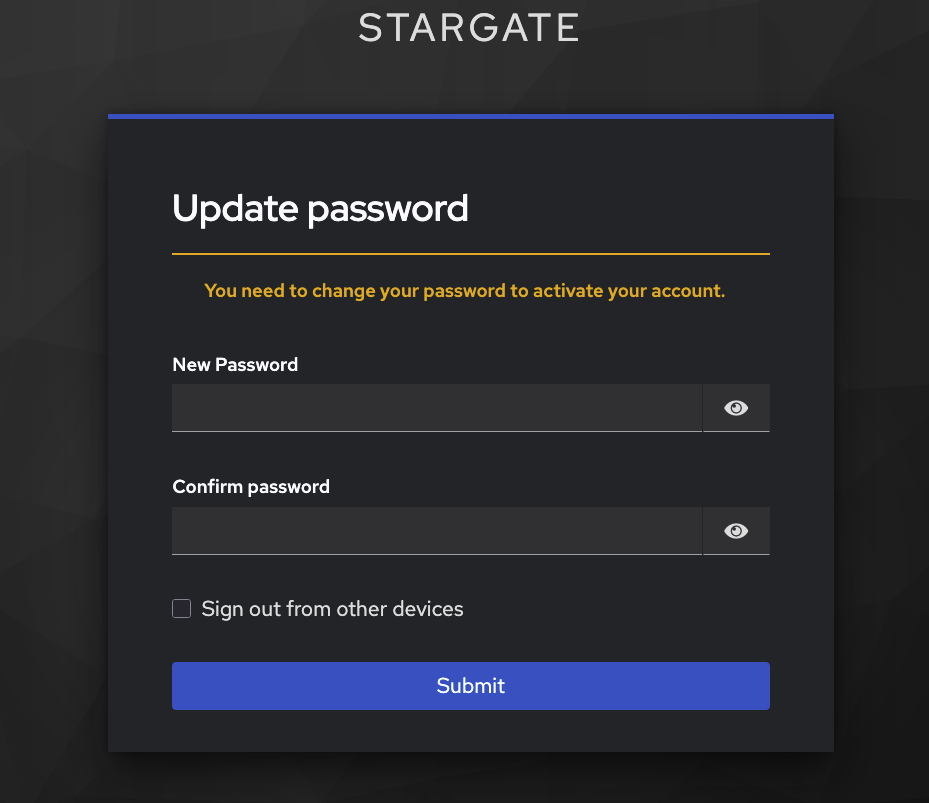
On first login, you will be prompted to change your password. Enter a new secure password and confirm it.
Please make sure you remember the password!
Step 12 - Update account information¶
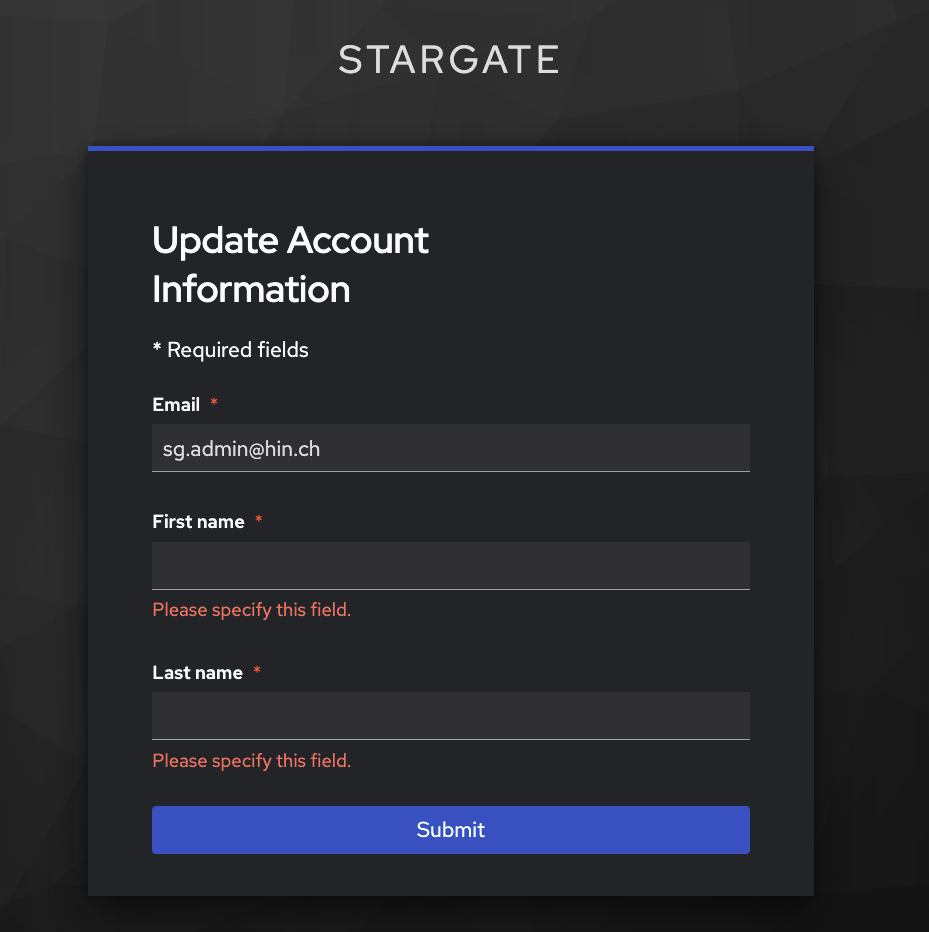
Complete your account profile by entering your first name and last name. The email address is pre-filled. Click "Submit" to continue.
Step 13 - Initial configuration and domain setup¶
Info
For multi-domain migration perform the operation for each domain domain you are activating at that moment.
On this screen, configure your initial settings:
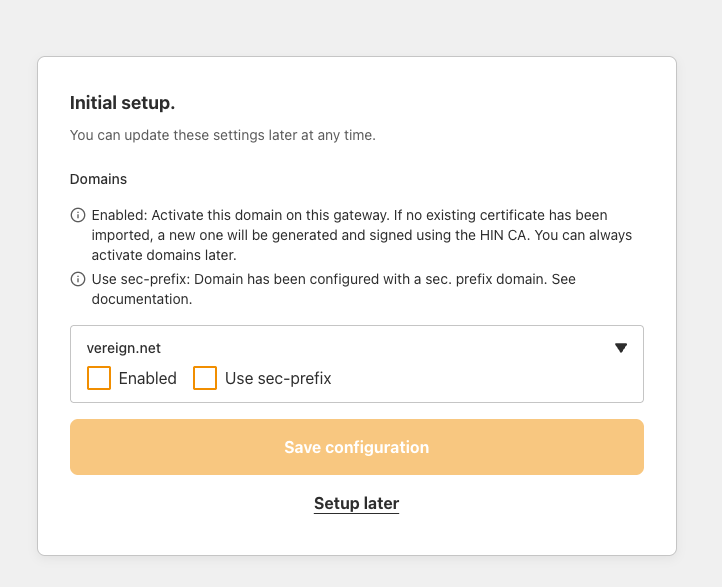
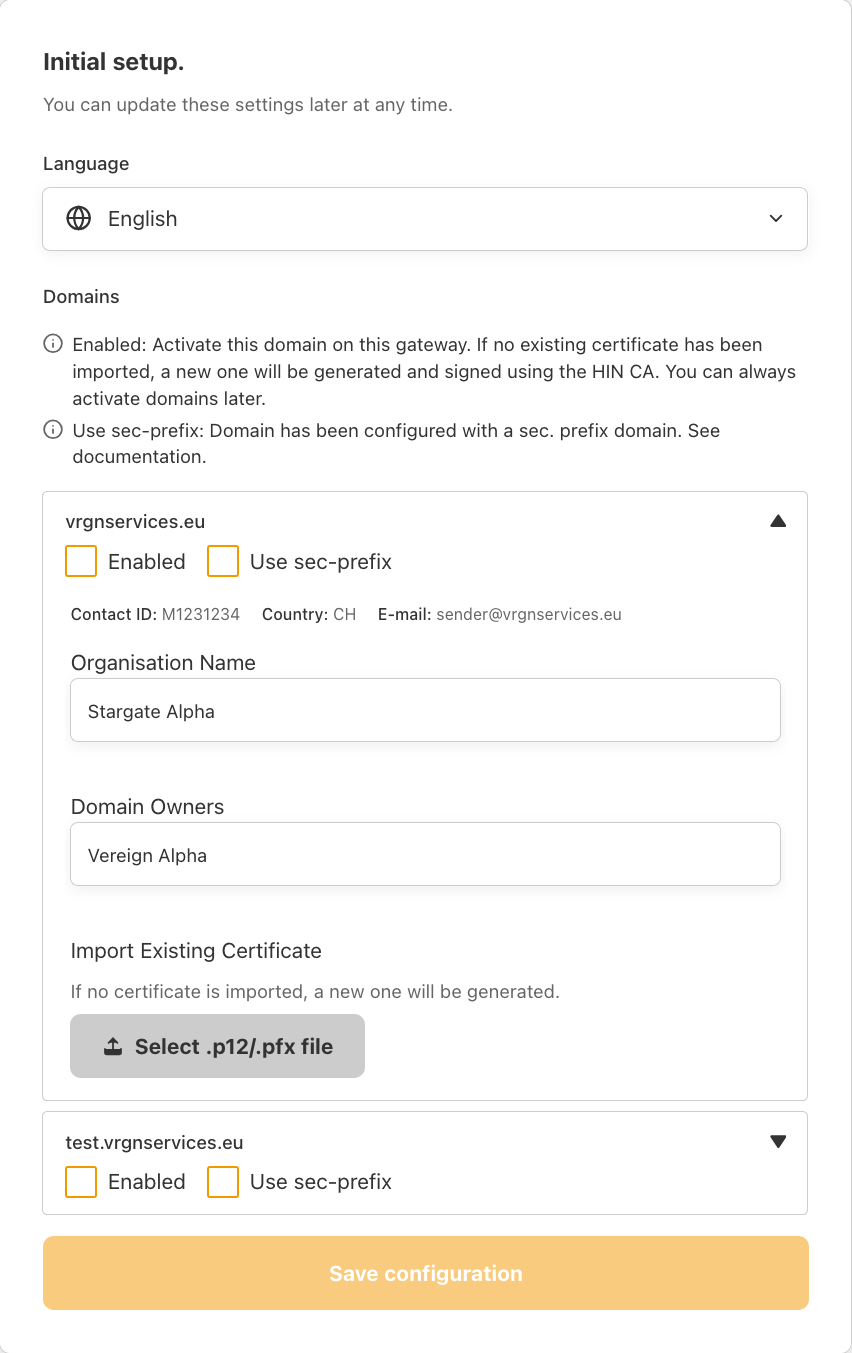
- Verify that all your current trusted domain(s) within the HIN Community are displayed correctly.
- Select which trusted domain(s) should be Enabled to obtain peer certificates from the HIN Certification Authority (HIN CA).
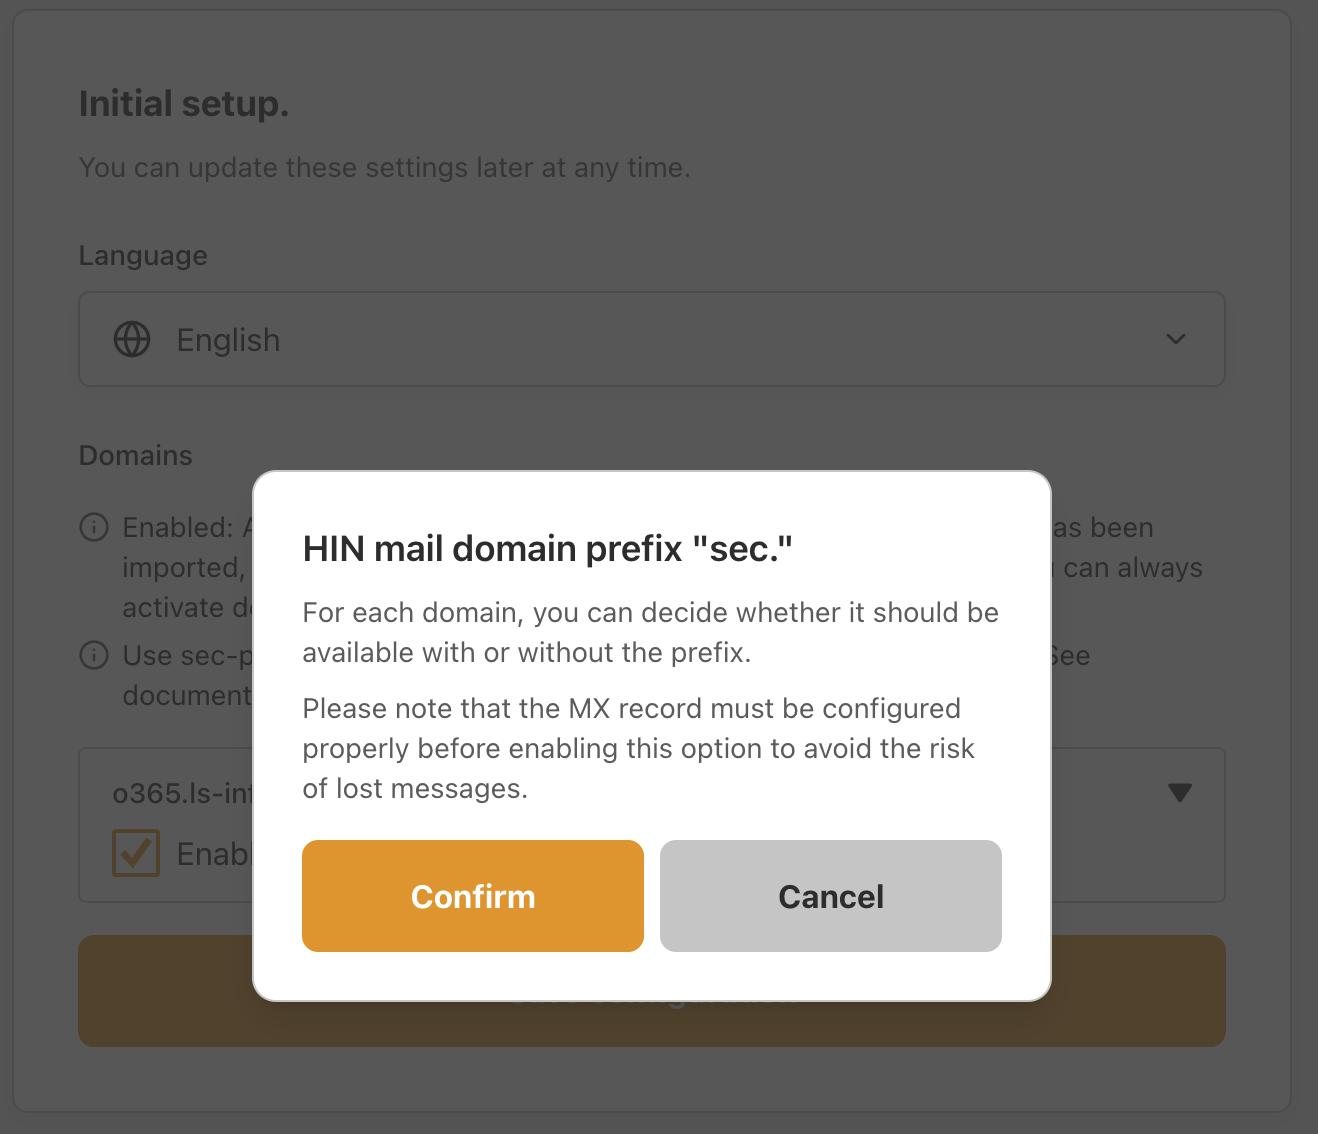
- Indicate for which domain(s) the
sec.<domain>prefix is already configured ("Use sec-prefix").
How to check if my domain is set up with a Security Prefix?
You can open our online tool in your browser: https://trust.hin.ls-infra.me/, enter sec.<domain>, and click the Check button. If you see the message:
✅ This domain is encrypted.
Then your domain is set up with a Security Prefix, and you have to enable the Use sec-prefix option.
- Verify that the organization name and domain owners are correct.
- Import the existing S/MIME certificate file (
.p12/.pfx) from the existing MGW:- Expand the domain and select the P12/PFX File option.
- If no password has been set for the certificate file, leave the password field empty.
- Click "Import Certificate".
- After the certificate has been imported, the message Certificate imported successfully is displayed.
- Click "Save Configuration" at the end of the page to save the changes.
Warning
- At least one domain must be Enabled to continue with the onboarding process. The "Save configuration" button will only become active once this requirement is met.
- If you notice that not all trusted domains are displayed or that the organisational information is incorrect, please contact HIN Support by email or phone (support@hin.ch / 0848 830 740).
Import your existing private key
Note: applicable for migration scenario!
If you do not import the private key from your existing MGW, a new key will be issued. This may result in messages not being decryptable for up to 6 hours, which could lead to data loss.
| Setting | Description |
|---|---|
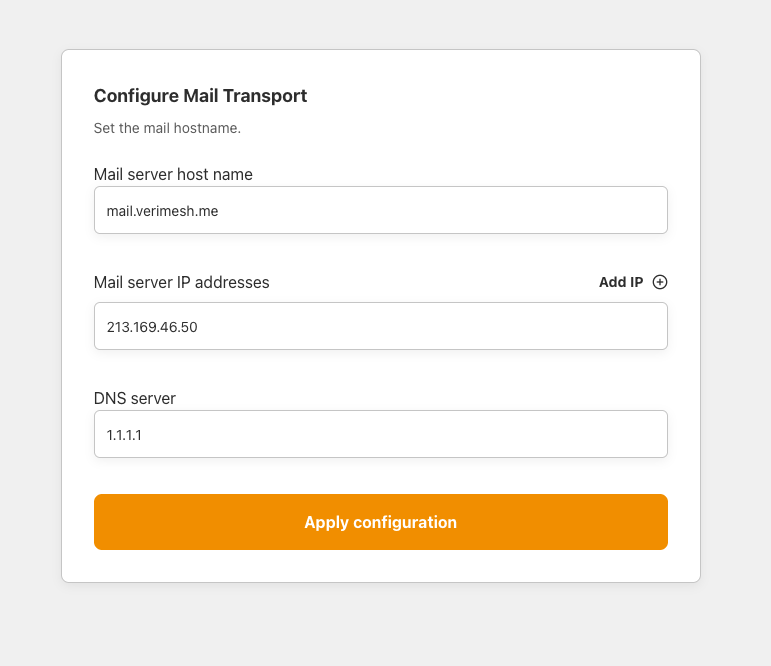
| Mail server host name | The FQDN of this mail gateway instance (e.g. mail.example.com). |
| Mail server IP addresses | The public IP address(es) of this server. Add additional IPs if the server is reachable on multiple addresses. |
| DNS | DNS of the host which will be used to resolve MX and other DNS records |
Multi-domain gradual migration scenario
During the migration support session, HIN engineers will assist the customer with the migration of one domain. Once the first domain has been successfully migrated, the customer is responsible for migrating any remaining domains independently.
Step 14 - Configure mail transport¶
You will be logged at the HIN gateway dashboard at Domains page
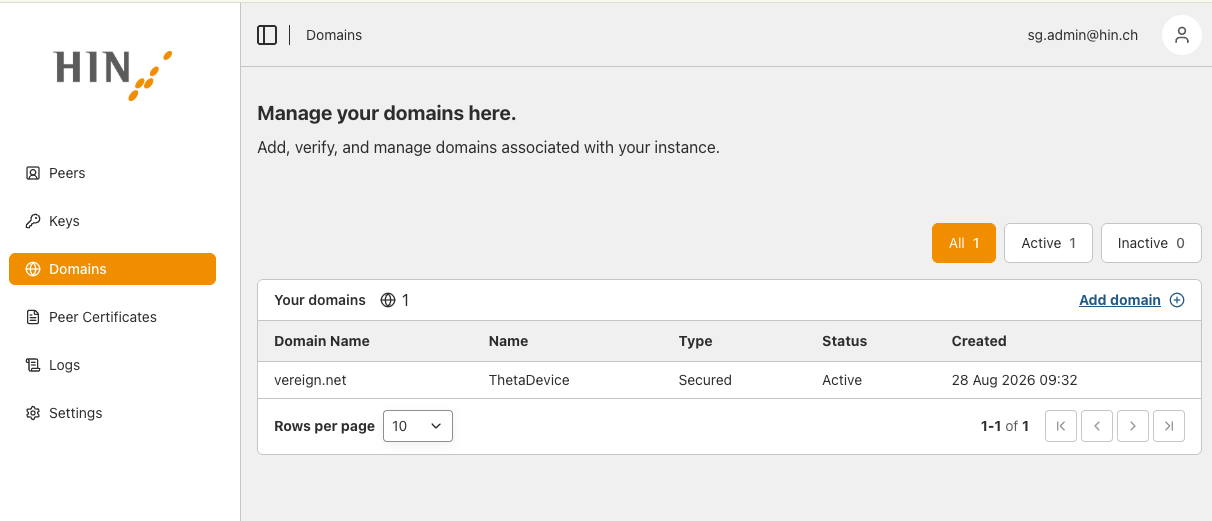
Domains page¶
Info
For multi-domain migration perform the operation for each active domain.
Under the Domains menu, for each available domain you can configure specific transport route:
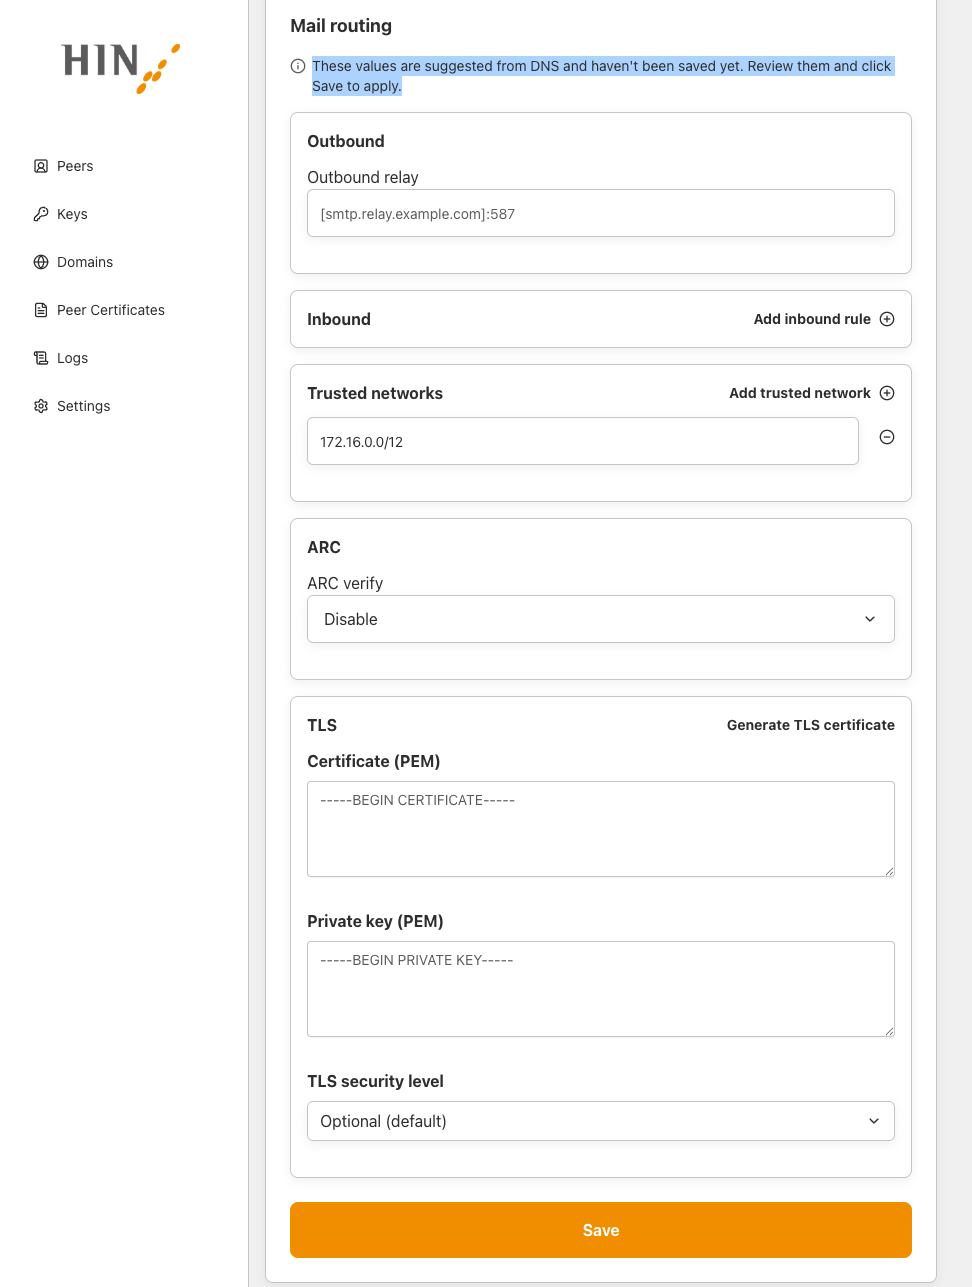
| Setting | Description |
|---|---|
| Inbound relay | The SMTP relay for inbound delivery for selected domain |
| Outbound relay | The SMTP relay for outbound delivery for selected domain. This setting corespond to Forwarding server setting from old MGW |
| Trusted networks | Additional networks allowed to relay through this gateway. For more information please check on "Step 18 - Configure mail server" |
| Configure TLS | TLS certificate settings for SMTP connections and from the Generate TLS certificate button you can generate TLS certificate |
| Email authentication | For all settings under Email authentication section please refer to Email authentication (DKIM ARC SPF DMARC) section |
How to test TLS connection?
You can always test if configured TLS Certificate was applied on your connection to HIN Gateway or not. Execute following command directly from HIN Gateway Terminal:
Or, directly from your local machine:
In output you will see all data related to your TLS connection and used Certificate.
How to convert pfx to pem TLS Certificate?
Use openssl command:
E.g.:
Additional actions:
- Add additional domains by clicking "Add domain", if required.
- if domain is not not HIN secured, it will apper in the
Domainslist as Type: Routed - which mean it can be managed only locally
- if domain is not not HIN secured, it will apper in the
Note
Ensure that all relay host and domain configurations are correct before proceeding.
Once the configuration has been reviewed and completed, click "Save" to continue.
Settings page¶
On this page under Settings menu, configure your global mail transport settings for the secure mail relay setup which are common for the whole instance. Detailed configuration for each domain can be performed under Domains -> $domain
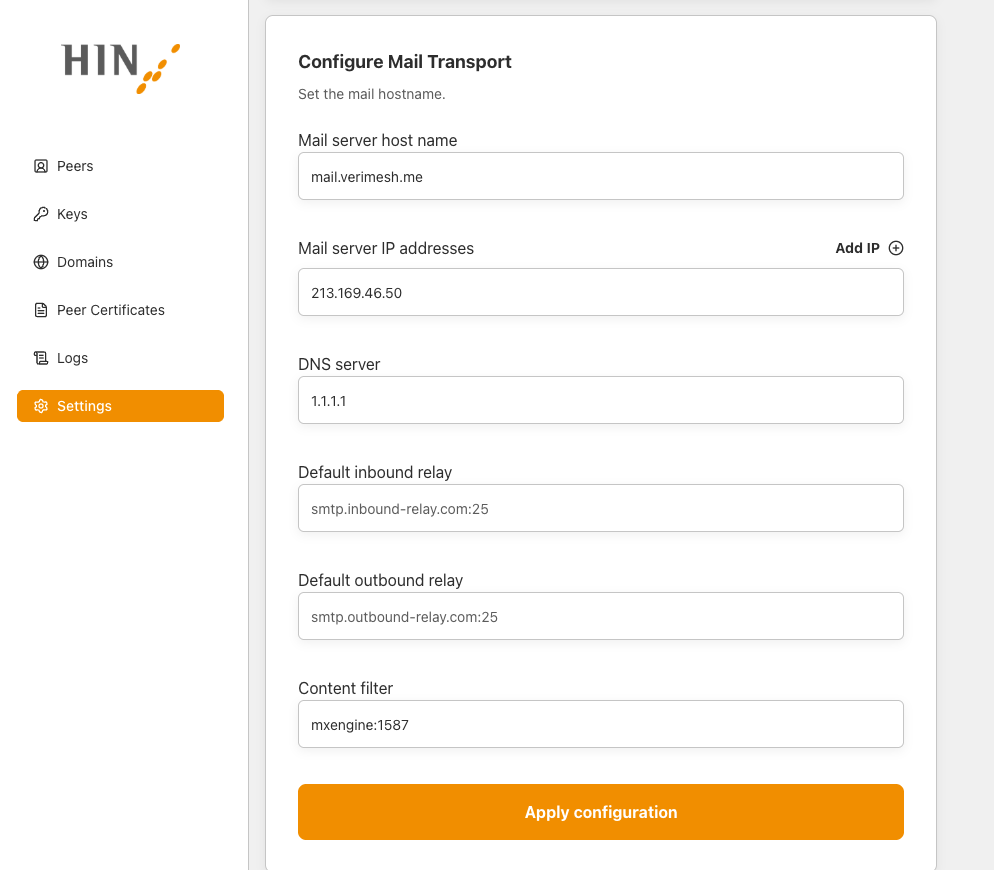
The following settings are available Settings menu:
| Setting | Description |
|---|---|
| Mail server host name | The FQDN of this mail gateway instance (e.g. mail.example.com). |
| Mail server IP addresses | The public IP address(es) of this server. Add additional IPs if the server is reachable on multiple addresses. |
| DNS | DNS of the host which will be used to resolve MX and other DNS records |
| Default inbound relay | The default SMTP relay for inbound delivery |
| Default outbound relay | The default SMTP relay for outbound delivery |
Step 15 - Configure whitelist headers¶
Info
For multi-domain perform the operation for each active domain.
Click "Domains" -> "Select domain", then select "Whitelist headers".
Enter the key exactly as configured in the mail server.
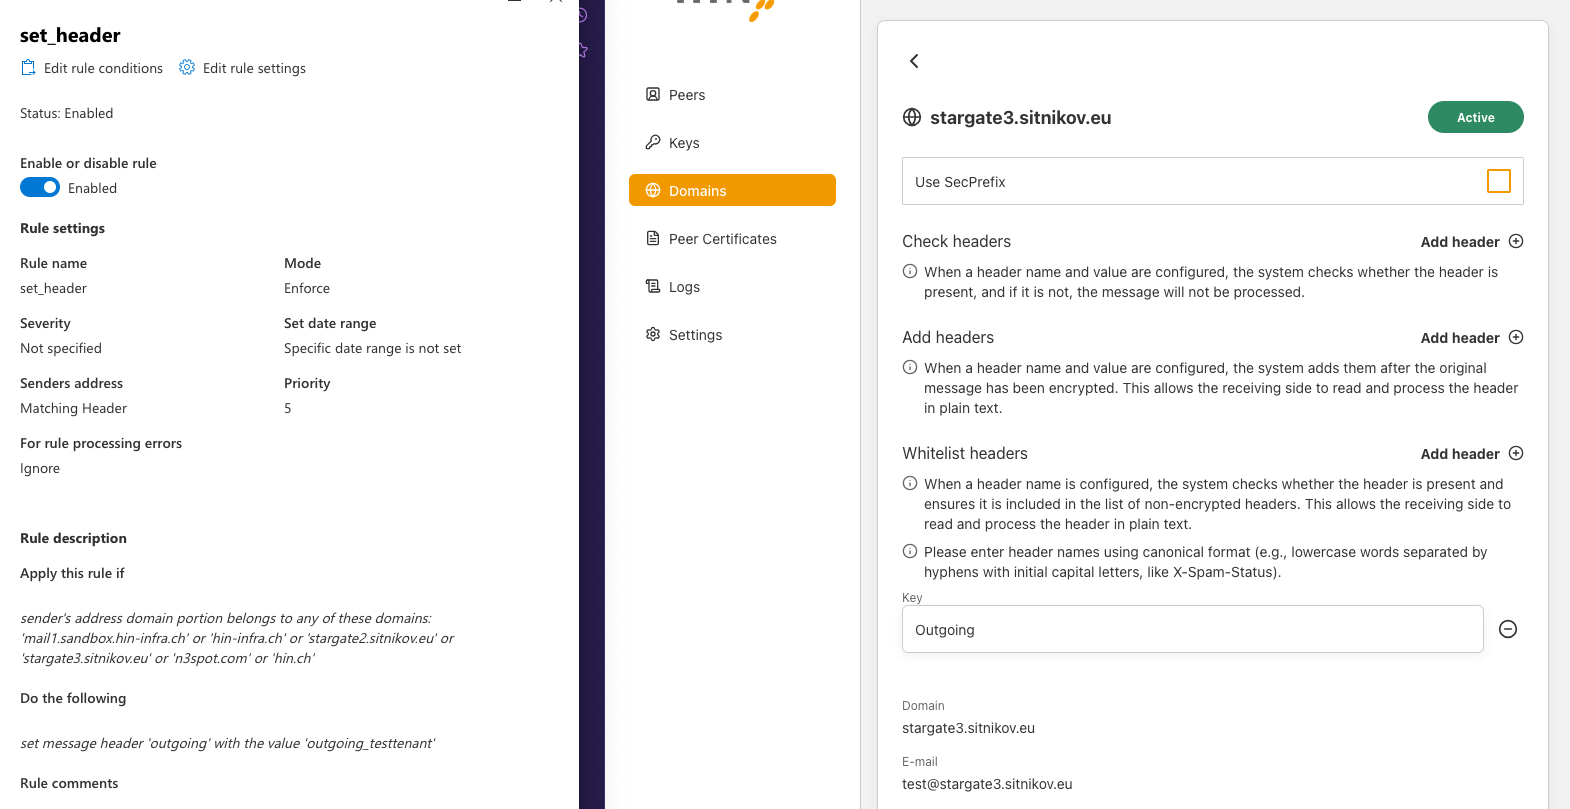
Step 16 - Peer certificates¶
Peer certificates are issued by the HIN Certification Authority (HIN CA) for enabled domains.
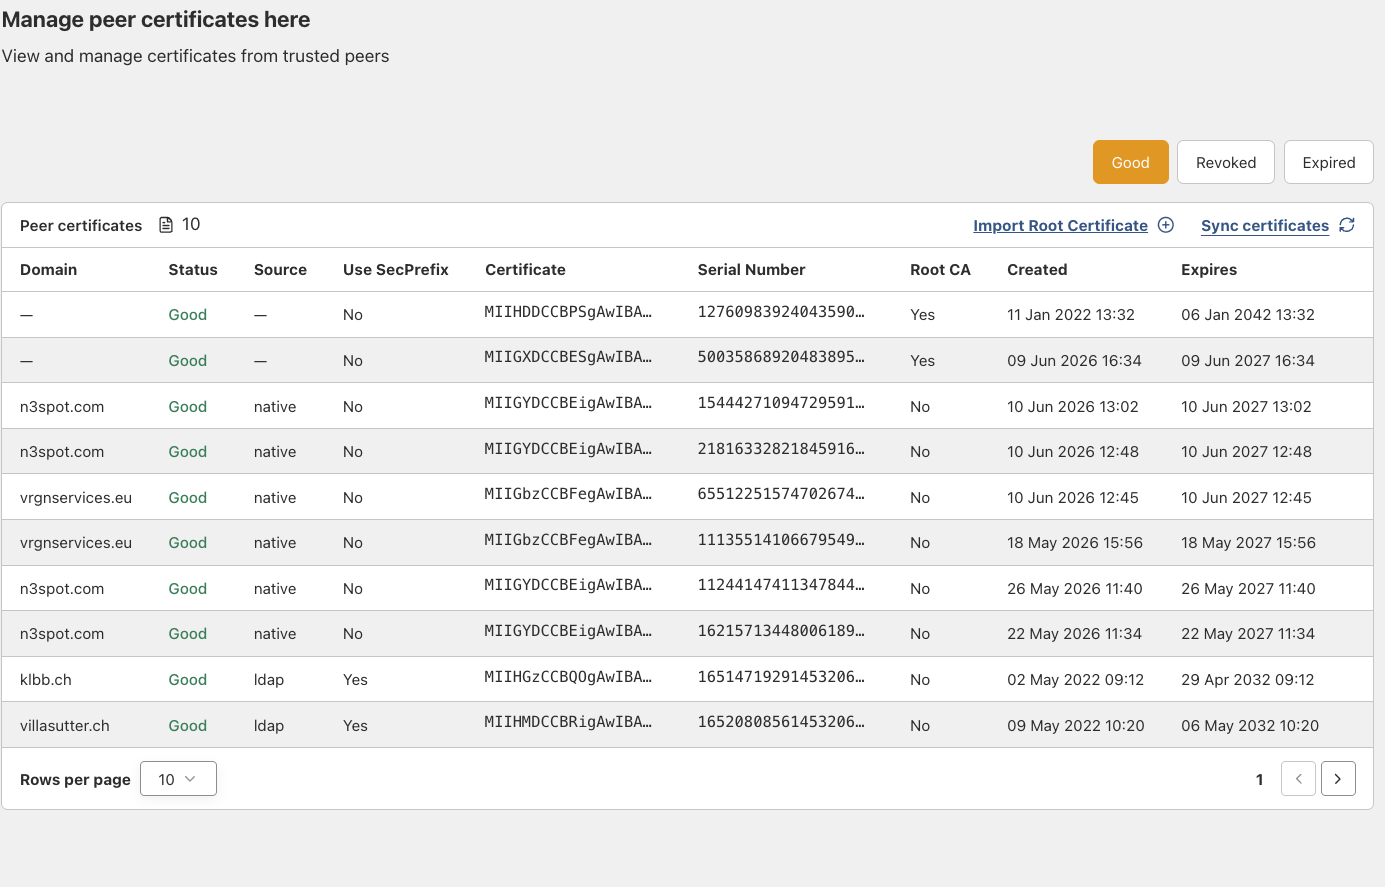
Once the onboarding is complete, navigate to the Peer certificates section in the dashboard and click the "Sync certificates" button to synchronise your peer certificates from the HIN CA.
Step 17 - Validate peer certificates¶
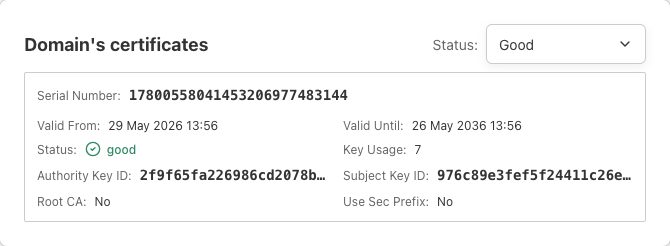
Ensure that your domain has received its policy-based peer certificate at the bottom of "Domains" -> "domainName" . The status of each domain must be "Good".
Question
Contact HIN Support by email or phone (support@hin.ch / 0848 830 740) if you encounter any issues.
Step 18 - Configure mail server and HIN Gateway¶
If you followed the recommended approach by exporting the private key, importing it into the HIN Gateway, and keeping the same IP address as the existing MGW, no changes are required on the email server.
Otherwise, configure your mail server or the associated components so that traffic is routed via the new HIN Gateway. Check and update the following settings, if required:
Email server¶
- SMTP relay / smart host
- Connectors
- Transport rules
- Routing domains
See Exchange Integration for detailed instructions.
HIN Gateway config¶
Domains page¶
Info
For multi-domain migration perform the operation for each active domain.
Under the Domains menu, for each available domain you can configure specific transport route:
| Setting | Description |
|---|---|
| Inbound relay | The SMTP relay for inbound delivery for selected domain |
| Outbound relay | The SMTP relay for outbound delivery for selected domain. This setting corespond to Forwarding server setting from old MGW |
| Trusted networks | Additional networks allowed to relay through this gateway. For more information please check on "Step 18 - Configure mail server" |
| Configure TLS | TLS certificate settings for SMTP connections and from the Generate TLS certificate button you can generate TLS certificate |
| Email authentication | For all settings under Email authentication section please refer to Email authentication (DKIM ARC SPF DMARC) section |
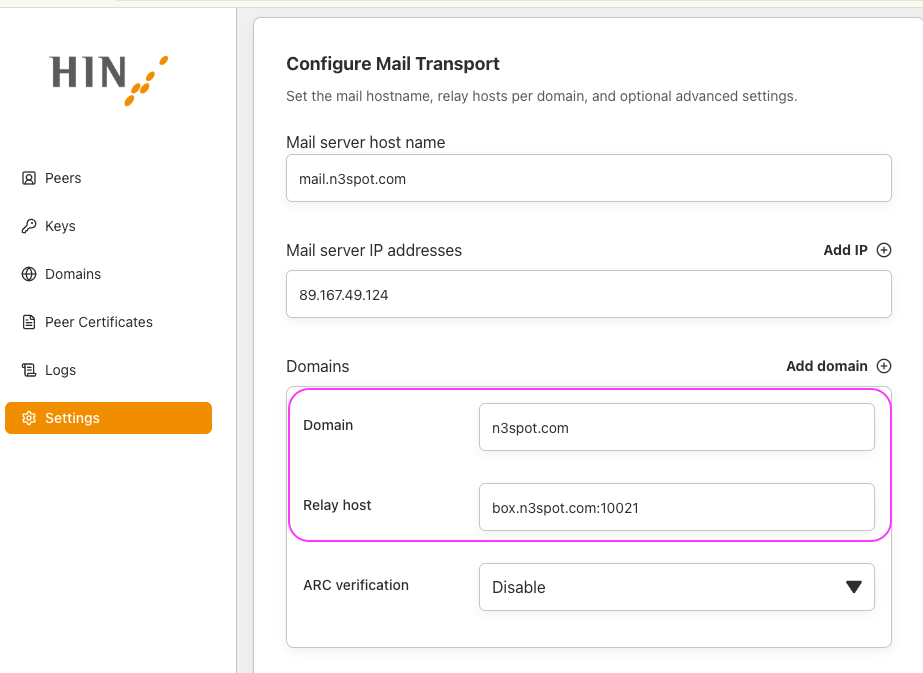
- Note: for migration scenarion: Go to the page for each domain, add a Outbound host using the value you recorded from the MGW's
Forwarding serverfield in "Step 1.2 - Backing up the existing MGW".
-
If you are using Microsoft 365 / Exchange Online, add its published outbound IP ranges to
Trusted networksso the HIN Gateway trusts and relays mail coming from Exchange Online:
Settings page¶
On this page under Settings menu, configure your global mail transport settings for the secure mail relay setup which are common for the whole instance. Detailed configuration for each domain can be performed under Domains -> $domain
The following settings are available Settings menu:
| Setting | Description |
|---|---|
| Mail server host name | The FQDN of this mail gateway instance (e.g. mail.example.com). |
| Mail server IP addresses | The public IP address(es) of this server. Add additional IPs if the server is reachable on multiple addresses. |
| DNS | DNS of the host which will be used to resolve MX and other DNS records |
| Default inbound relay | The default SMTP relay for inbound delivery |
| Default outbound relay | The default SMTP relay for outbound delivery |
Step 19 - Test and validate¶
Outgoing:
- Verify that the mail server is configured to send emails to the HIN Gateway using an SMTP relay or Exchange connector.
- Verify that the HIN Gateway can send emails to recipients outside the HIN Community.
- Verify that the HIN Gateway can send emails to recipients inside the HIN Community via WireGuard.
- Send an email from the HIN Community to an external email address (for example, Bluewin, Gmail, Yahoo, or GMX) with (confidential) included in the subject line, and verify that it is delivered successfully.
Incoming:
- Verify that encrypted emails can be received from the HIN Community via WireGuard. A sender from the
hin.chdomain is the easiest test path. - Verify that encrypted emails can be received from the HIN Community via SMTP using S/MIME.
- Verify that replies from senders outside the HIN Community to an initial secure email (HIN Mail-SEAL) can reach the HIN Gateway.
- Verify that plain-text emails can be received from external senders outside the HIN Community.
- Send an email from an external email address to the HIN Community and verify that it is received successfully.
Confirm:
- Emails are delivered successfully in both directions between the HIN trusted domain and external email addresses.
- Encryption is applied where required.
- There are no unexpected delays or bounces.
- Logging is successful.
Complete the Acceptance Report and return it to your HIN representative.
Step 20 - Change the password of the VM¶
Please make sure that the VM credentials which were provided to you initially are changed to your own defined password, and keep them in a secured and safe place.
Step 21 - Take existing MGW out of service¶
Info
This step applies only for single and multi domain migrations
Warning
Do not delete the existing MGW VM immediately - keep it safe until everything is up and running.
- Ensure there is no active traffic - check:
- No domains are pointing to the MGW (DNS, SMTP, connectors).
- No emails are being forwarded via the old appliance.
- Archive logs - export and save:
- Email logs
- Security/audit logs
- Required for compliance and troubleshooting
- Clean-up (optional) - remove:
- Firewall rules
- DNS entries
- Routing configurations that reference the existing MGW
Annex 1 - Backing up and restoring the appliance settings¶
Info
This step applies only for single and multi domain migrations
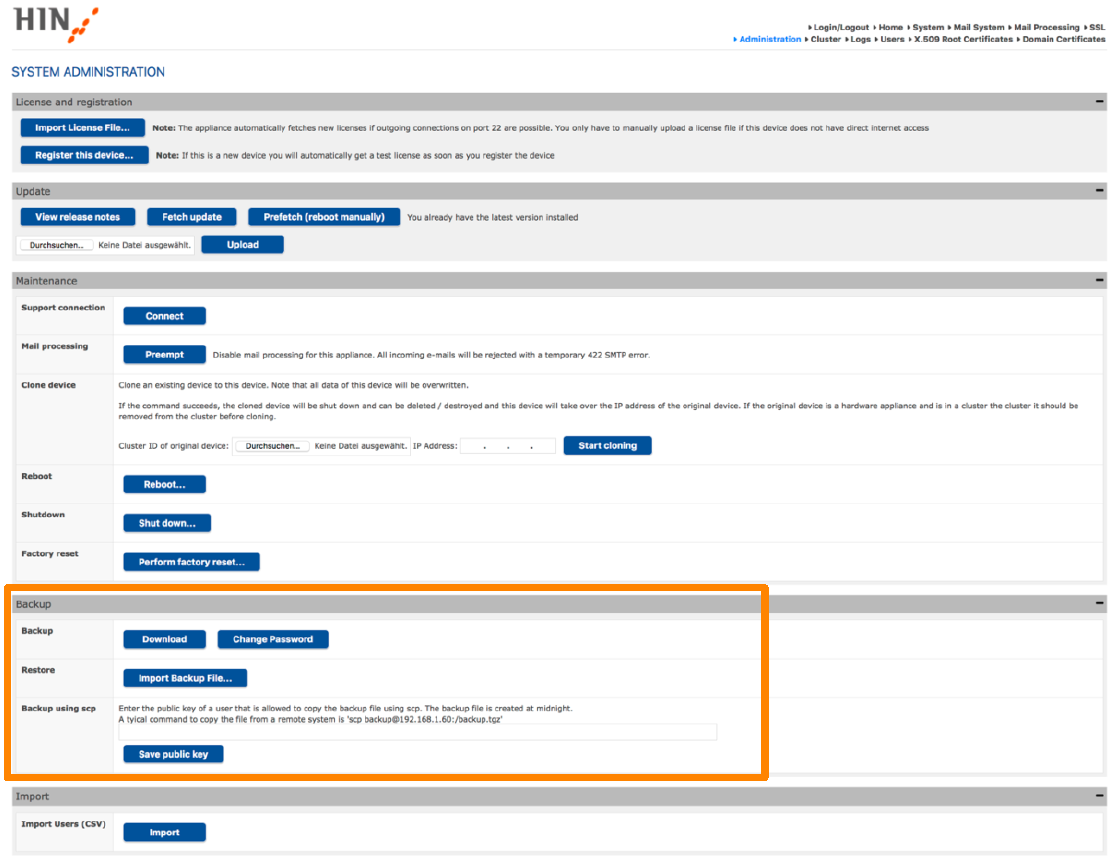
To back up or restore the settings of your HIN appliance, click the "Administration" menu in the web administration portal.
Backing up settings¶
Before you create a backup of the current HIN appliance settings, you must set a backup password. This password is required if you need to restore the backup later.
- To set or change the backup password, click "Change Password".
- To create and download a backup file, click "Download".
Changing the backup password¶
To change the password for future backups, click "Change Password".
Note
The new password only applies to backups created after the password has been changed. Existing backup files remain protected by the password that was set when they were created.
Restoring settings¶
To restore appliance settings from a backup file, click "Import Backup File...".
In the dialog window, select the required backup file and enter the password associated with that backup. The appliance settings will then be restored from the selected backup file.
Backup using SCP¶
The MGW supports backing up the appliance via SCP.
To use this option, the public key of the system that will access the MGW must be stored under "Backup using SCP". The backup is generated automatically every day at midnight and is stored on the MGW as backup.tgz.
Using the configured public key, the backup file can be retrieved via SCP with the operating system user backup. A typical SCP command to retrieve the backup file is:
This command downloads the file backup.tgz from the MGW to the current local directory.
Note
If you enter a new public key, the existing key will be replaced.
Multi-Domain Scenarios and Recommendation¶
MGW → HIN Gateway – Mail-Flow Architecture, Phased Rollout, and Rollback Plan
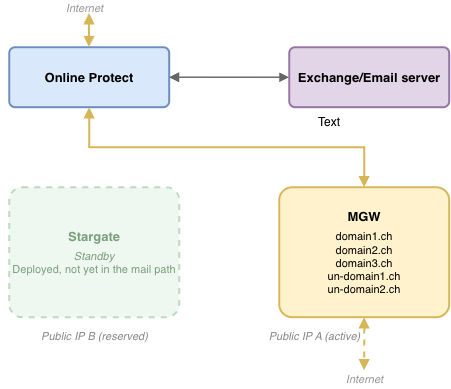
Phase 1 – Starting Point: Baseline (All Domains on MGW)¶
Baseline state
- All domains are routed through the MGW. Example: domain1.ch, domain2.ch, domain3.ch, un-domain1.ch, un-domain2.ch
- The HIN Gateway is deployed and prepared, but no live traffic is routed through it yet.
- DNS MX/SPF records still point to "Public IP A" (MGW), where the MGW is the front-facing gateway or the last MTA.
Pre-flight checklist
- Establish a baseline for the current MGW capacity and mail-flow logs.
- Validate HIN Gateway connectivity to Online Protect, Exchange Online, and the on-premises e-mail server.
- Align stakeholders on the migration schedule and communication plan.
- Review firewall/port documentation ahead of Public IP B provisioning (Phase 2, step 1)
Phase 2 – Migration: Gradual Domain-by-Domain Example¶
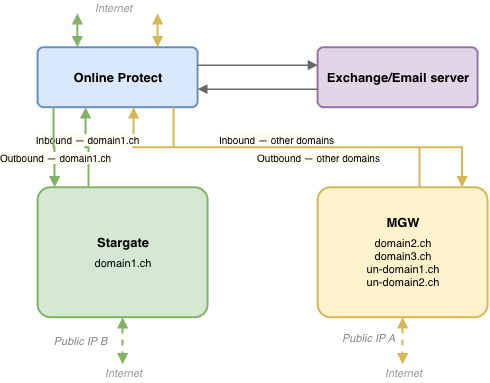
Migration steps
- Provision HIN Gateway — assign
Public IP Band update firewall rules (see network documentation for required ports) - Create two connectors in Exchange Online—one inbound and one outbound—pointing to the HIN Gateway.
- Add a mail-flow rule that routes by domain: domain1.ch → HIN Gateway, all remaining domains stay on MGW
- Repeat the process gradually, moving one additional domain at a time until all domains are routed through the HIN Gateway.
Roll-back (per domain)
- Point the affected domain's mail-flow rule back to MGW
- Leave the Stargate connectors in place for the next attempt
- Keep an ordered change log of every connector and rule modification. A rollback must apply these changes in reverse order.
Watch for customer-specific headers
Some domains rely on custom X-headers (routing, anti-spam allow-lists, compliance tags). Confirm that the HIN Gateway connectors preserve or replicate these headers before migrating a domain. Missing headers may result in incorrect routing or rejected e-mails.
Phase 3 Final - fully migrated to HIN Gateway¶
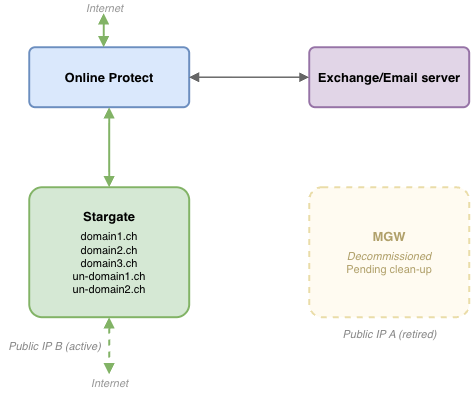
End state
- All domains now flow through HIN Gateway
- MGW carries no production traffic
- DNS/SPF records now point to Public IP B where the HIN Gateway is the front-facing gateway or the last MTA.
Clean-up checklist
- Remove the old MGW connectors and mail-flow rules
- Decommission the MGW VM once monitoring confirms that it is receiving no traffic and that e-mail flow is functioning correctly
- Release Public IP A if no longer required
- Update runbooks and DNS documentation
Migration strategy comparison¶
Recommended – Migrate All Domains at Once
- No additional Public IP required
- No temporary connector or mail-flow-rule changes
- Simple roll-back: power off Stargate, power the old MGW VM back on
- Shortest cutover window — lowest chance of configuration drift
Alternative – Gradual Domain-by-Domain Migration
- Lower blast radius per step — only one domain at risk at a time
- Requires a second public IP address and temporary split-routing rules and connectors
- Must handle customer-specific headers per domain
- Roll-back requires replaying the exact change sequence in reverse
Warning
Confirm the exact firewall ports and connector settings against the current network documentation before performing any installation steps.
Note
See the specific notes in the HIN Gateway Installation Guide regarding multi-domain migration.
Technical configuration and Integration
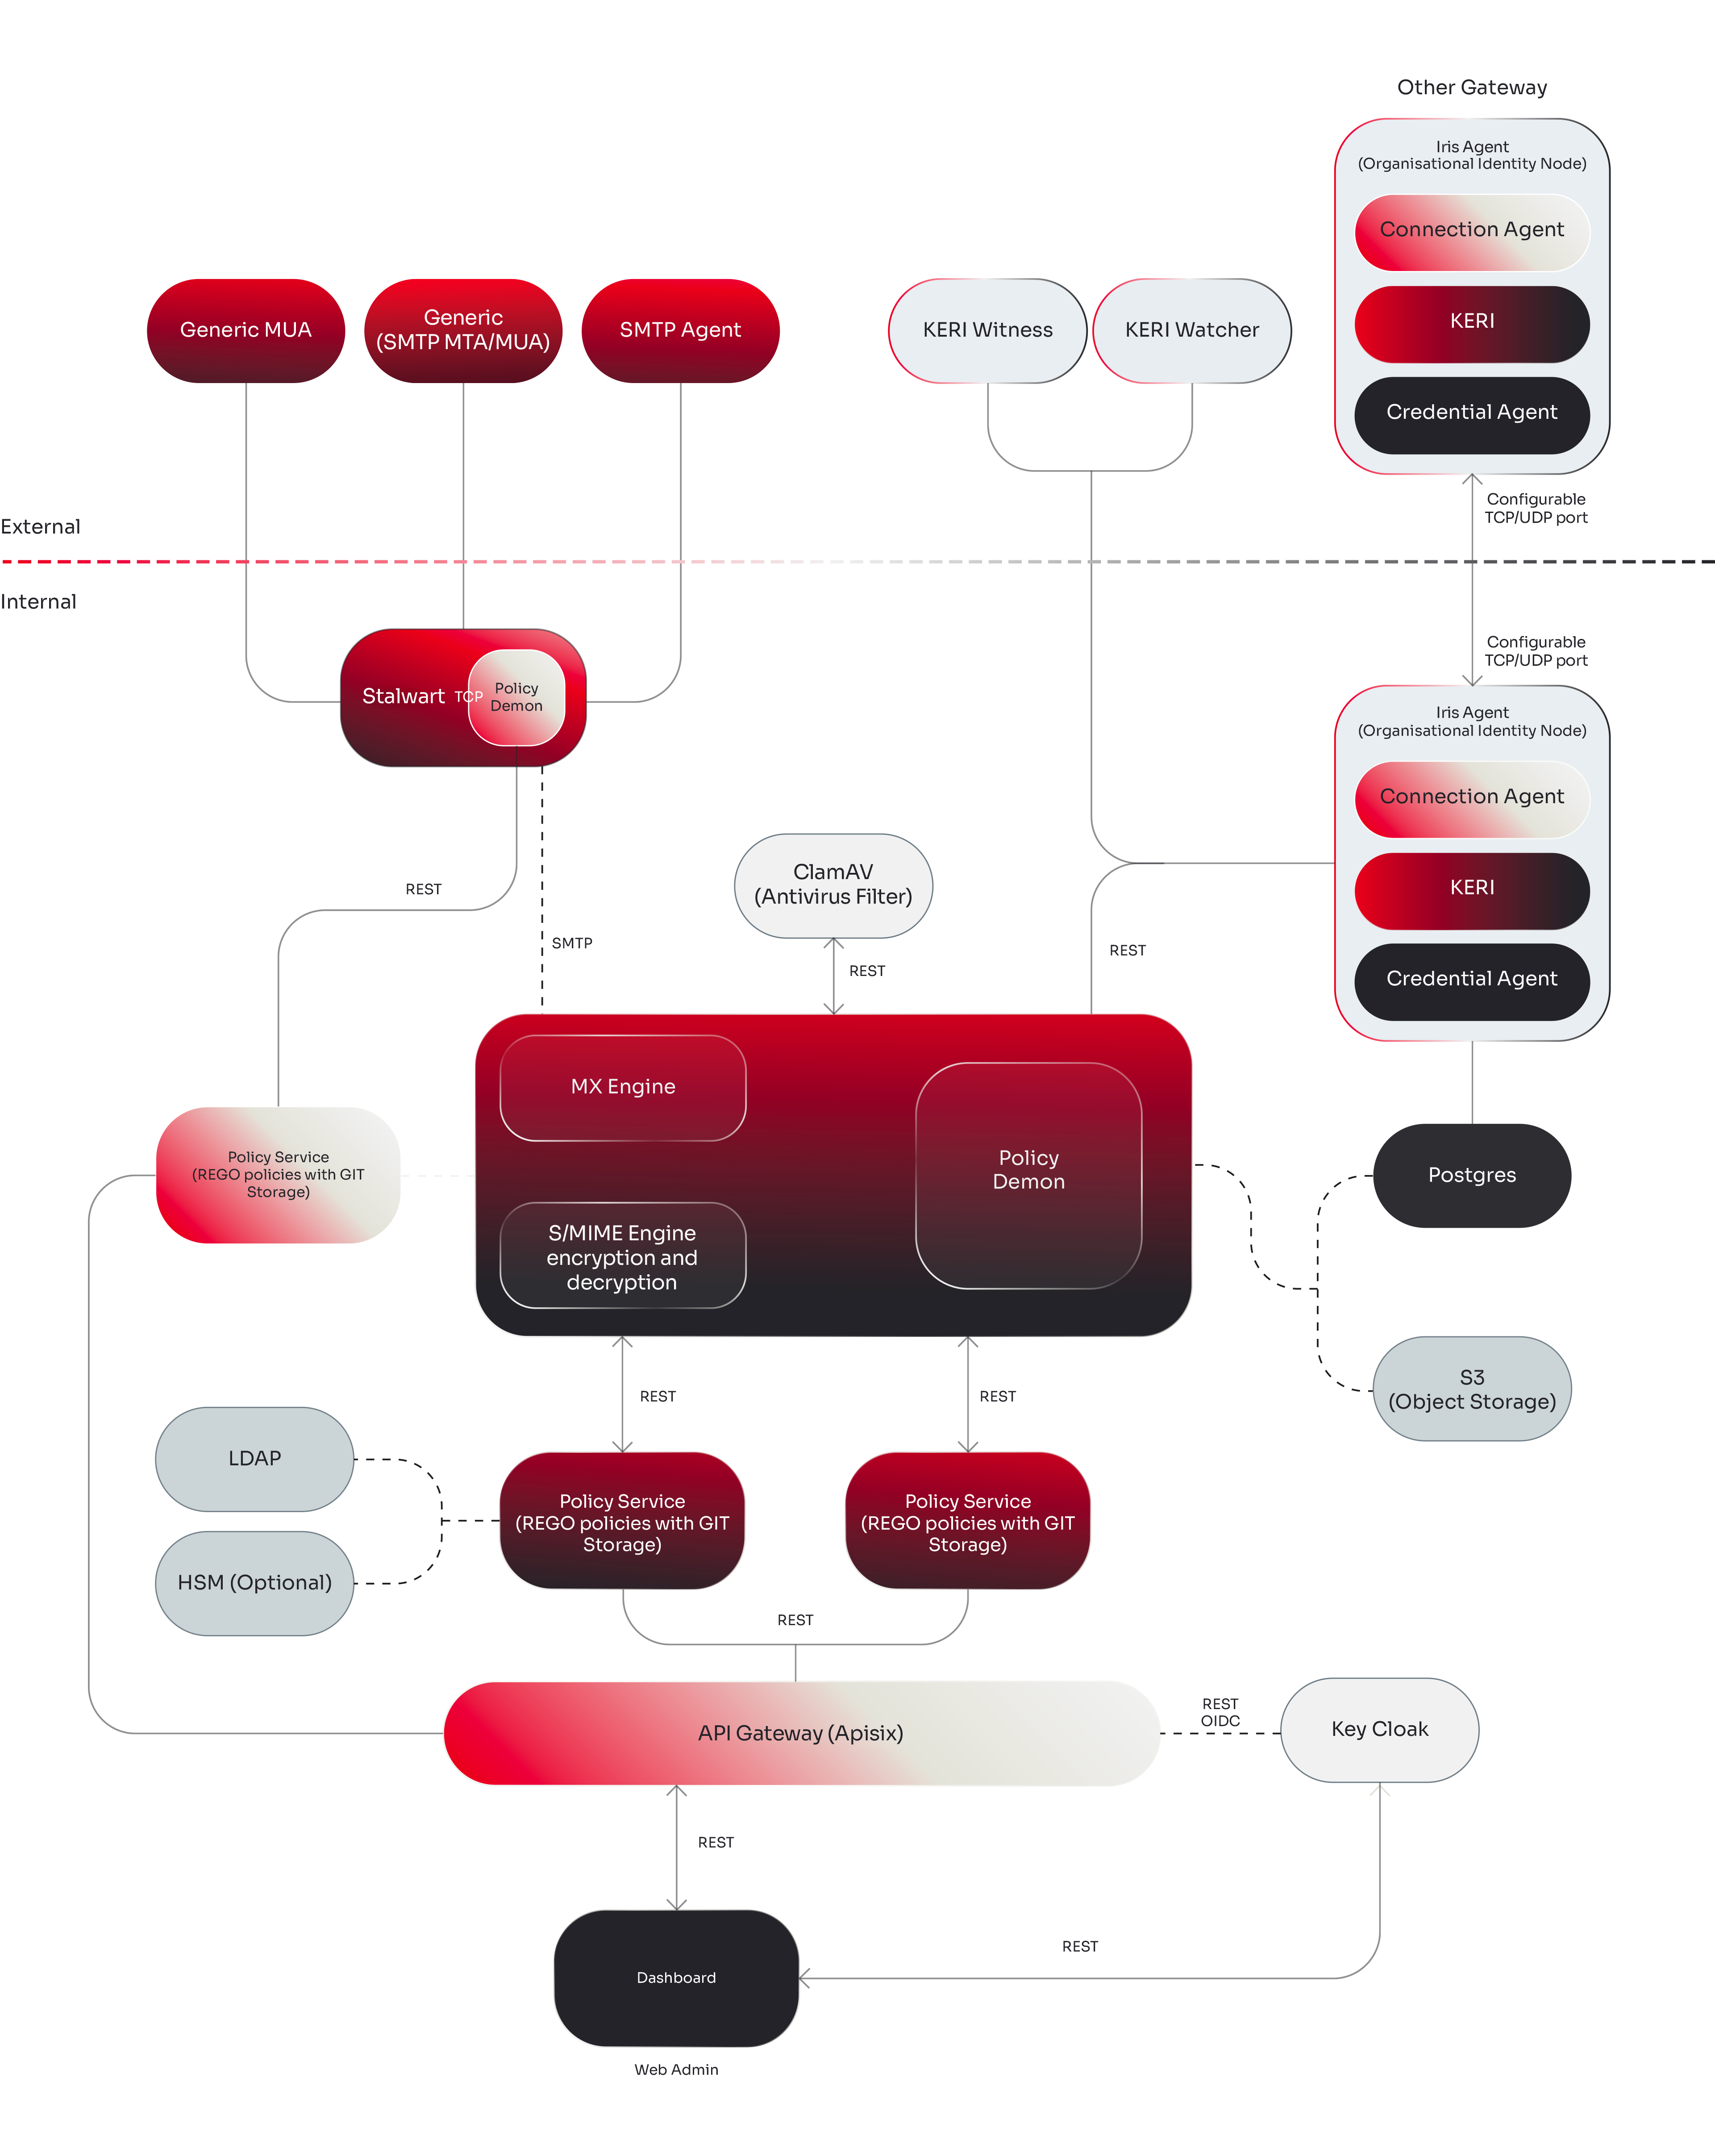
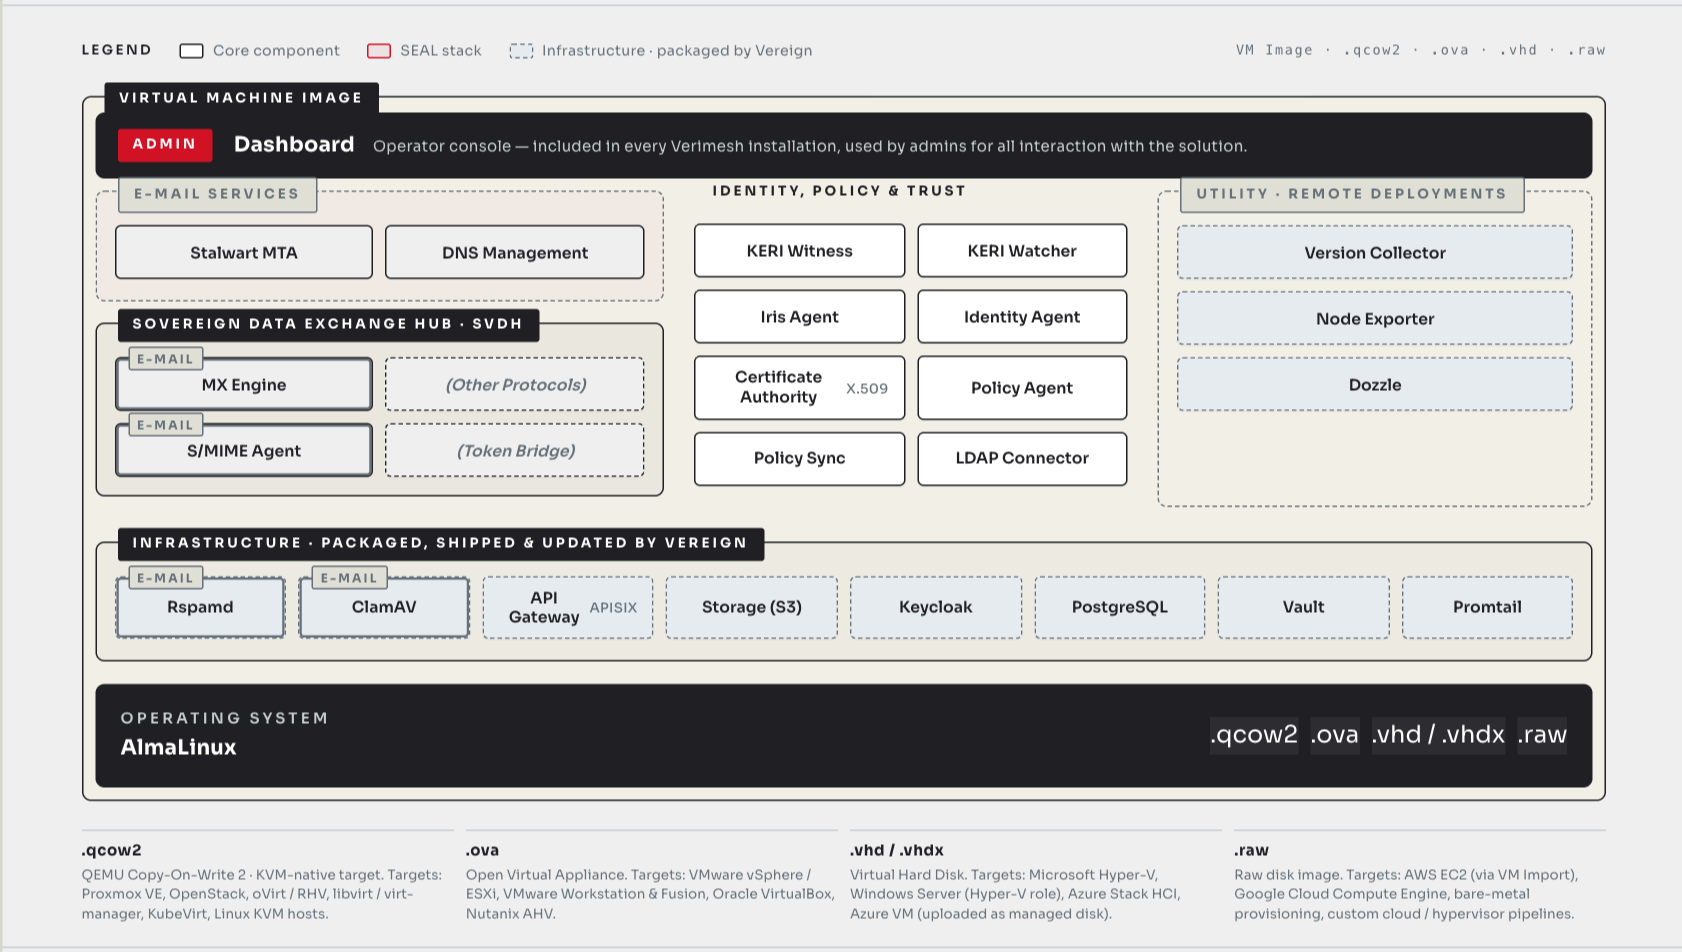
Applications overview¶
Applications¶
- smimekeys-client - S/MIME keys client service (port
8081) - policy - Policy service (port
8082) - irisagent - IRIS Agent service (port
8083, WireGuard:19818/udp,19818/tcp) - mxengine - MX Engine service (port
8084, SMTP:1587) - stalwart - Stalwart MTA mail server (port
25,10026) - clamav - ClamAV antivirus; scans mail at Stalwart's SMTP DATA stage via the milter protocol (port
7357) - mtaconf - MTA configuration daemon (API:
8080) - dashboard - Web-based admin UI for onboarding, domain management, and monitoring (port
443) - policy-sync - Syncs OPA/Rego policies from Git repository to database (runs continuously)
Infrastructure¶
- PostgreSQL - Database (port
5432) - Vault - Secrets management (internal port
8200, not published to the host) - MinIO - S3-compatible storage (API on host port
9000; console not published to the host) - Keycloak - Identity provider and OIDC authentication (port
8180) - APISIX - API gateway with OIDC bearer auth (port
9080) - NATS - Inter-service messaging (triggers Stalwart reloads from dashboard)
Init Containers¶
- vault-init - Initializes and unseals Vault on first run
- seaweedfs-init - Creates the S3 bucket
- apisix-init - Generates APISIX config from template
- keycloak-init - Sets initial admin password
Monitoring¶
- node-exporter - Host metrics for Prometheus (port
9100) - version-collector - Collects app versions from
/livenessendpoints for node-exporter - Alloy - Log collector for Loki (ships app logs)
- Dozzle - Real-time container log viewer (port
8190, HTTPS, behind Keycloak SSO via oauth2-proxy; optional, enabled withDOZZLE_ENABLED) - oauth2-proxy - OIDC relying party that authenticates Dozzle access against Keycloak (starts together with Dozzle)
See Monitoring and Logs for detailed configuration and usage.
Architecture overview¶
VM Architecture overview¶
Monitoring and Logs¶
Stargate includes built-in monitoring and log collection services that run alongside the application containers.
Components¶
| Service | Port | Purpose |
|---|---|---|
| node-exporter | 9100 |
Host-level metrics (CPU, memory, disk, network) for Prometheus |
| version-collector | - | Collects app versions from /liveness endpoints |
| Alloy | 12345 |
Docker log collector - ships container logs to Loki |
| Loki | 3100 (internal) |
Local log aggregation backend |
| Dozzle | 8190 |
Web-based container log viewer (HTTPS, Keycloak SSO; optional) |
| oauth2-proxy | 8190 |
OIDC relying party that authenticates Dozzle access (with Dozzle) |
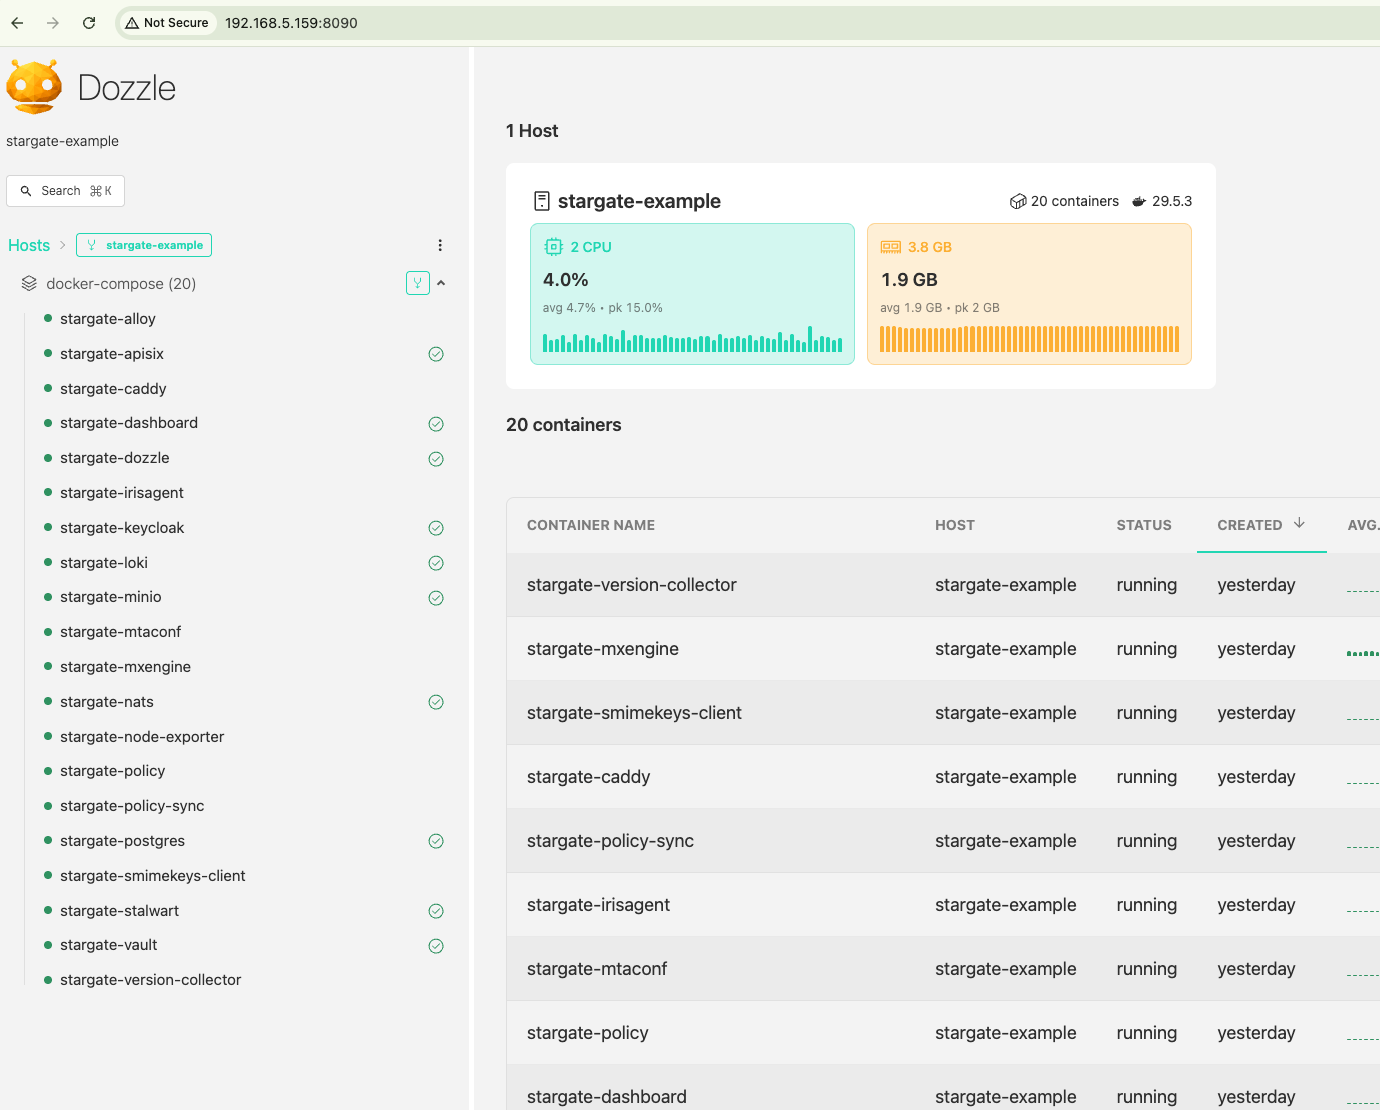
Dozzle - Local Log Viewer¶
Dozzle provides a web-based UI to view real-time logs from all Stargate containers. It is optional and enabled by setting DOZZLE_ENABLED="true" in customer-config.sh.
Access is protected by Keycloak: an oauth2-proxy sits in front of Dozzle and requires the same login as the dashboard (the stargate realm). Dozzle itself is not exposed directly.
Access: open https://<SERVER_IP>:8190 in a browser and sign in with your HIN Gateway (Keycloak) credentials.
Note
Port 8190 (HTTPS) must be reachable from your network. If you restrict access by IP or firewall, allow 8190/tcp as you do for the dashboard and Keycloak.
Logs are organized by service. By selecting a specific service, you can view its corresponding log entries and details.
Grafana Alloy - Log Forwarding¶
Grafana Alloy collects logs from all Stargate application containers and writes them to the local Loki instance. Optionally, logs can also be forwarded to a remote Loki-compatible endpoint for centralized monitoring.
How it works¶
- Alloy discovers Stargate containers via the Docker socket
- Logs are always written to the local Loki instance (used by the dashboard for log export)
- If a remote Loki URL is configured, logs are additionally forwarded to that endpoint
Configuring remote log forwarding¶
From the HIN Gateway dashboard, navigate to the Settings page. Under the Grafana Alloy section, enter the Loki push URL of your remote log collection server:
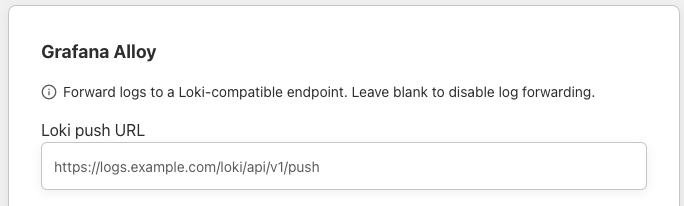
The URL should follow the standard Loki push API format:
Leave the field blank to disable remote log forwarding.
Note
Changes take effect within 1 minute (Alloy polls the dashboard configuration on that interval). No container restart is required.
Requirements on the remote side¶
Your remote Loki endpoint must be reachable from the Stargate server over HTTPS (port 443). If you use IP-based allowlisting on your ingress, add the Stargate server's public IP.
Prometheus Metrics¶
Stargate exposes Prometheus-compatible metrics endpoints from its application containers. These can be scraped by any Prometheus-compatible server for centralized metrics collection.
Available endpoints¶
| Service | Port | Path |
|---|---|---|
| smimekeys-client | 2113 |
/metrics |
| irisagent | 2114 |
/metrics |
| policy | 2115 |
/metrics |
| mxengine | 2116 |
/metrics |
| node-exporter | 9100 |
/metrics |
| APISIX | 9091 |
/apisix/prometheus/metrics |
Scrape configuration¶
Add the Stargate server as a target in your Prometheus configuration. Example for a single instance:
scrape_configs:
  - job_name: 'stargate-<name>-smimekeys'
    static_configs:
      - targets: ['<STARGATE_IP>:2113']
        labels:
          environment: 'stargate-<name>'
          service: 'smimekeys-client'
    metrics_path: /metrics

  - job_name: 'stargate-<name>-irisagent'
    static_configs:
      - targets: ['<STARGATE_IP>:2114']
        labels:
          environment: 'stargate-<name>'
          service: 'irisagent'
    metrics_path: /metrics

  - job_name: 'stargate-<name>-policy'
    static_configs:
      - targets: ['<STARGATE_IP>:2115']
        labels:
          environment: 'stargate-<name>'
          service: 'policy'
    metrics_path: /metrics

  - job_name: 'stargate-<name>-mxengine'
    static_configs:
      - targets: ['<STARGATE_IP>:2116']
        labels:
          environment: 'stargate-<name>'
          service: 'mxengine'
    metrics_path: /metrics

  - job_name: 'stargate-<name>-node'
    static_configs:
      - targets: ['<STARGATE_IP>:9100']
        labels:
          environment: 'stargate-<name>'
          service: 'node-exporter'
    metrics_path: /metrics
Replace <STARGATE_IP> with the server's public or private IP and <name> with a deployment identifier (e.g., prod, customer-name).
Tip
The environment and service labels enable filtering in Grafana dashboards across multiple Stargate instances.
Firewall requirements¶
The metrics ports (2113-2116, 9100) must be reachable from your Prometheus server. If you restrict access by IP, add your monitoring server's IP to the firewall rules.
Node Exporter¶
The node-exporter service exposes standard host-level metrics (CPU, memory, disk I/O, network) on port 9100. It also includes a textfile collector that exposes custom metrics from the version-collector sidecar (application version information).
Summary of exposed ports¶
| Port | Service | Protocol | Purpose |
|---|---|---|---|
8190 |
Dozzle (via oauth2-proxy) | HTTPS | Authenticated log viewer UI (Keycloak SSO) |
9100 |
node-exporter | HTTP | Host metrics (Prometheus) |
2113 |
smimekeys-client | HTTP | App metrics (Prometheus) |
2114 |
irisagent | HTTP | App metrics (Prometheus) |
2115 |
policy | HTTP | App metrics (Prometheus) |
2116 |
mxengine | HTTP | App metrics (Prometheus) |
9091 |
APISIX | HTTP | Gateway metrics (Prometheus) |
Exchange Integration with Stargate¶
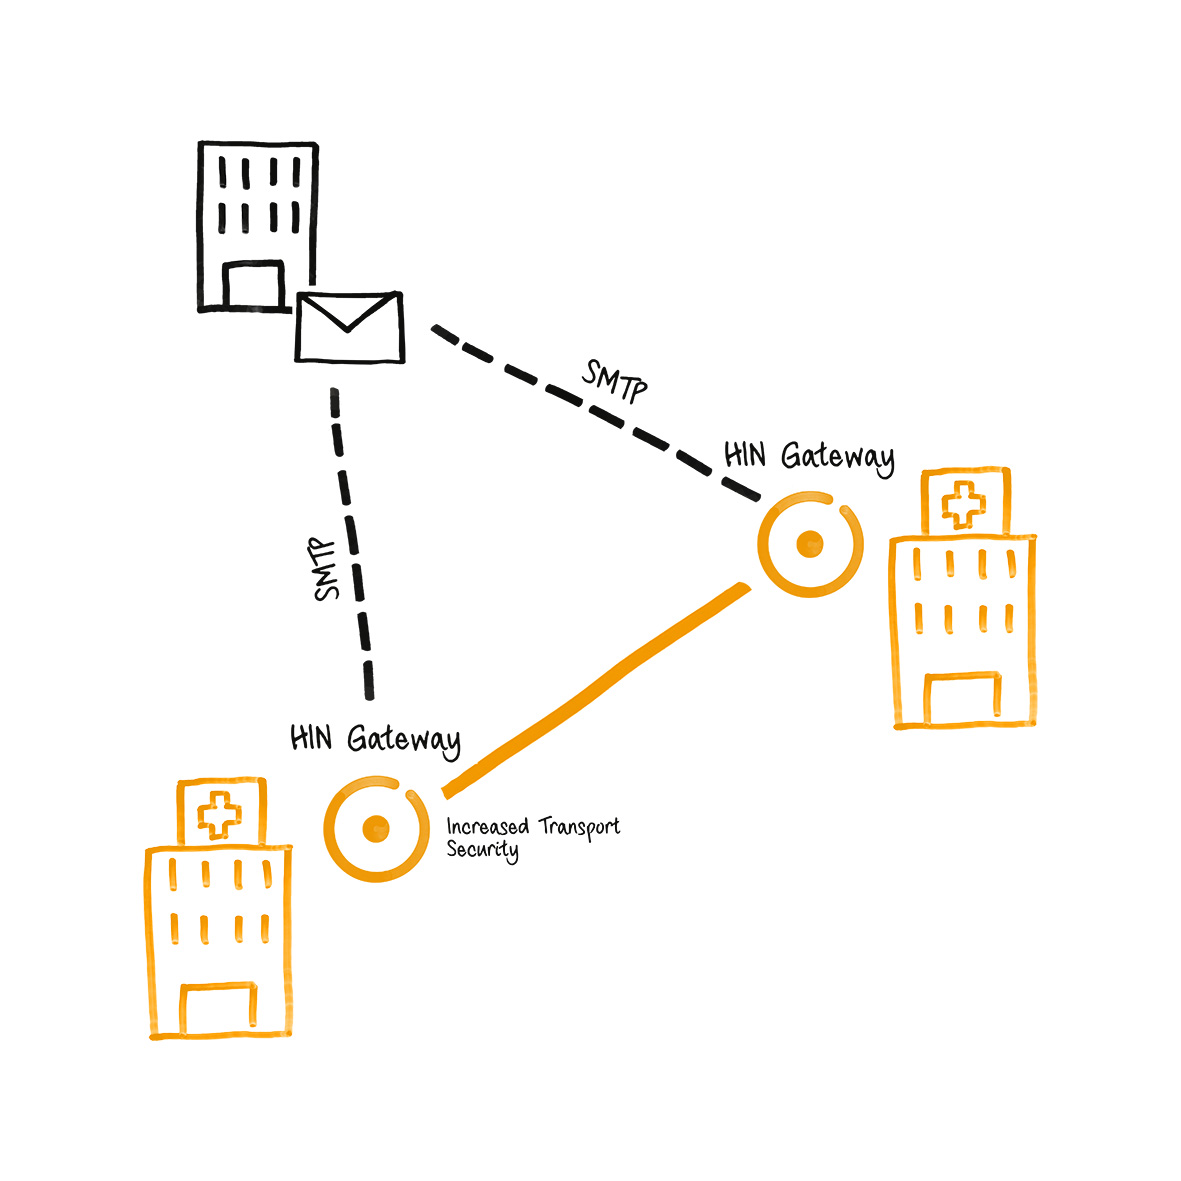
This guide explains how to configure Microsoft Exchange (Online and On-Premises) to route mail through the Stargate gateway for S/MIME signing and encryption.


Overview¶
Stargate acts as a mail relay between external mail servers and your Exchange environment. Two integration patterns are supported:
Pattern A - Exchange Online as primary MX with transport rules:
flowchart LR
    I1 --> EO --> TR --> C --> S1 --> EO
    E2 --> TR2 --> OC --> S2 --> I2
    I1["Internet"]
    I2["Internet"]
    EO["Exchange Online"]
    E2["Exchange Online"]
    TR["Transport Rule"]
    TR2["Transport Rule"]
    OC["Outbound Connector"]
    C["Connector"]
    S1["Stargate"]
    S2["Stargate"]
Pattern B - Stargate as primary MX:
flowchart LR
    I1 --> mx15 --> mx20
    EO --> TR --> OC --> Stargate --> I2
    I1["Internet"]
    I2["Internet"]
    mx15["Stargate (MX priority 15)"]
    mx20["Exchange Online (MX priority 20)"]
    EO["Exchange Online"]
    TR["Transport Rule"]
    OC["Outbound Connector"]
    Stargate
In both patterns, you need:
- DNS records pointing to the Stargate server
- Outbound connector - routes mail from Exchange to Stargate
- Inbound connector - accepts mail from Stargate into Exchange
- Transport rule - triggers the outbound connector for external recipients
Prerequisites¶
Before configuring Exchange, ensure:
- Stargate is installed and running (deployment instructions)
- You have the Stargate server's public IP address (referred to as
<STARGATE_IP>below) - You have the mail hostname of the Stargate server (referred to as
<MAIL_HOSTNAME>, e.g.mail.example.com) - You know your mail domain (referred to as
<YOUR_DOMAIN>, e.g.example.com) - You have Exchange admin access (Exchange Admin Center or on-premises Exchange Management Shell)
- DNS records are configured per the DNS Setup Guide (A, MX, SPF at minimum)
Part 1: DNS Setup¶
See the DNS Setup Guide for complete instructions on configuring A, MX, SPF, PTR, DMARC, and DKIM records.
At minimum, before proceeding with the Exchange configuration below, you need:
- A record:
<MAIL_HOSTNAME>pointing to<STARGATE_IP> - MX record:
<YOUR_DOMAIN>with Stargate at higher priority (lower number) than Exchange - SPF record:
ip4:<STARGATE_IP>andip4:<HIN_SEALER_IP>added to your domain's TXT record (see DNS Setup Guide - SPF for sealer IPs)
Part 2: Exchange Online Configuration¶
Step A: Create the Outbound Connector (Office 365 → Stargate)¶
This connector routes outbound mail from Exchange Online to the Stargate relay server.
-
Navigate to the Exchange Admin Center - Connectors
-
Click "+ Add a connector"
-
Connection from: Select "Office 365"
- Connection to: Select "Your organization's email server"
-
Click "Next"
-
Connector name: Enter a descriptive name, e.g.:
- Check "Retain internal Exchange email headers"
-
Click "Next"
-
Use of connector: Select "Only when I have a transport rule set up that redirects messages to this connector"
- Click "Next"
Tip
This is important - the connector won't route any mail by itself. It will only be used when triggered by the transport rule created in Step C.
- Routing: Select "Route email through these smart hosts"
- Enter the Stargate server IP address:
<STARGATE_IP> -
Click "+" to add it, then click "Next"
-
Security restrictions: Select "Any digital certificate, including self-signed certificates"
- Click "Next"
Note
Stargate's MTA (Stalwart) accepts opportunistic TLS on inbound connections. Selecting "any digital certificate" ensures connectivity even with self-signed certificates.
- Validation email: Enter a valid email address for your domain (e.g.
user@<YOUR_DOMAIN>) - Click "+", then click "Validate"
- Wait for validation to complete, then click "Next"
Tip
For validation to succeed, the Stargate server must be running and accepting mail on port 25.
-
Review the settings and click "Create connector"
-
On the confirmation screen, click "Done"
Step B: Create the Inbound Connector (Stargate → Office 365)¶
This connector accepts mail from the Stargate relay server into Exchange Online.
-
From the Connectors page, click "+ Add a connector"
-
Connection from: Select "Your organization's email server"
- Connection to: Shows "Office 365" (automatic)
-
Click "Next"
-
Connector name: Enter a descriptive name, e.g.:
- Check "Retain internal Exchange email headers"
-
Click "Next"
-
Authenticating sent email: Select "By verifying that the IP address of the sending server matches one of the following IP addresses that belong exclusively to your organization"
- Enter the Stargate server IP address:
<STARGATE_IP> - Click "+" to add it, then click "Next"
Note
This tells Exchange Online to trust mail from this specific IP address, bypassing additional spam/authentication checks for mail that has already been processed by Stargate.
-
Review the settings and click "Create connector"
-
Click "Done"
Verify Connectors¶
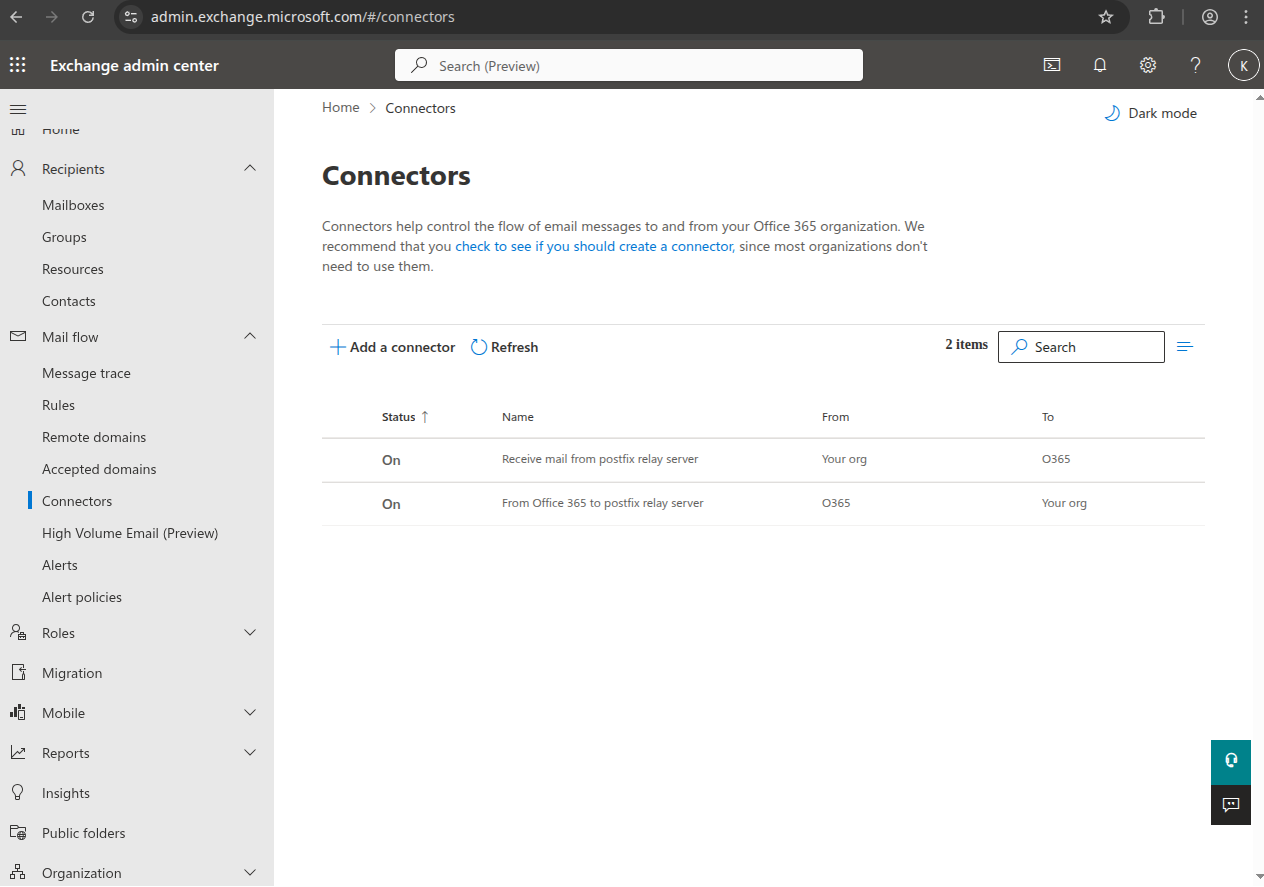
After creating both connectors, the Connectors page should show:
| Status | Name | From | To |
|---|---|---|---|
| On | Receive mail from Stargate relay server | Your org | O365 |
| On | From Office 365 to Stargate relay server | O365 | Your org |
Step C: Create the Transport Rule¶
The transport rule redirects all outbound mail through the Stargate outbound connector, except mail originating from Stargate itself (to prevent mail loops).
-
Navigate to Exchange Admin Center - Rules
-
Click "+ Add a rule" → "Create a new rule"
-
Rule name: Enter a descriptive name, e.g.:
- Apply this rule if: Select "The recipient..." → "is external/internal" → "Outside the organization"
- Click "Save"
Note
This condition ensures only outbound mail (to external recipients) is redirected through Stargate.
- Do the following: Select "Redirect the message to..." → "the following connector" → select the outbound connector created in Step A (e.g. "From Office 365 to Stargate relay server")
-
Click "Save"
-
Except if: Click "+" to add an exception
- Select "The sender..." → "IP address is in any of these ranges"
- Enter the Stargate server IP address:
<STARGATE_IP> - Click "Add", verify the IP is listed, then click "Save"
Warning
This exception is critical - it prevents mail loops. Without it, mail from Stargate arriving at Exchange Online would be redirected back to Stargate in an infinite loop.
- Review the rule summary. It should show:
- Apply this rule if: The recipient is located Outside the organization
- Do the following: Redirect the message to the connector "From Office 365 to Stargate relay server"
-
Except if: The sender IP address is in one of these ranges:
<STARGATE_IP> -
Click "Next", then "Next" again, then "Finish", then "Done"
-
Enable the rule: The rule is created in a disabled state. Click on the rule in the list and toggle "Enable or disable rule" to "Enabled"
Tip
Do not forget to enable the rule - it will not work until enabled.
Part 3: On-Premises Exchange Server Configuration¶
For on-premises Exchange Server (2016, 2019), the setup is similar but configured through the Exchange Management Console (EAC) or Exchange Management Shell (PowerShell).
Send Connector (On-Premises → Stargate)¶
Create a Send connector to route outbound mail through Stargate:
Exchange Management Shell (PowerShell):
New-SendConnector -Name "To Stargate Relay" `
  -AddressSpaces "SMTP:*;1" `
  -SmartHosts "<STARGATE_IP>" `
  -SmartHostAuthMechanism None `
  -DNSRoutingEnabled $false `
  -SourceTransportServers "<YOUR_EXCHANGE_SERVER>"
Exchange Admin Center (GUI):
- Navigate to Mail flow → Send connectors
- Click + to create a new connector
- Name: "To Stargate Relay"
- Type: Select "Internet"
- Network settings: Select "Route mail through smart hosts", add
<STARGATE_IP> - Smart host authentication: Select "None"
- Address space: Add
*(all domains) or specific external domains - Source server: Select your Exchange transport server(s)
Receive Connector (Stargate → On-Premises)¶
Create or modify a Receive connector to accept mail from Stargate:
Exchange Management Shell (PowerShell):
New-ReceiveConnector -Name "From Stargate Relay" `
  -Bindings "0.0.0.0:25" `
  -RemoteIPRanges "<STARGATE_IP>" `
  -TransportRole FrontendTransport `
  -Usage Custom `
  -AuthMechanism ExternalAuthoritative `
  -PermissionGroups ExchangeServers
Exchange Admin Center (GUI):
- Navigate to Mail flow → Receive connectors
- Click + to create a new connector
- Name: "From Stargate Relay"
- Type: Select "Frontend Transport"
- Network adapter bindings: Leave default or bind to specific IP
- Remote network settings: Remove the default
0.0.0.0-255.255.255.255and add only<STARGATE_IP> - Authentication: Check "Externally Secured"
- Permission groups: Check "Exchange servers"
Transport Rule (On-Premises)¶
Create a transport rule to redirect outbound mail through the Send connector:
Exchange Management Shell (PowerShell):
New-TransportRule -Name "Relay outbound via Stargate" `
  -SentToScope NotInOrganization `
  -RouteMessageOutboundConnector "To Stargate Relay" `
  -ExceptIfSenderIpRanges "<STARGATE_IP>"
Exchange Admin Center (GUI):
- Navigate to Mail flow → Rules
- Click + → "Create a new rule"
- Name: "Relay outbound via Stargate"
- Apply this rule if: "The recipient is located..." → "Outside the organization"
- Do the following: "Redirect the message to..." → "the following connector" → "To Stargate Relay"
- Except if: "The sender IP address is in..." → add
<STARGATE_IP>
Part 4: Stargate-Side Configuration¶
Automatic Configuration (Default)¶
By default, Stalwart automatically discovers where to deliver processed mail by looking up MX records for each domain configured via the dashboard's /mail page. It filters out its own hostname and uses the remaining MX entries as delivery targets.
This works when:
- Your domain has MX records pointing to both Stargate and Exchange
- Stargate has a higher-priority (lower number) MX record than Exchange
Manual Override via the dashboard¶
If you want all outbound mail from Stargate to go to a single Exchange endpoint (e.g. Exchange Online Protection), set the relay host through the dashboard's /mail page (e.g. [smtp.office365.com]). The dashboard sends the value to mtaconf's REST API and the daemon applies it to Stalwart.
Note
A single relay host sends all mail through one server and does not support per-domain routing. For multiple domains routing through different Exchange servers, use the per-domain relay map on the same dashboard page (configures sender_dependent_relayhost_maps under the hood) - see Multi-Domain Setup below.
Multi-Domain Setup¶
For setups with multiple domains and different Exchange servers (e.g. BALZ Informatik AG with 26 domains), use MX records for per-domain routing:
domain1.com    MX 10  exchange1.domain1.com
domain1.com    MX 20  stargate.domain1.com

domain2.com    MX 10  exchange2.domain2.com
domain2.com    MX 20  stargate.domain2.com
Each domain's MX records tell Stargate where to deliver processed mail for that specific domain.
Verify Stargate Configuration¶
After setup, verify the Stalwart configuration:
Check relay configuration¶
Check mail queue (should be empty when everything is working)¶
Send a test email and check logs¶
Troubleshooting¶
Mail not leaving Exchange Online¶
- Verify the transport rule is enabled (it is created in a disabled state)
- Check the rule conditions - it should apply to recipients "Outside the organization"
- Verify the outbound connector validation passed
- Check Exchange message trace in the Admin Center for delivery status
Mail loops (duplicate messages)¶
- Ensure the transport rule has the exception for the Stargate IP address
- Without this exception, mail from Stargate arriving at Exchange gets redirected back to Stargate
Stargate not accepting mail from Exchange¶
- Check port 25 is open on the Stargate server's firewall
- Verify SPF record includes the Stargate IP
- Check Stalwart logs:
docker logs stargate-stalwart
Exchange Online rejecting mail from Stargate¶
- Verify the inbound connector is configured with the correct Stargate IP
- Check that the Stargate IP hasn't changed
- Verify the connector is enabled (Status: On)
TLS Certificate Errors¶
Stargate uses opportunistic TLS with a self-signed certificate. The outbound connector in Exchange should be configured to accept "Any digital certificate, including self-signed certificates". If you see TLS-related errors:
- Verify the outbound connector security setting allows self-signed certificates
- For on-premises Exchange, ensure the Send connector does not require TLS (
-RequireTLS $false)
Validation fails during connector creation¶
The outbound connector validation requires:
- Stargate server is running and accepting connections on port 25
- The validation email address is valid for your domain
- Network path between Exchange Online and Stargate is open (no firewall blocking)
Quick Reference¶
| Component | Exchange Online Location | Purpose |
|---|---|---|
| Outbound Connector | Admin Center → Mail flow → Connectors | Route outbound mail to Stargate |
| Inbound Connector | Admin Center → Mail flow → Connectors | Accept mail from Stargate |
| Transport Rule | Admin Center → Mail flow → Rules | Trigger outbound connector for external recipients |
| DNS Record | Example | Purpose |
|---|---|---|
| A | mail IN A <STARGATE_IP> |
Point hostname to Stargate |
| MX (Stargate) | @ IN MX 15 mail.<YOUR_DOMAIN>. |
Inbound mail hits Stargate first |
| MX (Exchange) | @ IN MX 20 <DOMAIN>.mail.protection.outlook.com. |
Fallback / delivery target |
| SPF | ip4:<STARGATE_IP> and ip4:<HIN_SEALER_IP> added to existing TXT record |
Authorize Stargate and HIN sealer to send mail |
For the full DNS setup (including PTR, DMARC, DKIM, and multi-domain), see the DNS Setup Guide.
Stargate mail relay setup¶
Create a Stargate relay for a mail domain hosted in Microsoft Office 365¶
For the relay, we need a VM or a server with a real static IP address.
In this example we will use a VM with IP address 128.140.117.200 and hostname mail.vrgnservices.eu to relay mail for domain vrgnservices.eu.
Set up DNS records¶
See the DNS Setup Guide for complete instructions on all required records (A, MX, SPF, PTR, DMARC, DKIM).
Quick example for domain vrgnservices.eu with Stargate IP 128.140.117.200:
- A record:
mail.vrgnservices.eu→128.140.117.200 - MX record:
MX @ 15 mail.vrgnservices.eu.(higher priority than the existing Exchange MX at 20) - SPF record:
v=spf1 ip4:128.140.117.200 include:spf.protection.outlook.com -all
Verify:
# host -t mx vrgnservices.eu
vrgnservices.eu mail is handled by 20 vrgnservices-eu.mail.protection.outlook.com.
vrgnservices.eu mail is handled by 15 mail.vrgnservices.eu.
# host -t txt vrgnservices.eu|grep v=spf1
vrgnservices.eu descriptive text "v=spf1 ip4:128.140.117.200 include:spf.protection.outlook.com -all"
Install the Stargate docker compose containers¶
Requirements¶
- 2 CPU cores (minimum)
- 4 GB RAM (minimum)
- 20 GB storage (minimum)
- Root access: Must be run as root or with
sudo - Supported distributions:
- RHEL 8, 9 and 10 compatible distributions such as Alma Linux, Rocky Linux, CentOS Stream
- Ubuntu 22 and 24
- Debian 11, 12 and 13
- Real IPv4 address
- Valid DNS records: Your domain must have:
- MX records pointing to your mail servers
- SPF record defining allowed sending networks
The script installs all components and starts them. Mail domains and the Stalwart hostname are then configured at runtime via the dashboard's /mail page (the mtaconf daemon extracts the necessary mail relay settings from DNS based on those domains).
Set up Exchange¶
We need to configure connectors and a transport rule in Exchange to relay all outgoing mail to the Stargate relay and allow incoming mail from it.
Navigate to https://admin.exchange.microsoft.com/#/connectors
Outgoing connector¶
Create an outgoing mail connector, click "Add":
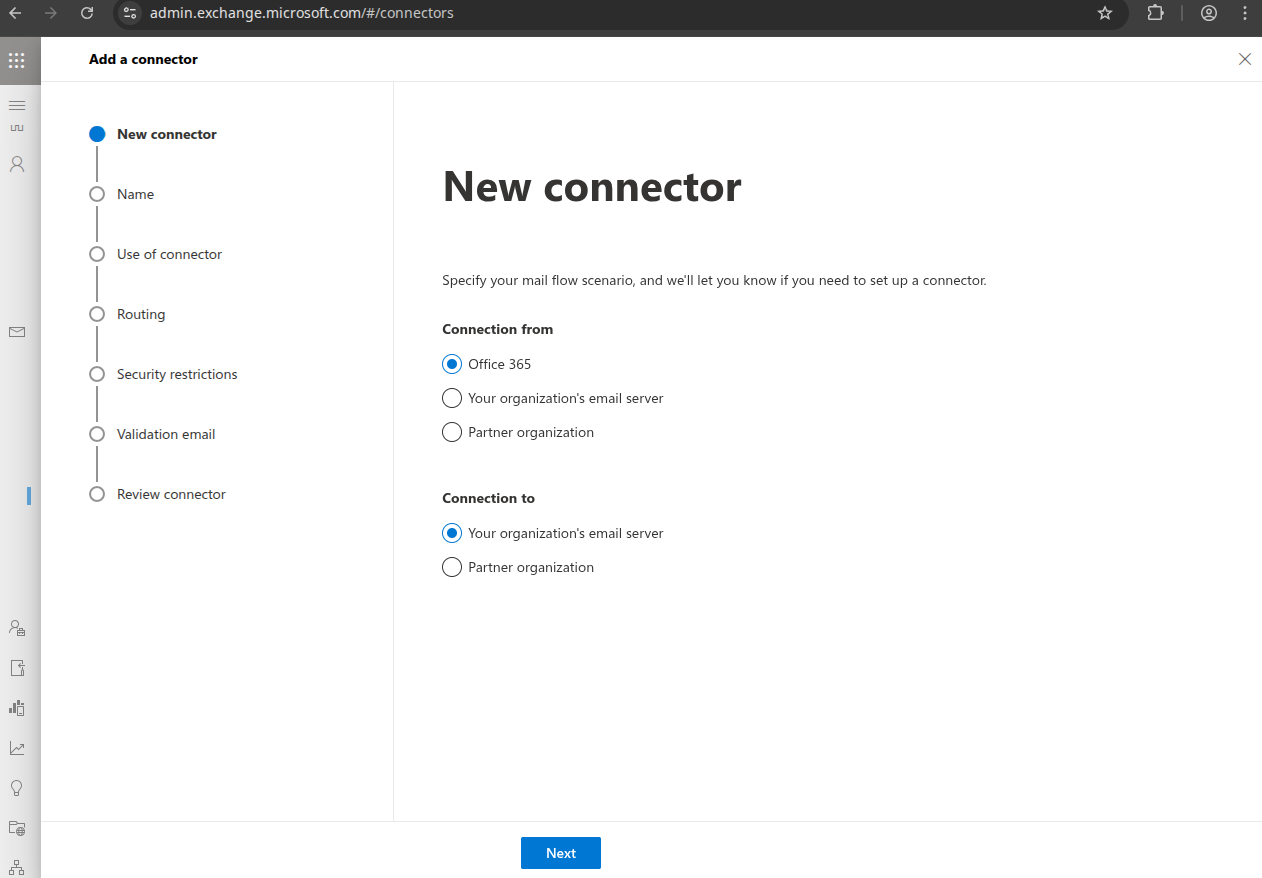
Select "Connection from": "Office 365" "Connection to": "your organization's email server", click "Next".
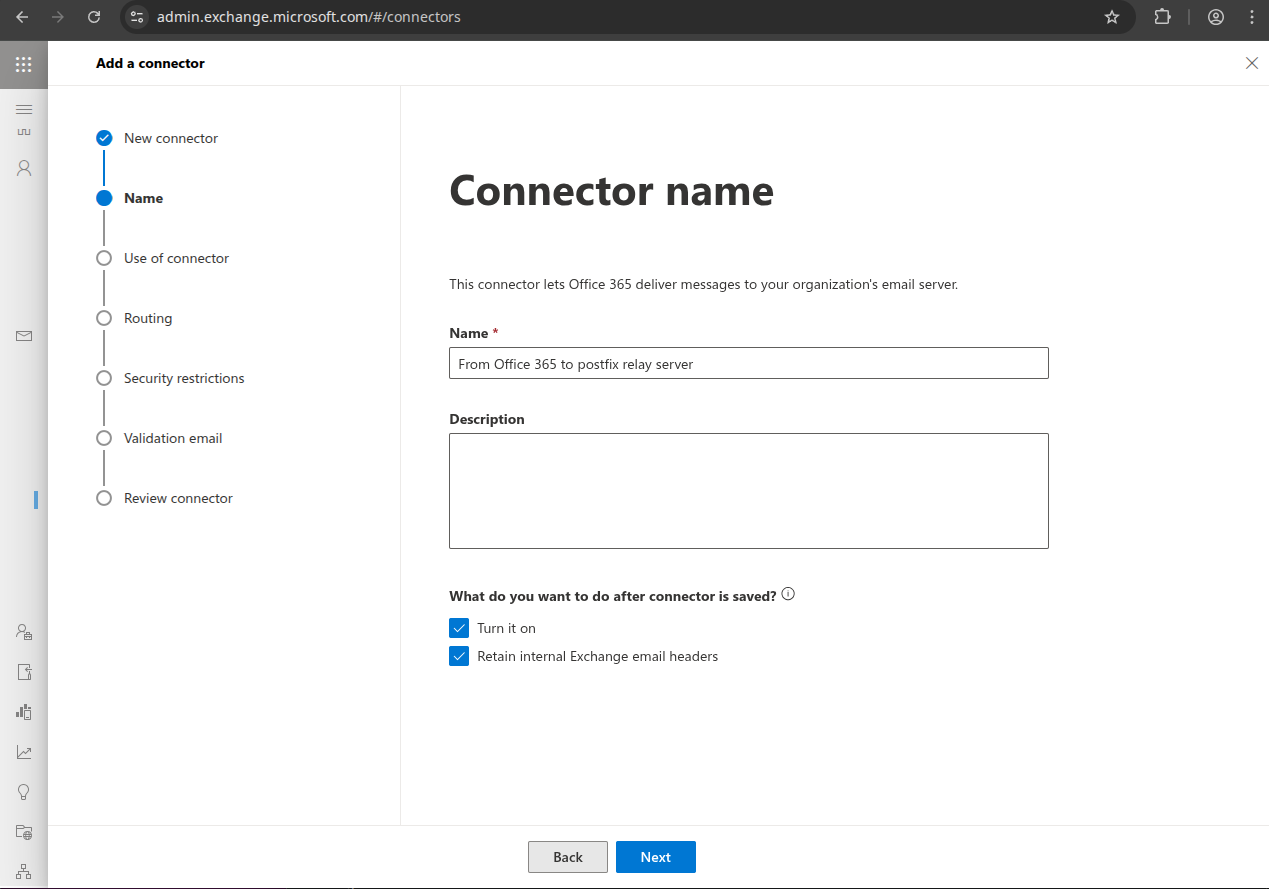
Name it something like "From Office 365 to Stargate relay server" and check "Retain Internal Exchange email headers", click "Next".
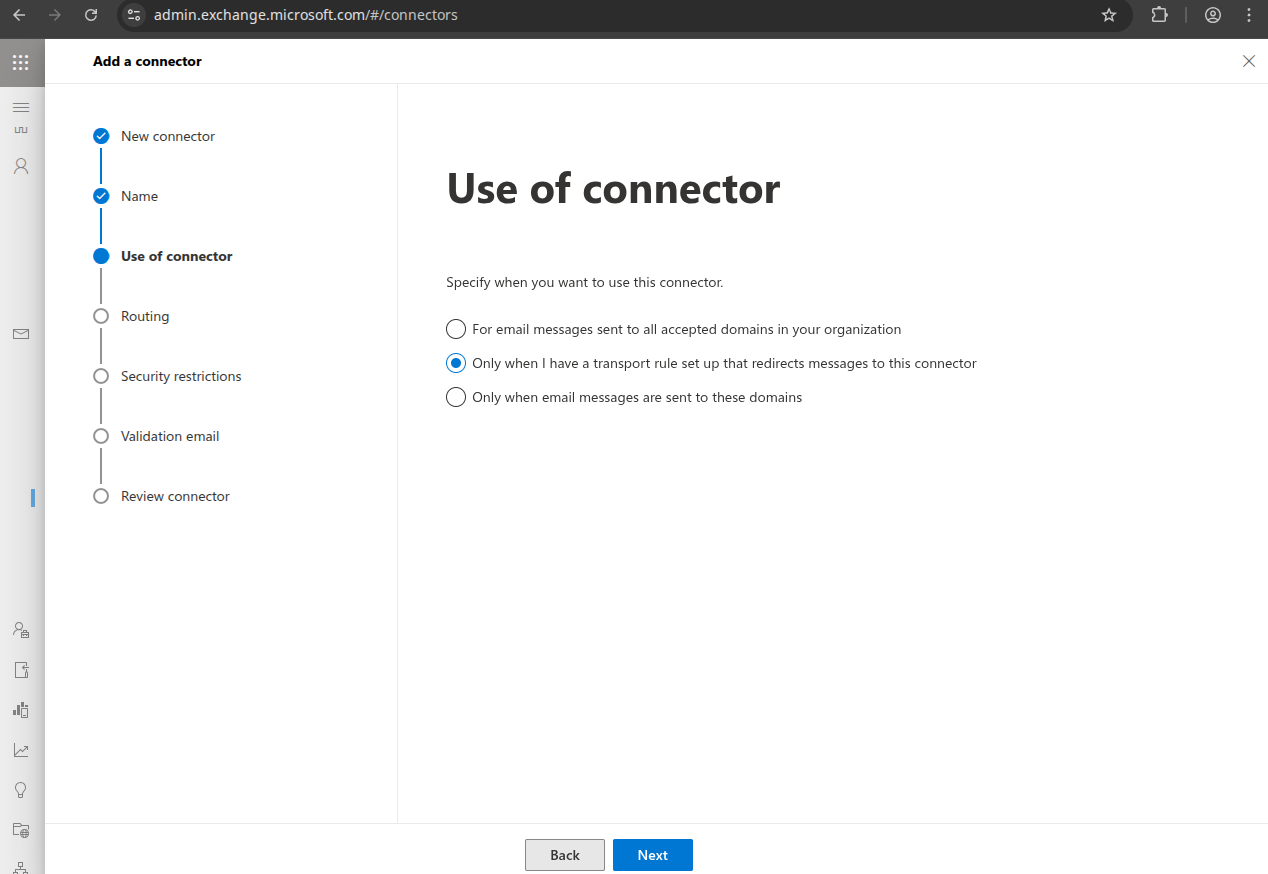
Select "Only when I have a transport rule set up that redirects messages to this connector", click "Next".
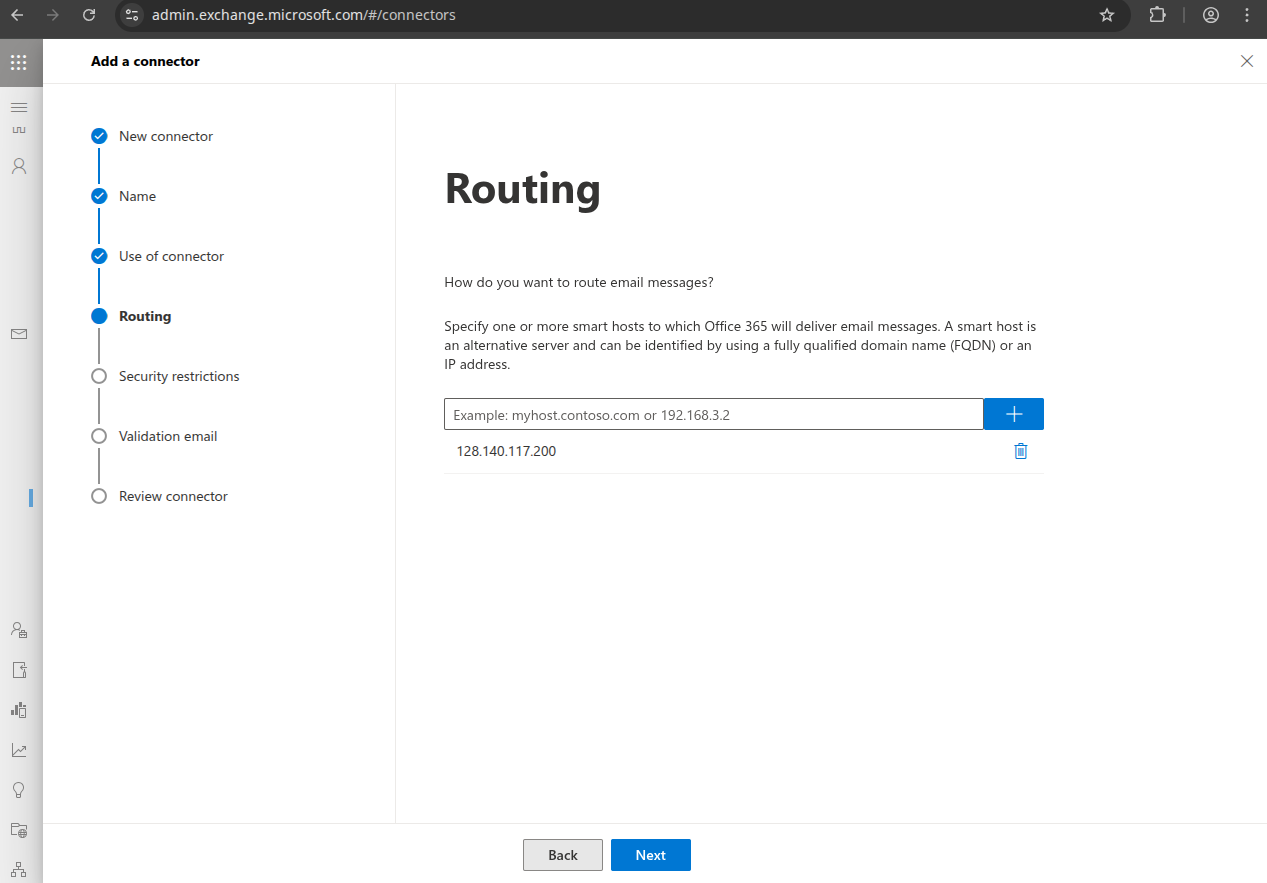
Enter the IP address of the Stargate relay server, click "+", click "Next".
Select "Any digital certificate, including self-signed certificates", click "Next".
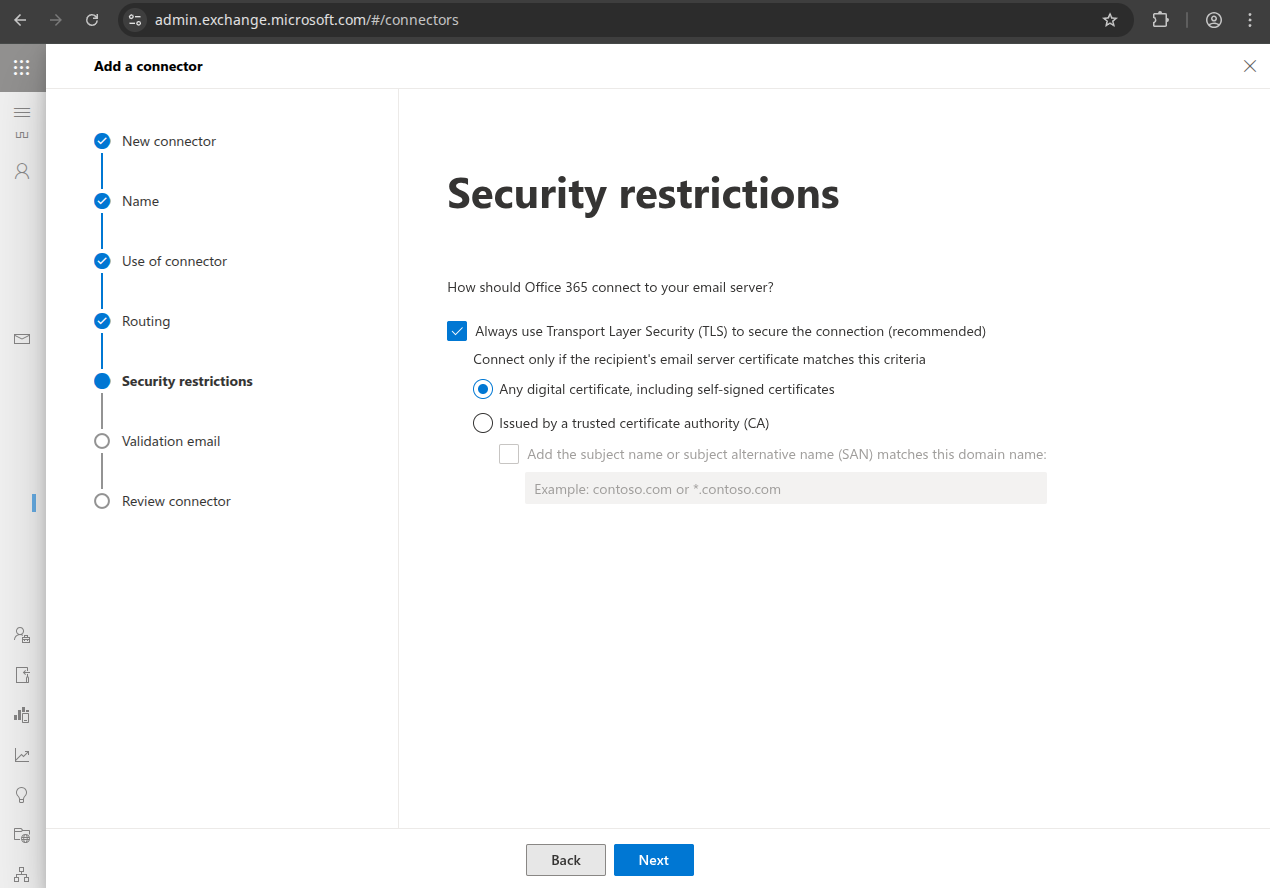
Enter a valid email address for your domain, click "+", click "Validate", click "Next".
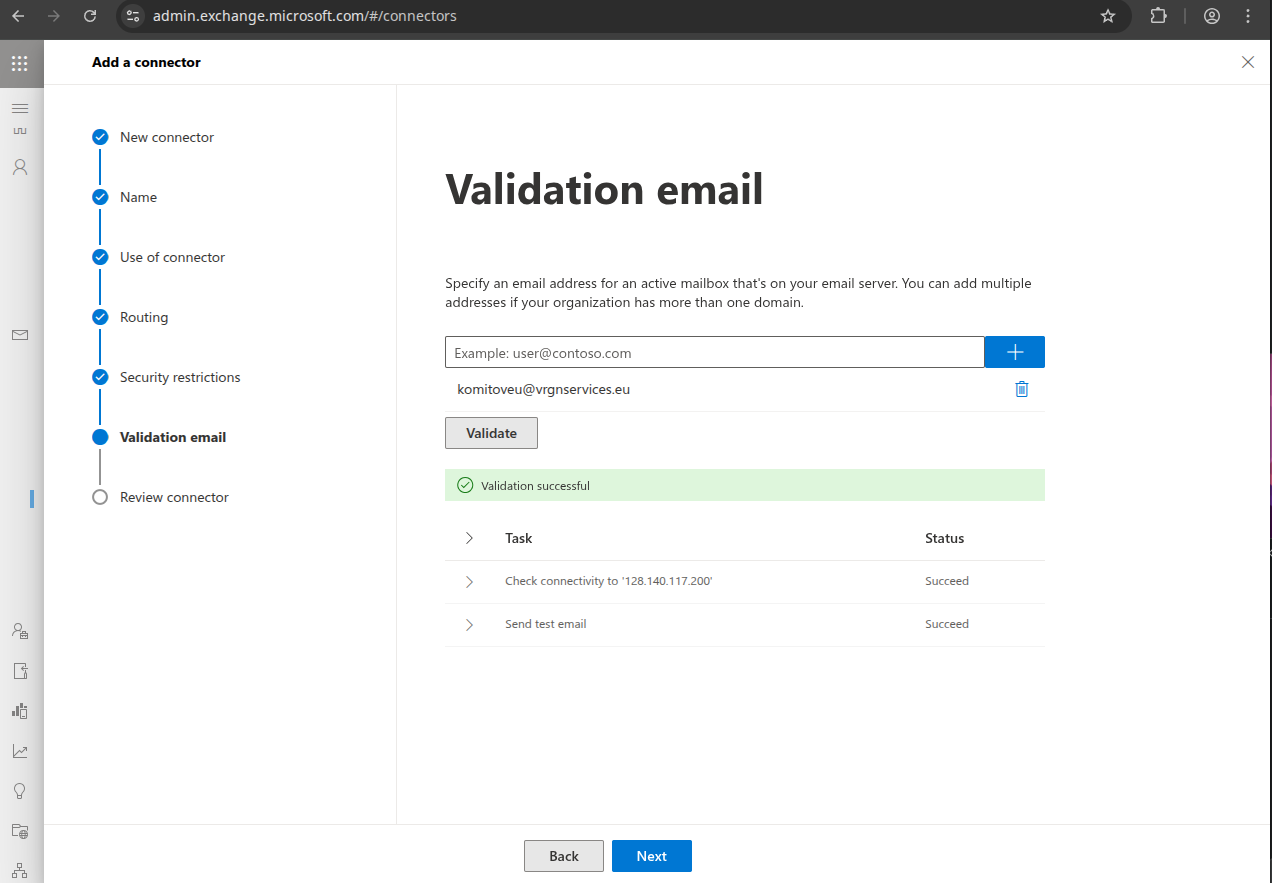
Click "Create connector".
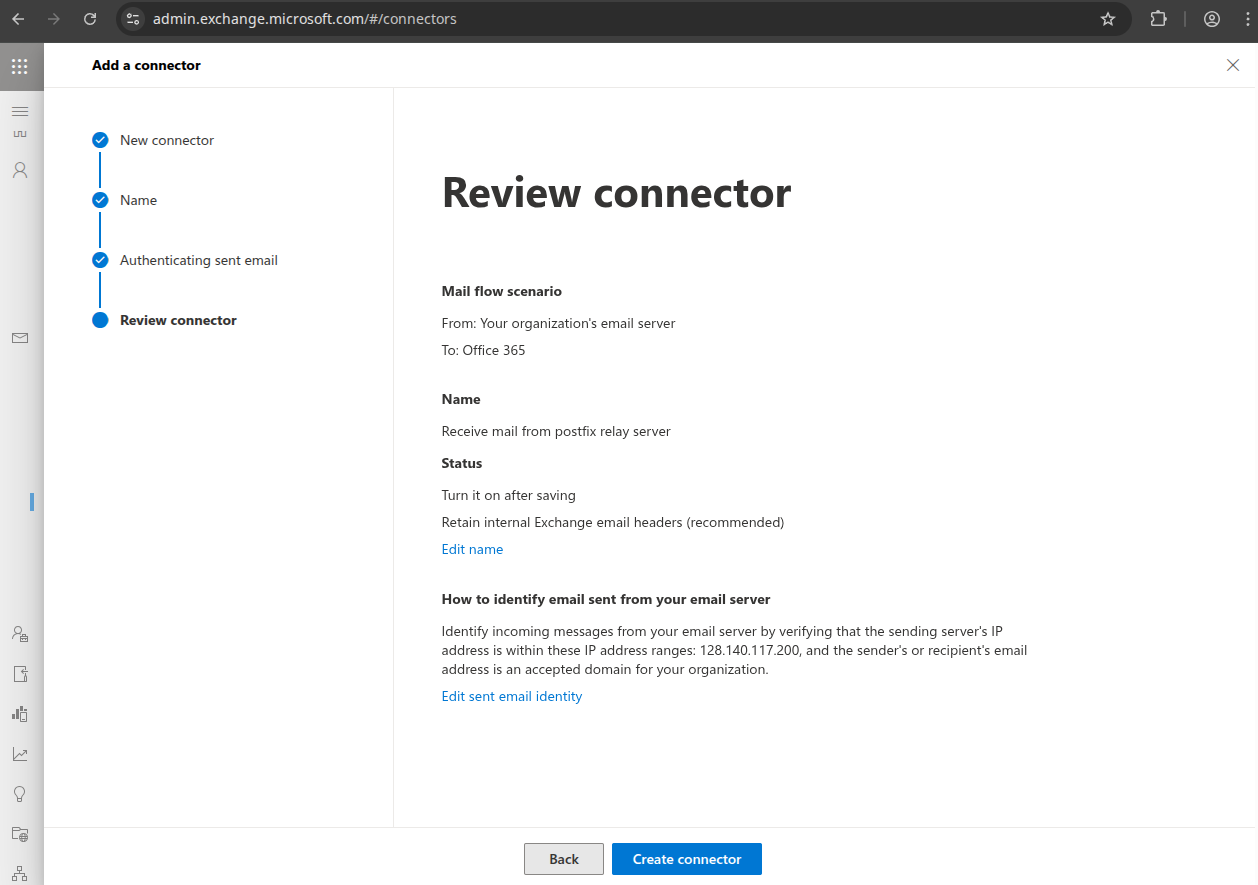
Click "Add another connector".
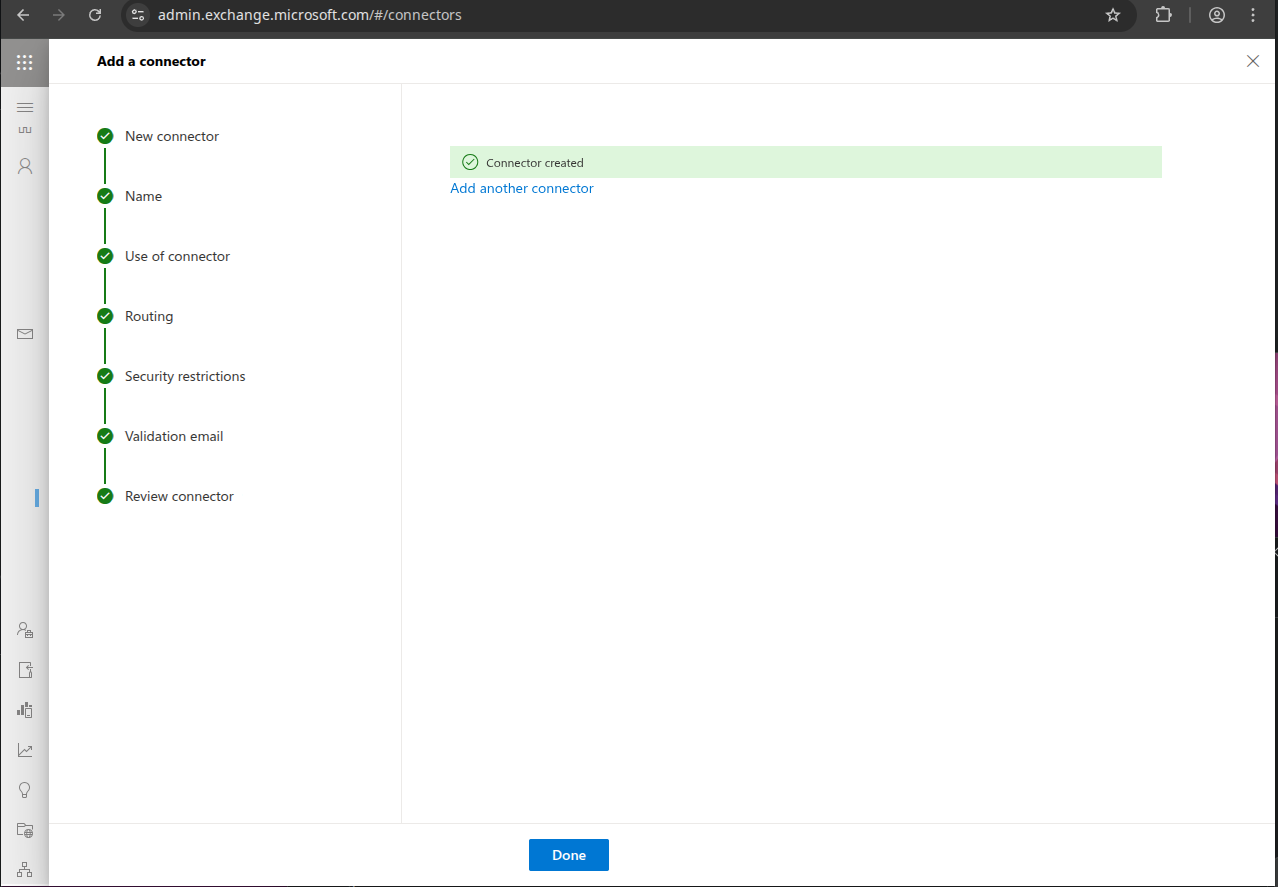
Incoming connector¶
Create an incoming mail connector, choose "Connection from": "Your organization's email server", click "Next".
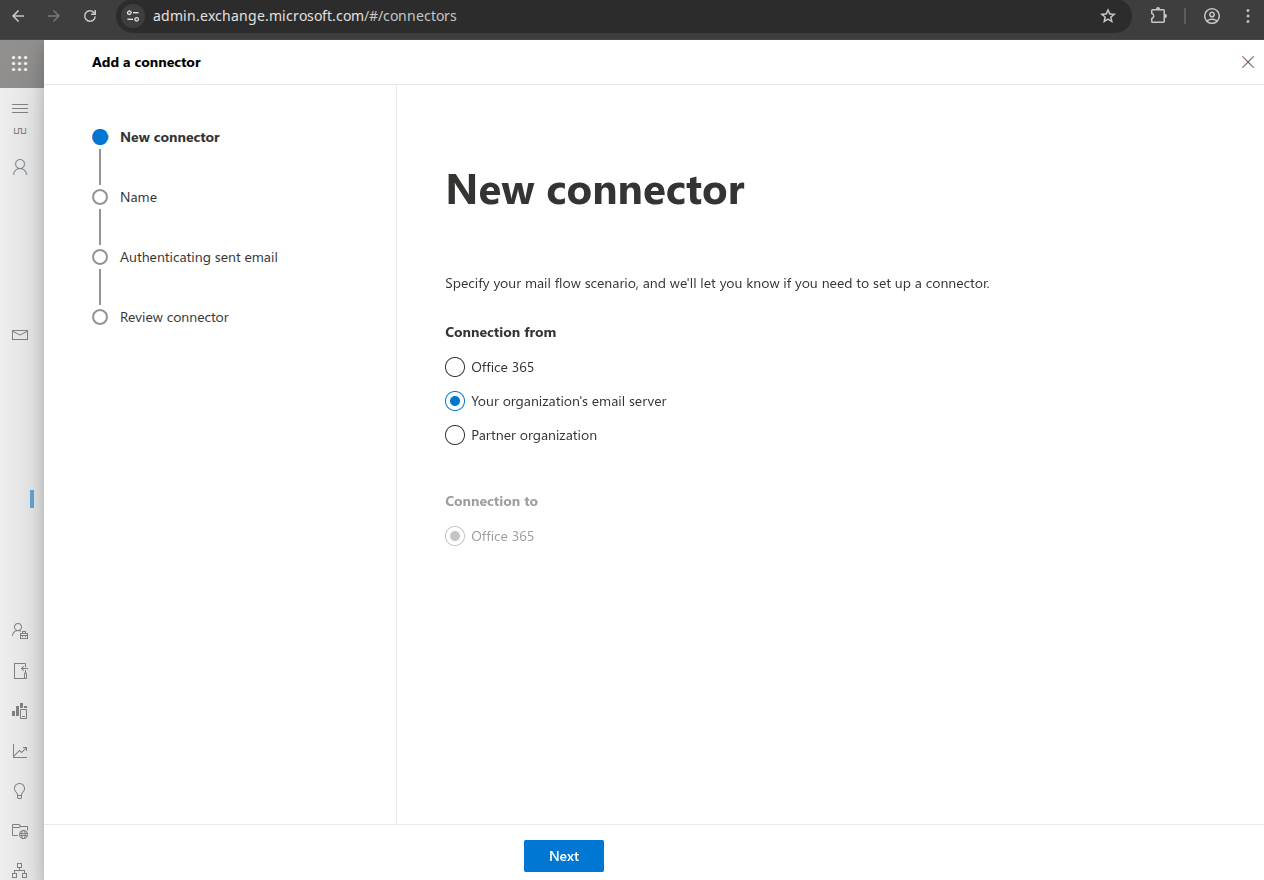
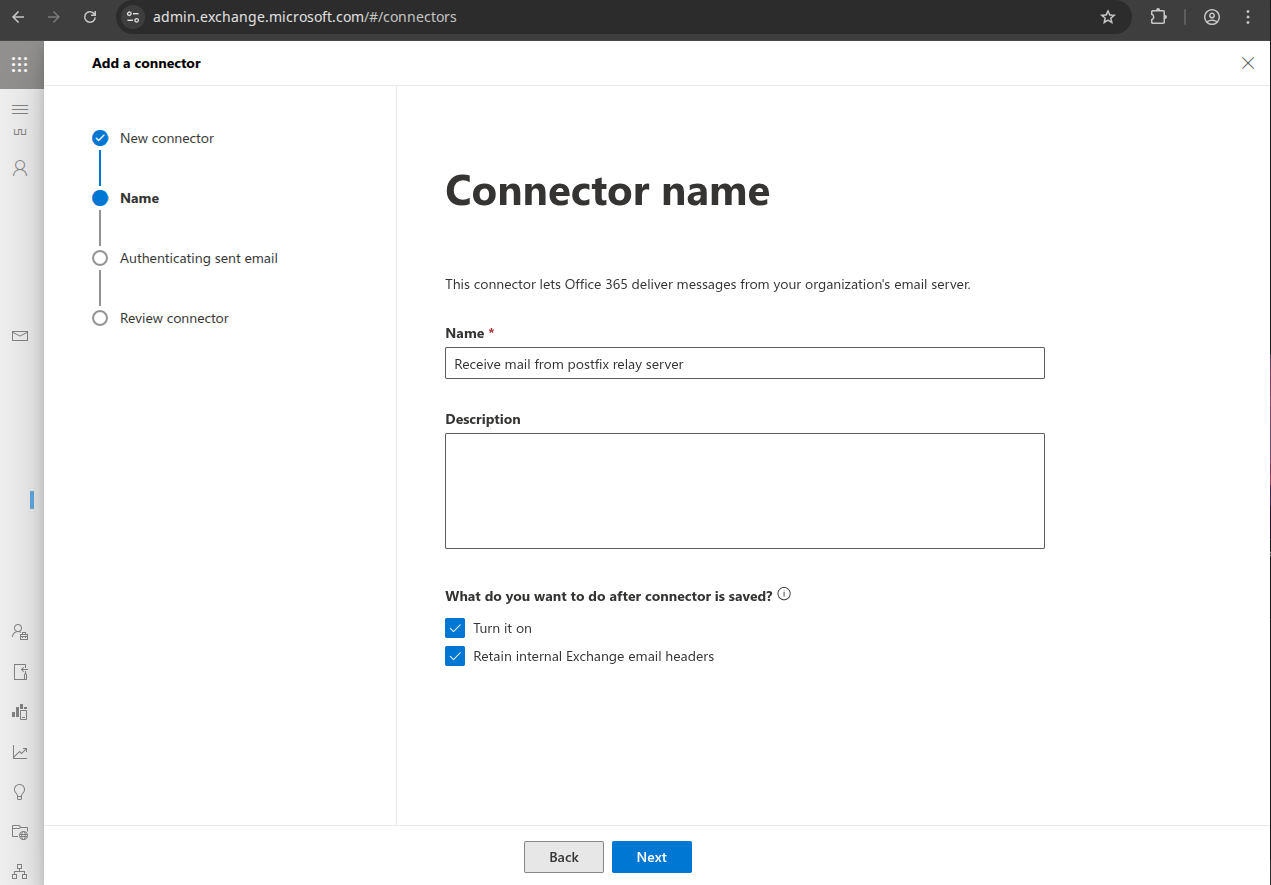
Name it something like "Receive mail from Stargate relay server" and check "Retain internal Exchange email headers", click "Next.
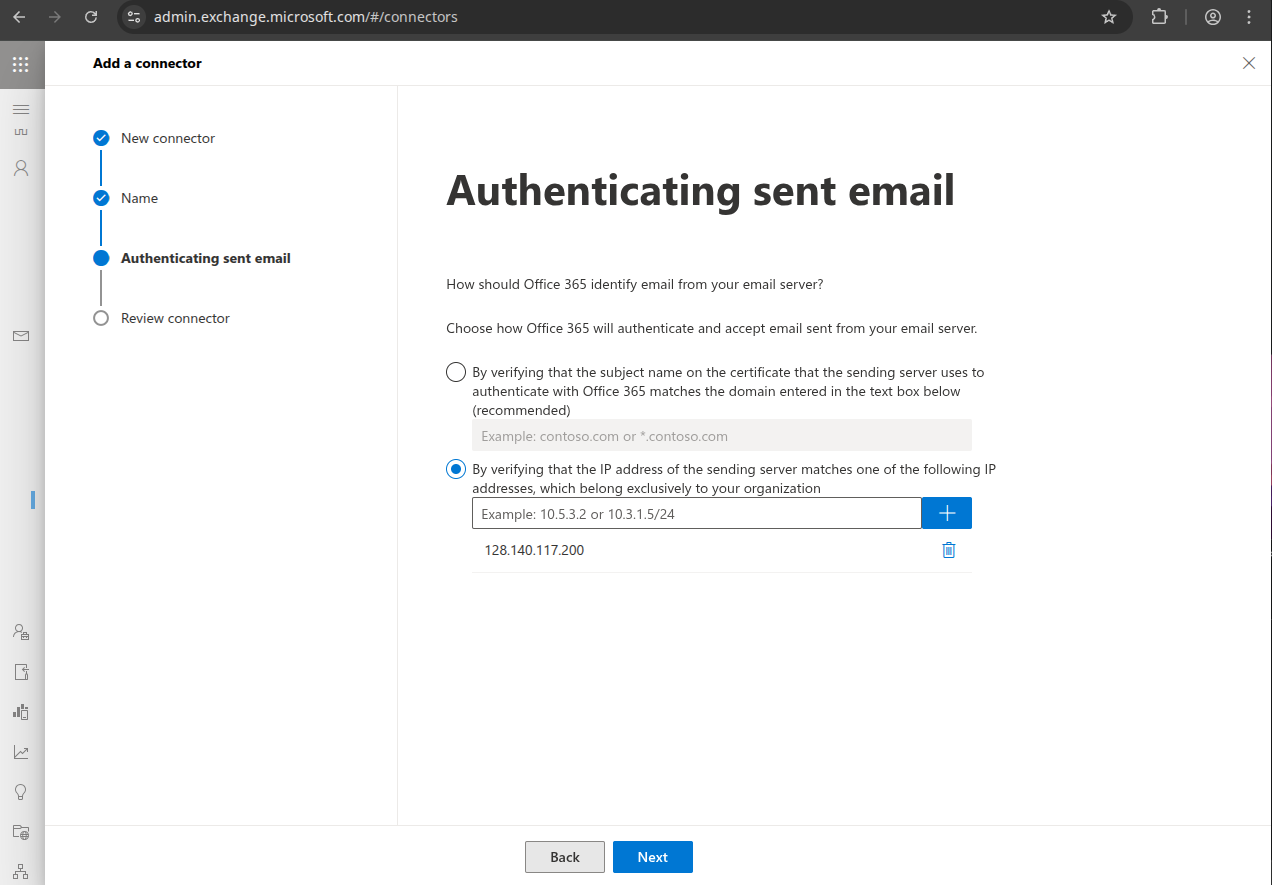
Select "By verifying that the IP address of the sending server matches one of the following IP addresses, type the IP address of the Stargate server, click "+", click "Next".
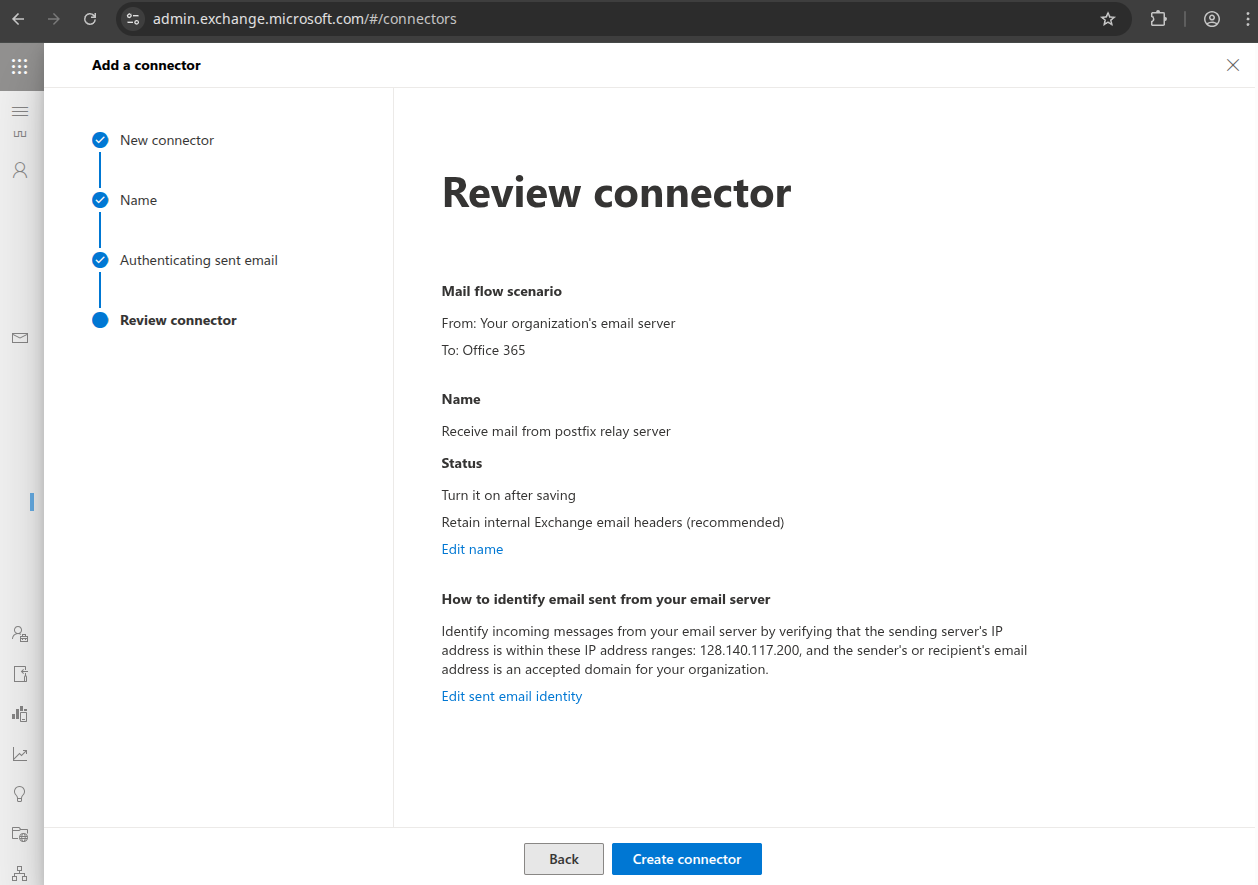
Click "Create connector".
Click "Done".
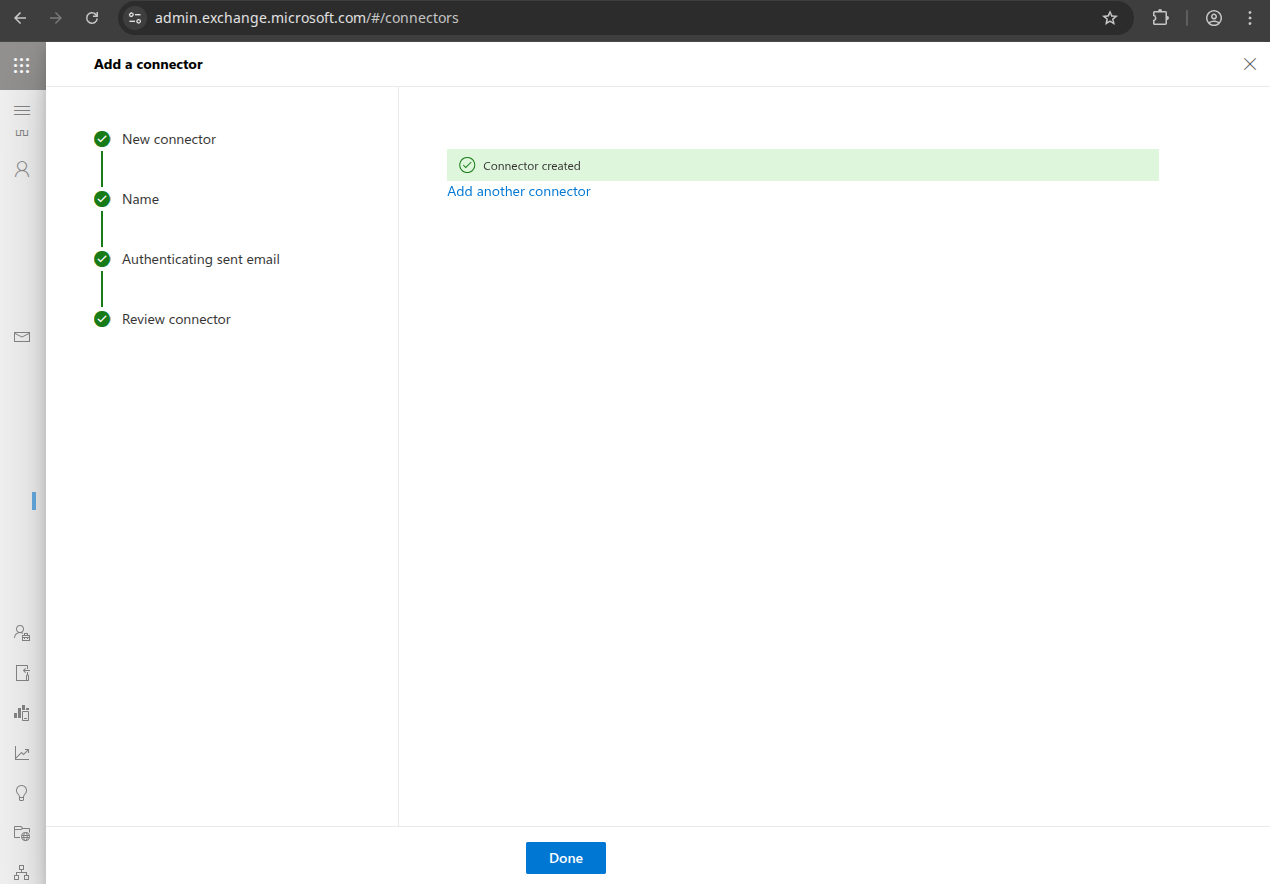
This is how it looks when done:
Transport Rule¶
Create the transport rule. Navigate to https://admin.exchange.microsoft.com/#/transportrules
Click "+Add a rule" → "Create a new rule".
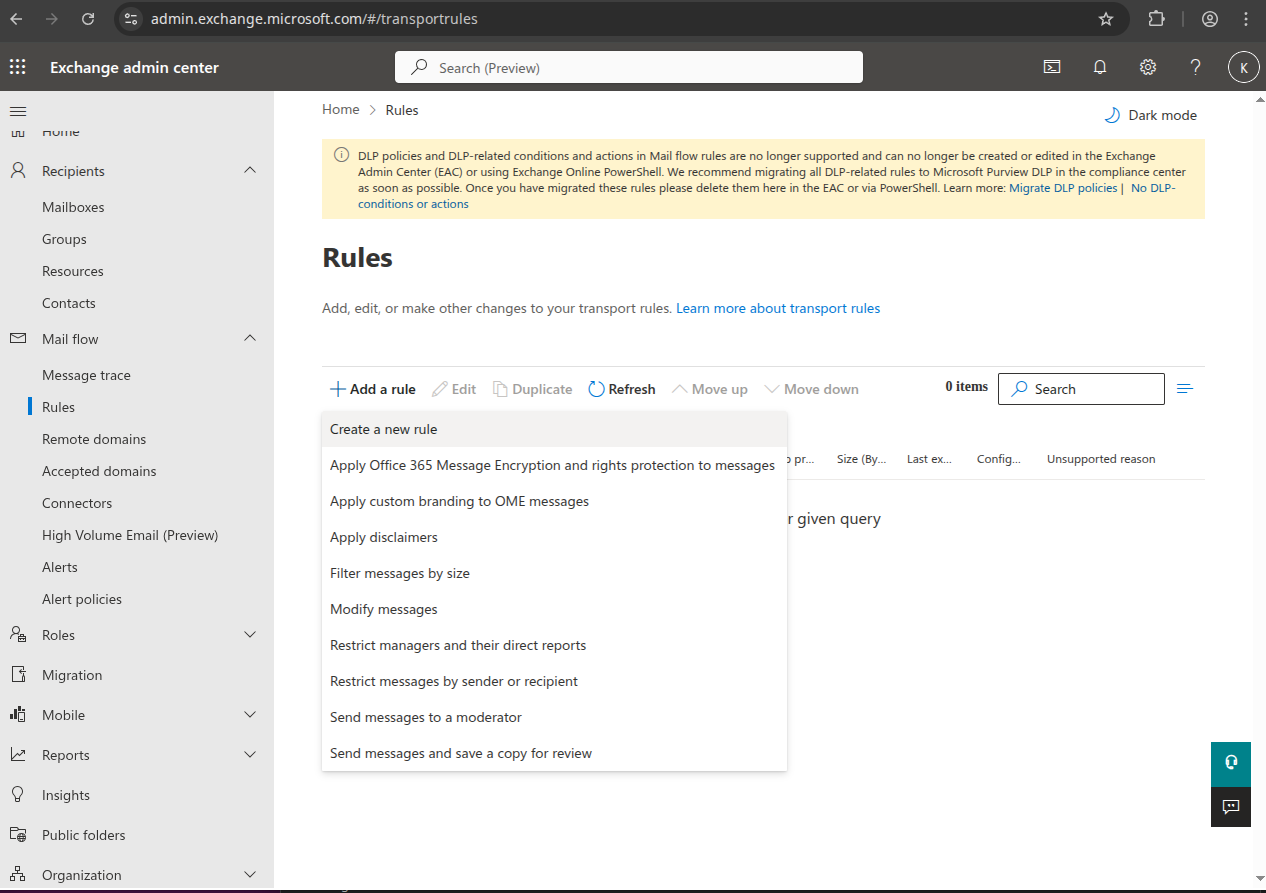
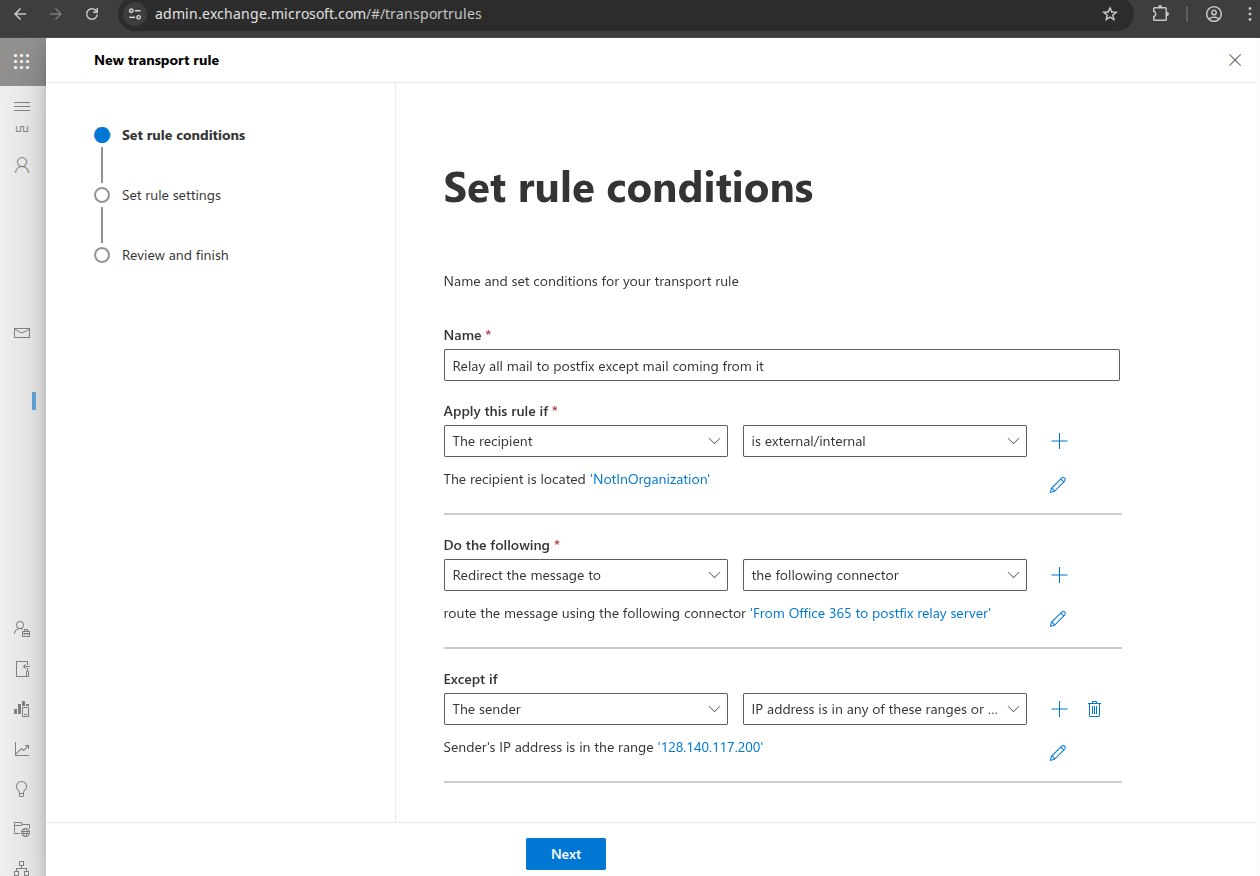
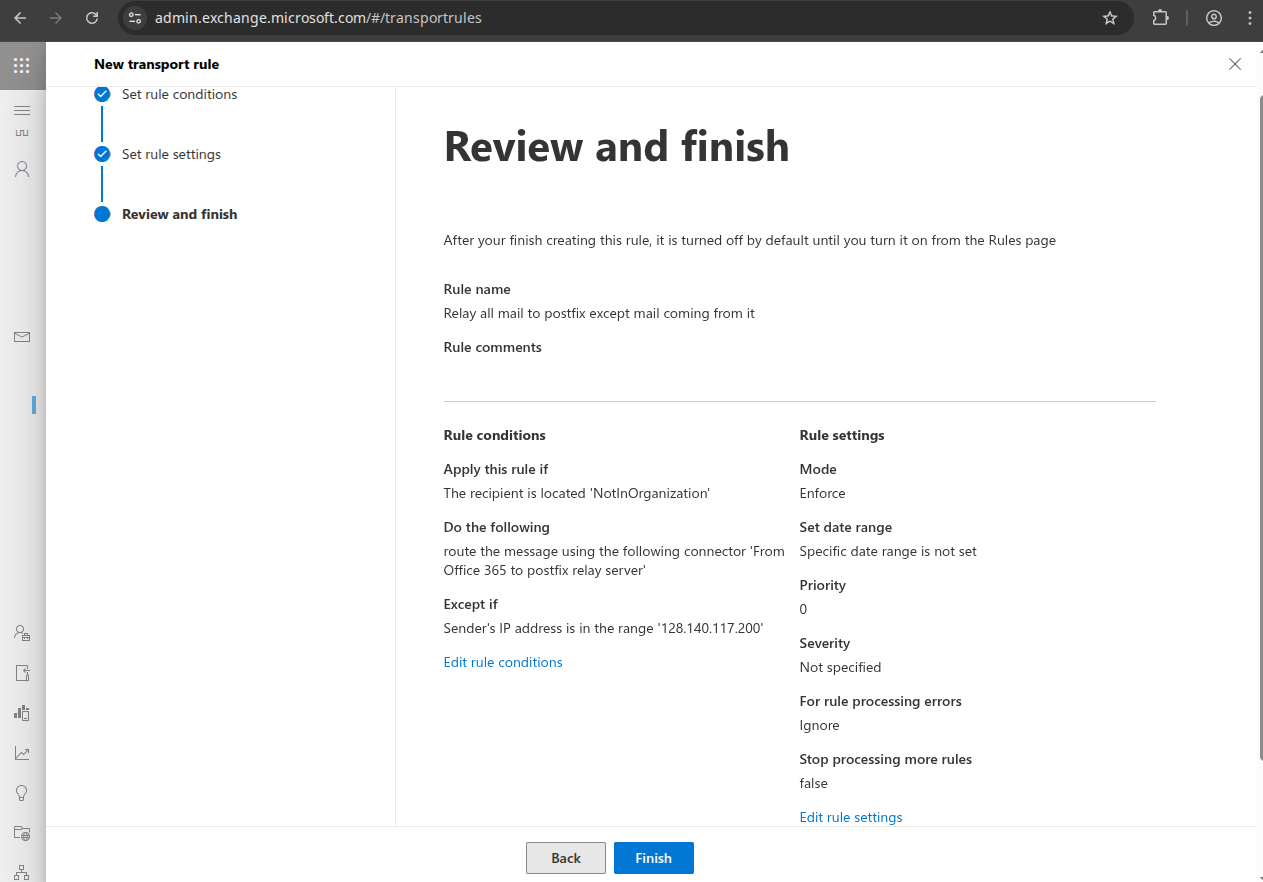
Name it something like "Relay all mail to Stargate except mail coming from it", choose "Apply rule if" "The recipient:" "is external/internal" "Outside the organization", click "Save".
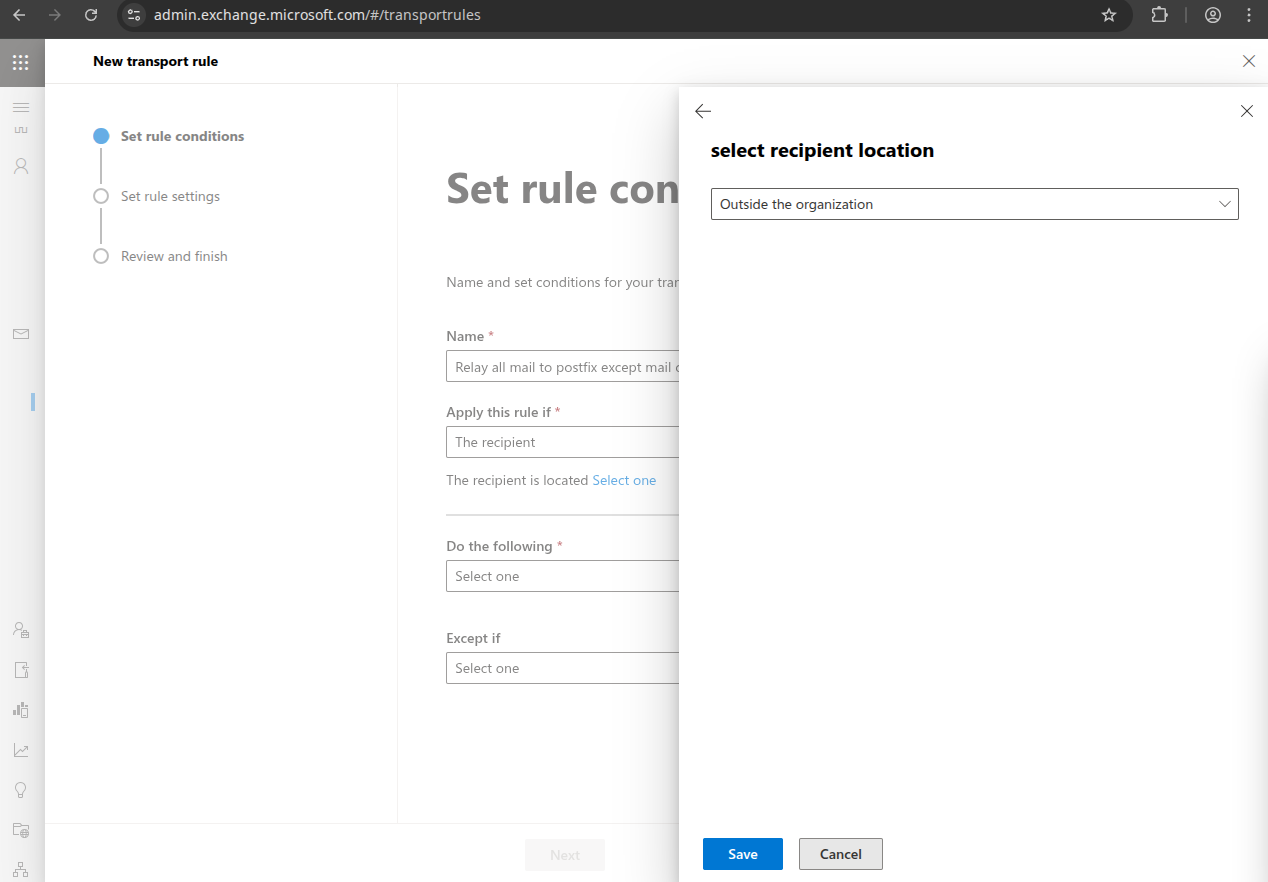
Choose "Do the following" "Redirect message to the following connector" "From Office 365 to Stargate relay server", click "Save".
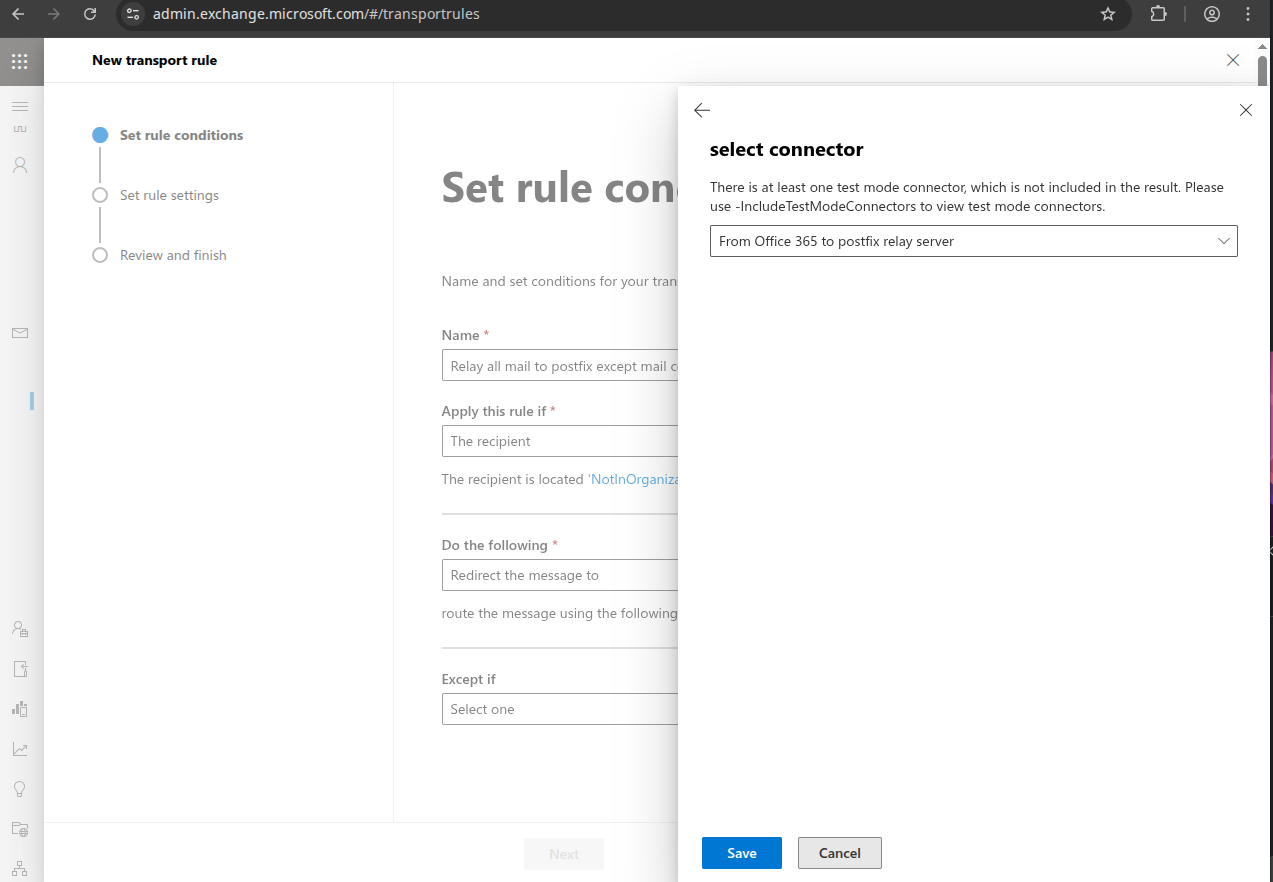
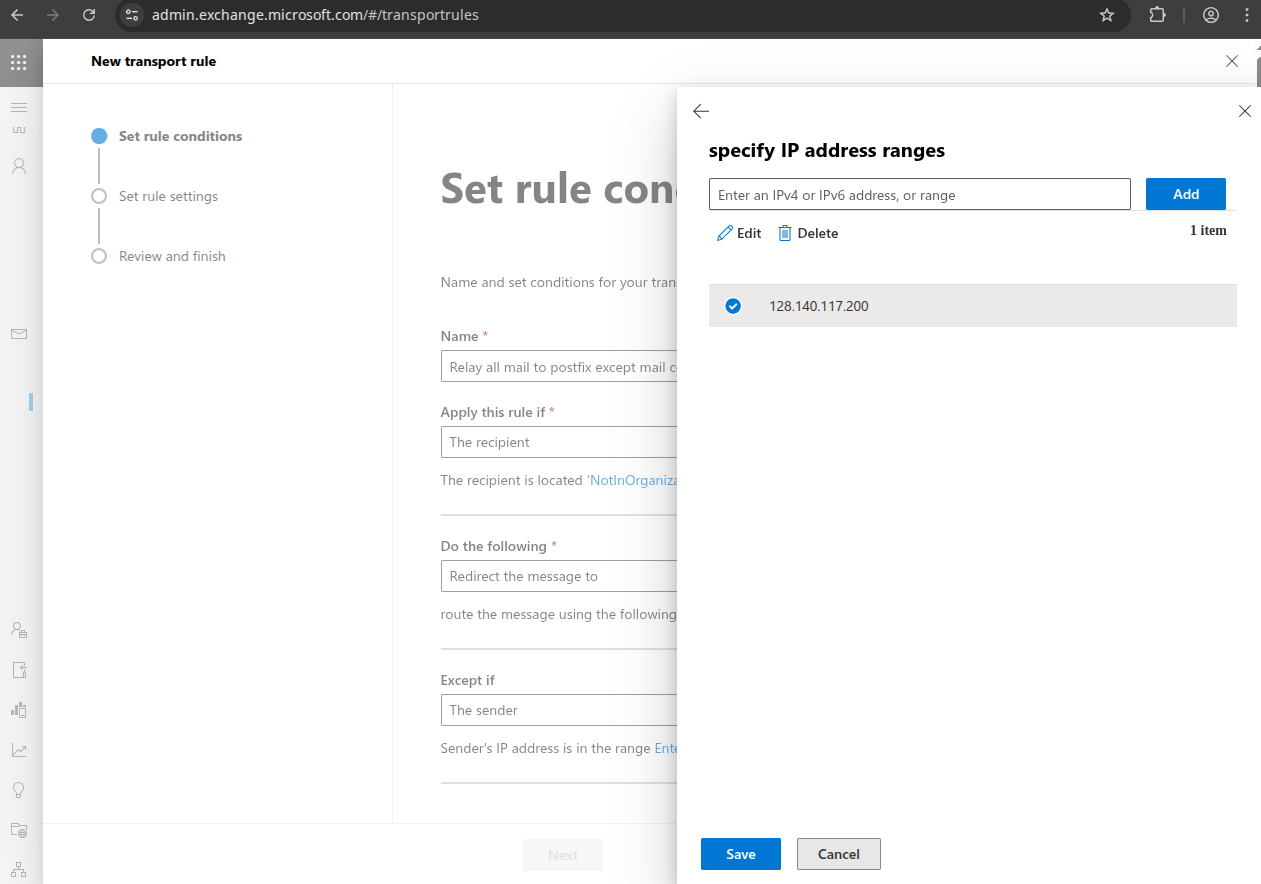
Choose "Except if The sender IP address is in any of these ranges" enter the IP address of the Stargate server, click "Add", check the IP address and click "Save".
This is needed to prevent mail loops, as this rule also applies to other domains hosted in Office 365.
Now it should look like this, click "Next":
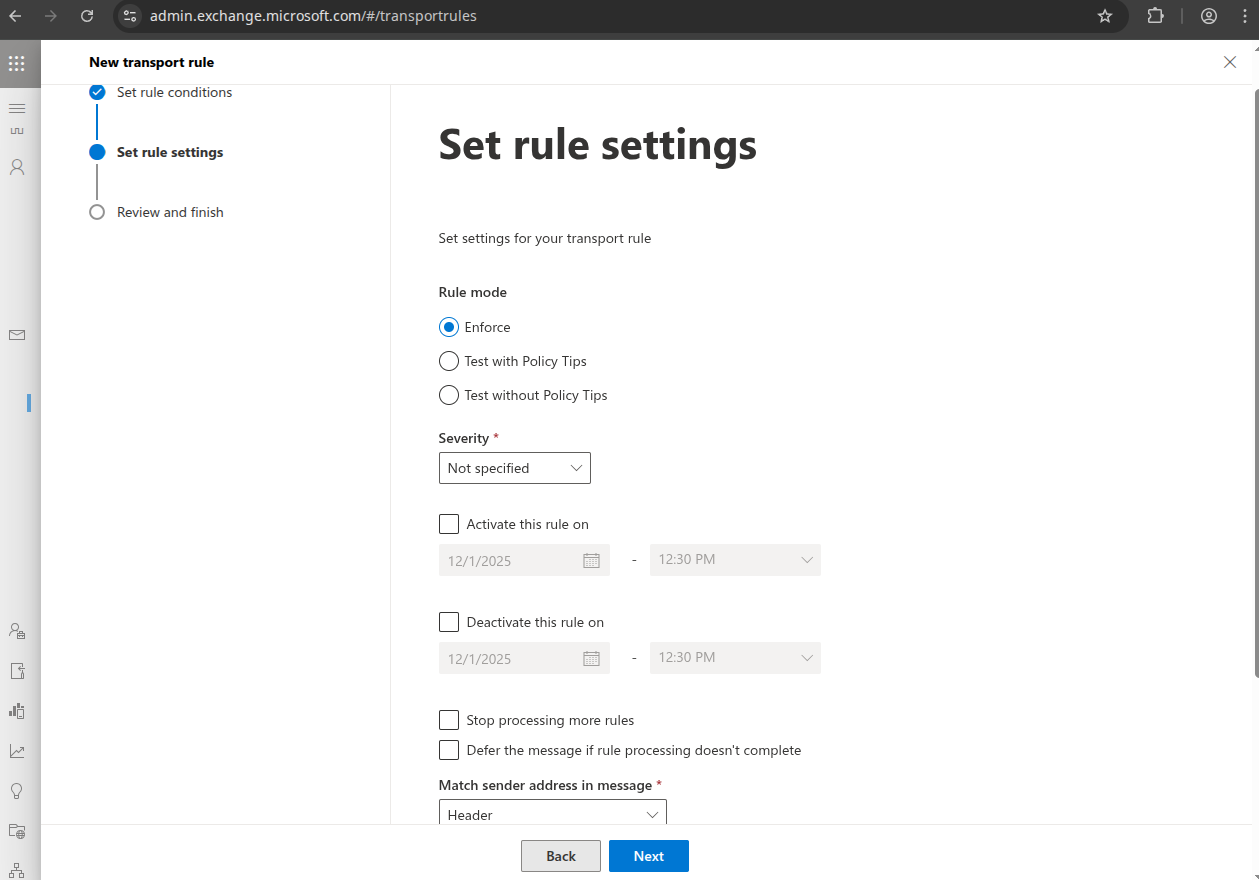
Click "Next".
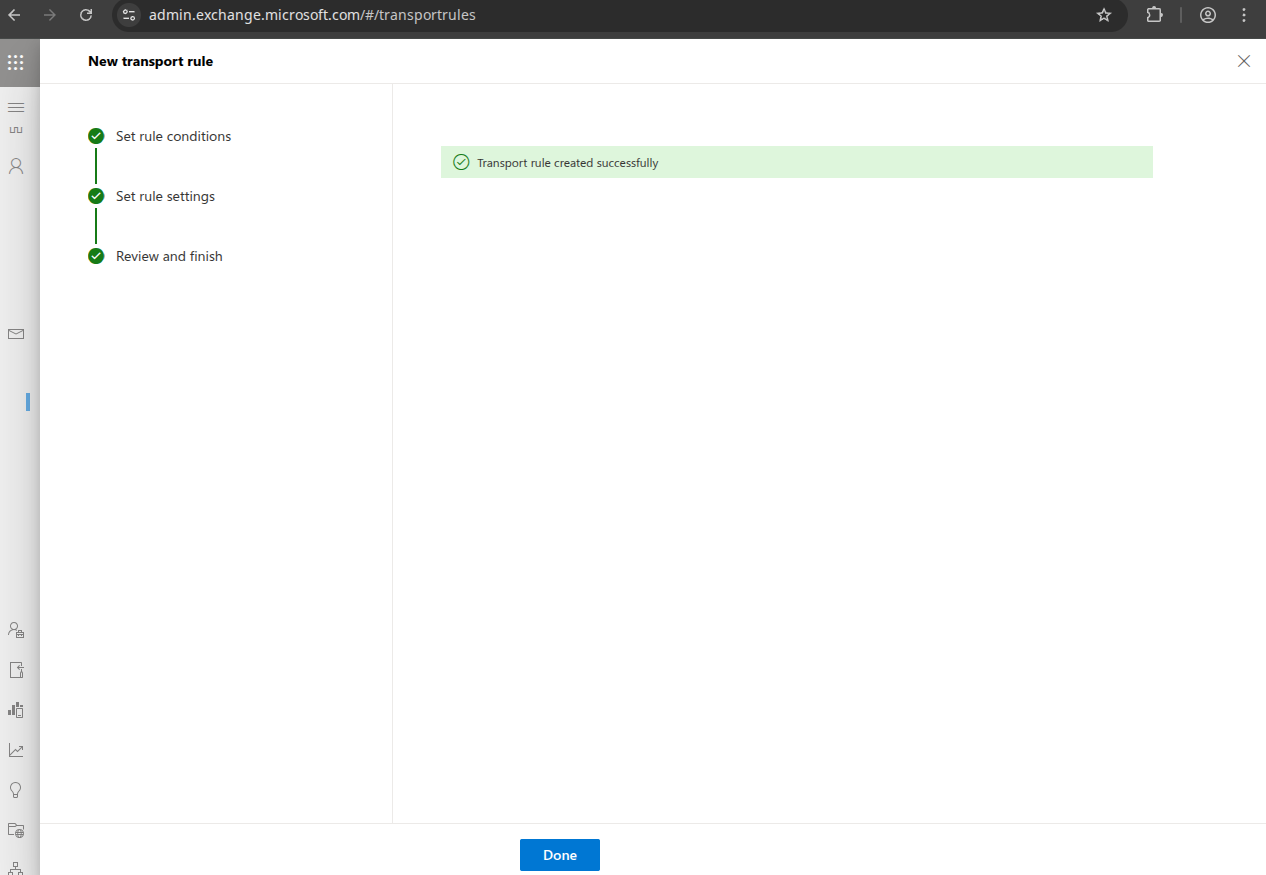
Click "Finish".
Click "Done".
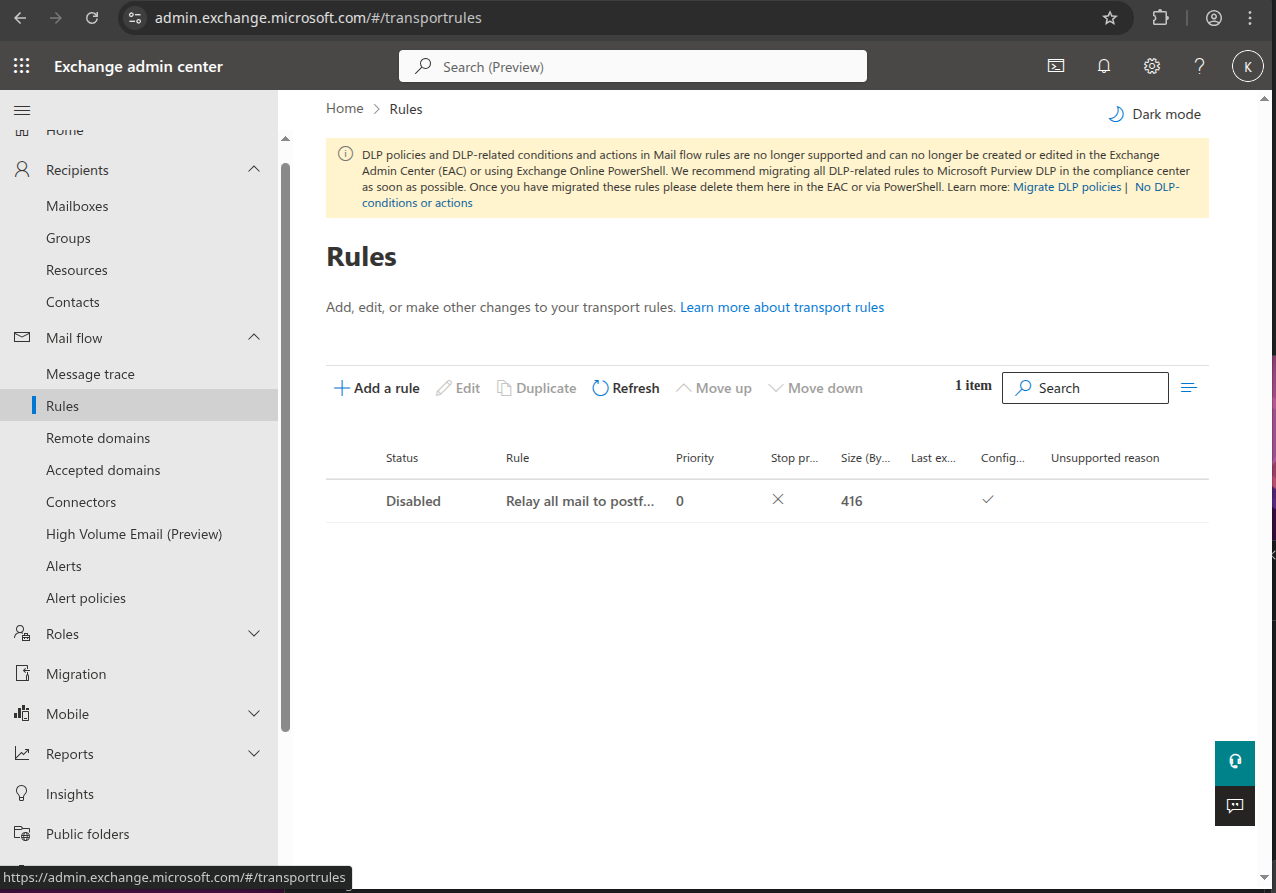
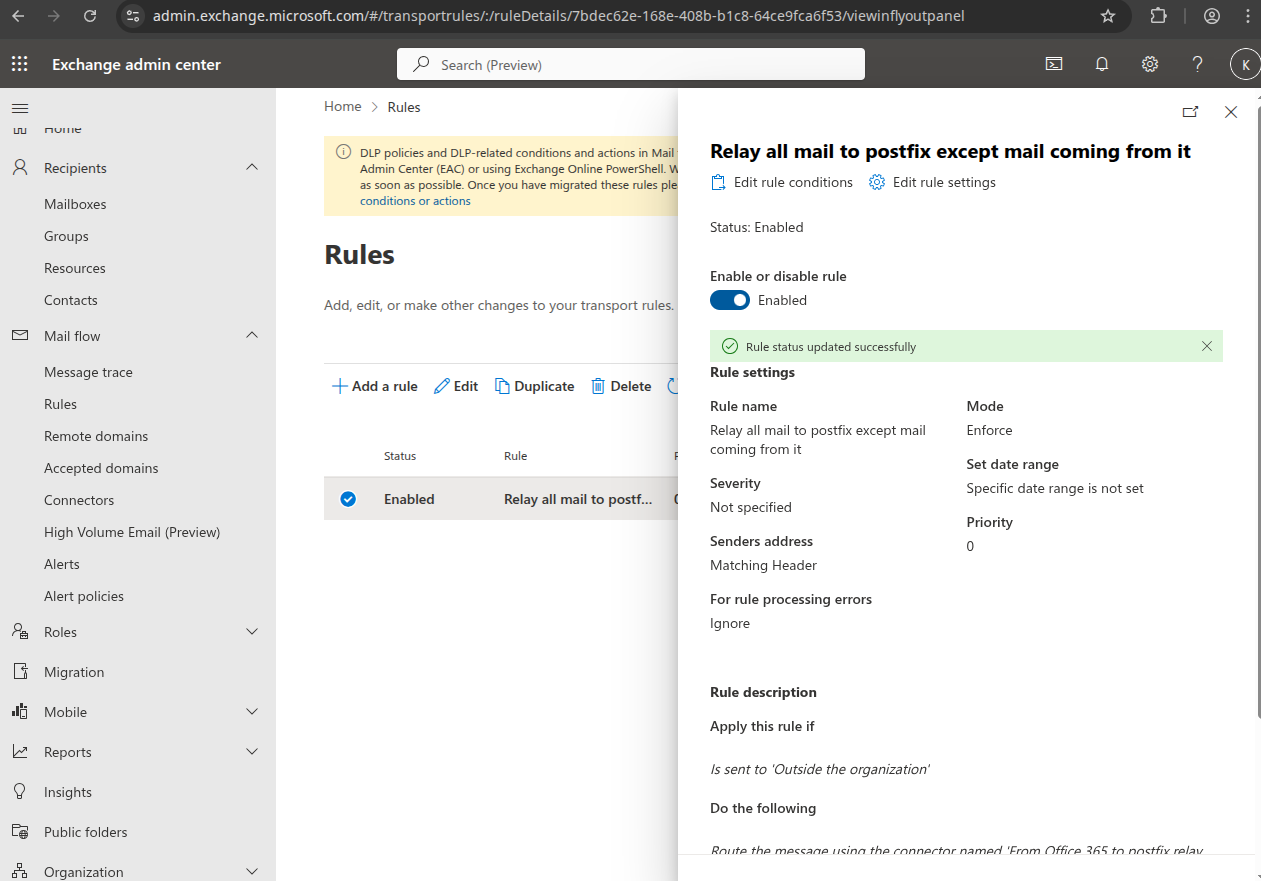
Click on the rule and set the "Enable or disable rule" to "Enabled"
DNS Setup for Stargate¶
This guide covers all DNS records required for a working Stargate deployment. Configure these records before installing Stargate or immediately after, depending on the record type.
Throughout this guide:
<STARGATE_IP>- your Stargate server's public static IP address (SERVER_STATIC_IPincustomer-config.sh)<MAIL_HOSTNAME>- the FQDN of the Stargate relay (e.g.mail.example.ch; configured via the dashboard's/mailpage)<YOUR_DOMAIN>- your mail domain (e.g.example.ch; configured via the dashboard's/mailpage)
Record Summary¶
| Record | Name | Value | Required | When |
|---|---|---|---|---|
| A | <MAIL_HOSTNAME> |
<STARGATE_IP> |
Yes | Before install |
| MX | <YOUR_DOMAIN> |
<MAIL_HOSTNAME> (priority 15) |
Yes | Before install |
| SPF | <YOUR_DOMAIN> |
ip4:<STARGATE_IP> added to TXT |
Yes | Before install |
| PTR | <STARGATE_IP> |
<MAIL_HOSTNAME> |
Recommended | Before install |
| DMARC | _dmarc.<YOUR_DOMAIN> |
v=DMARC1; p=none; ... |
Recommended | After install |
| DKIM | selector._domainkey.<YOUR_DOMAIN> |
From M365/provider | Recommended | After install |
For multi-domain deployments, repeat the MX, SPF, DMARC, and DKIM records for each domain listed in MAIL_DOMAINS.
Required Records¶
A Record¶
Create an A record pointing the Stargate mail hostname to the server's public IP:
Example:
If the Stargate has an IPv6 address, add an AAAA record as well:
Why: External mail servers connect to this hostname to deliver mail. Without the A record, the MX record below is unresolvable.
MX Records¶
Add an MX record for the Stargate with a higher priority (lower number) than the existing mail server. This ensures inbound mail reaches the Stargate first for S/MIME processing before being forwarded to Exchange or your mail platform.
Keep the existing Exchange / mail server MX record at a lower priority (higher number):
Example (complete MX set):
Info
The lower MX number means higher priority. Stargate at priority 15 receives mail before Exchange Online at priority 20.
Why: The Stargate intercepts inbound mail, processes S/MIME, then forwards to the next MX (Exchange). The second MX record is also used by Stalwart to know where to relay processed mail.
Important: If the Stargate is the only MX record for a domain, Stalwart will filter out its own hostname and have no delivery target. Always keep a second MX pointing to your actual mail server.
SPF Record¶
Add the Stargate server IP and the HIN sealer IP to your domain's SPF record so outbound mail relayed through it passes SPF checks at the recipient's end.
If you use M365 / Exchange Online:
<YOUR_DOMAIN>. TXT "v=spf1 ip4:<STARGATE_IP> ip4:<HIN_SEALER_IP> include:spf.protection.outlook.com -all"
If you do not use M365 / Google Workspace:
Example:
example.ch. TXT "v=spf1 ip4:128.140.117.200 ip4:193.247.208.66 include:spf.protection.outlook.com -all"
Why the HIN sealer IP is required
When the Stargate produces a SEAL'd (encrypted) message for a non-HIN recipient, the final outbound hop to the recipient is the HIN sealer, not your Stargate or M365. Without the sealer IP in your SPF record, every SEAL'd outbound message will fail SPF at the recipient and - because there is no DKIM signature on the SEAL'd payload - DMARC will fail too. Strict-DMARC recipients (Gmail, Outlook with p=reject enforcement, Proofpoint) will reject or junk the message.
Sealer IPs to add in SPF:
| Environment | Sealer host | IP to add to SPF |
|---|---|---|
| HIN Test (alpha/beta) | mx3.hintest.ch |
193.247.208.66 |
| HIN Production | TBD - request canonical list from HIN before go-live | TBD |
If HIN publishes more than one sealer host (e.g. mx1, mx2, mx3), include all their IPs. Resolve them with dig +short mx hintest.ch followed by dig +short A <each-mx>. Until you have the full list, leave the SPF policy at ~all (softfail) instead of -all (hardfail) so that legitimate SEAL mail through any unlisted sealer IP is not outright rejected.
SPF lookup limit
The total include: chain in an SPF record must stay under 10 DNS lookups. Adding ip4: entries does not count toward this limit. Check your count with MXToolbox SPF lookup.
How the Stargate uses SPF: The mtaconf daemon resolves each domain's SPF record to auto-populate the list of IPs allowed to relay through the Stargate without authentication. This is how Microsoft 365 outbound IPs get whitelisted automatically - they appear in the include:spf.protection.outlook.com chain.
Recommended Records¶
PTR (Reverse DNS)¶
Configure the reverse DNS (PTR) record for the Stargate IP to match <MAIL_HOSTNAME>:
This is configured at your hosting provider (Hetzner, Azure, AWS, etc.), not in your domain registrar's DNS panel. Most providers have a "Reverse DNS" or "rDNS" setting in the server/IP management page.
Why: Many receiving mail servers (including Gmail and Outlook) check that the connecting IP's PTR record resolves to a hostname, and that hostname resolves back to the same IP (forward-confirmed reverse DNS / FCrDNS). A missing or mismatched PTR is a strong spam signal and can cause delivery failures.
DMARC Record¶
Publish a DMARC policy for each sending domain. Start with p=none (monitoring only), then tighten after confirming alignment:
Example:
Once DMARC aggregate reports confirm that SPF and/or DKIM pass consistently, tighten the policy:
p=none- monitoring only (start here)p=quarantine- suspicious mail goes to spamp=reject- unauthorized mail is rejected
Why: DMARC ties SPF and DKIM together and tells recipients what to do with mail that fails both. Even p=none is enough to clear Outlook's "we can't verify this sender" banner, as long as SPF passes.
Check your DMARC record: MXToolbox DMARC lookup
DKIM Records¶
If your domain is an accepted domain in M365 or Google Workspace, enable DKIM signing in the admin centre and publish the CNAME records as instructed:
M365 example:
selector1._domainkey.<YOUR_DOMAIN>.    CNAME    selector1-<YOUR_DOMAIN_DASHED>._domainkey.<TENANT>.onmicrosoft.com.
selector2._domainkey.<YOUR_DOMAIN>.    CNAME    selector2-<YOUR_DOMAIN_DASHED>._domainkey.<TENANT>.onmicrosoft.com.
Note
Publishing the CNAME records alone is not enough - DKIM signing must also be enabled in the M365 admin centre (Defender portal > Email authentication > DKIM).
Why: DKIM proves the message body was not tampered with in transit. When combined with SPF and DMARC, it provides the strongest sender authentication.
Multi-Domain Setup¶
For deployments handling multiple mail domains (configured via the dashboard's /mail page), each domain needs its own set of DNS records.
Per-Domain Records¶
For each configured domain:
| Record | Required |
|---|---|
MX pointing to <MAIL_HOSTNAME> |
Yes |
SPF including ip4:<STARGATE_IP> |
Yes |
DMARC (_dmarc.<domain>) |
Recommended |
| DKIM (from your mail provider) | Recommended |
The A record and PTR record are shared (they point to the Stargate server, not to individual domains).
Per-Domain Mail Routing¶
Each domain's MX records tell the Stargate where to deliver processed mail. If different domains use different Exchange servers:
domain1.ch    MX    15    mail.domain1.ch.
domain1.ch    MX    20    exchange1.domain1.ch.

domain2.ch    MX    15    mail.domain2.ch.
domain2.ch    MX    20    exchange2.domain2.ch.
Alternatively, configure explicit per-domain relay targets via the dashboard's /mail page (relay host field per domain) to override MX-based routing.
Verification¶
After configuring all records, verify them:
# A record
host <MAIL_HOSTNAME>
# Expected: <MAIL_HOSTNAME> has address <STARGATE_IP>

# MX records
host -t mx <YOUR_DOMAIN>
# Expected: Both Stargate and Exchange MX records listed

# SPF record
host -t txt <YOUR_DOMAIN> | grep v=spf1
# Expected: SPF record includes ip4:<STARGATE_IP>

# PTR (reverse DNS)
host <STARGATE_IP>
# Expected: <STARGATE_IP> → <MAIL_HOSTNAME>

# Forward-confirmed reverse DNS (FCrDNS)
host $(host <STARGATE_IP> | awk '{print $NF}' | sed 's/\.$//')
# Expected: resolves back to <STARGATE_IP>

# DMARC
host -t txt _dmarc.<YOUR_DOMAIN>
# Expected: v=DMARC1; p=...

# DKIM (M365)
host -t cname selector1._domainkey.<YOUR_DOMAIN>
# Expected: CNAME to your tenant's onmicrosoft.com
Example output:
$ host mail.example.ch
mail.example.ch has address 128.140.117.200

$ host -t mx example.ch
example.ch mail is handled by 15 mail.example.ch.
example.ch mail is handled by 20 example-ch.mail.protection.outlook.com.

$ host -t txt example.ch | grep v=spf1
example.ch descriptive text "v=spf1 ip4:128.140.117.200 include:spf.protection.outlook.com -all"

$ host 128.140.117.200
200.117.140.128.in-addr.arpa domain name pointer mail.example.ch.

$ host -t txt _dmarc.example.ch
_dmarc.example.ch descriptive text "v=DMARC1; p=none; rua=mailto:postmaster@example.ch"
Online tools:
- MXToolbox MX Lookup
- MXToolbox SPF Check (includes lookup count)
- MXToolbox DMARC Check
- Mail-Tester (send a test mail to get a deliverability score)
Troubleshooting¶
"Client host rejected: Access denied" (554 5.7.1)¶
Stalwart is rejecting the sending server because its IP is not in the allowed relay list. This usually means:
- The SPF record for your domain does not include the sending server's IP range
- The mail configuration has not been reloaded since the SPF record was updated
Reload the mail configuration via the dashboard's /mail page (submit the config again), or restart the container: docker compose restart stalwart
Mail flagged as spam / "can't verify sender"¶
- SPF is missing or does not include the Stargate IP - add
ip4:<STARGATE_IP>to your SPF record - DMARC is not published - add at least
v=DMARC1; p=none - PTR record is missing or mismatched - configure reverse DNS at your hosting provider
- DKIM is not enabled in your M365/provider tenant
MX lookup returns only the Stargate¶
If the Stargate is the only MX for a domain, Stalwart filters out its own hostname and has no relay target. Add a second MX record pointing to your mail server:
example.ch.    MX    15    mail.example.ch.          ← Stargate (inbound)
example.ch.    MX    20    example-ch.mail.protection.outlook.com.  ← Exchange (relay target)
SPF lookup count exceeded (> 10)¶
Each include: in the SPF record triggers additional DNS lookups. The total chain must stay under 10. Solutions:
- Use
ip4:/ip6:entries instead ofinclude:where possible (they do not count) - Flatten nested includes using a tool like SPF Flattener
- Remove unused
include:entries from old providers
Port 25 blocked by hosting provider¶
Some cloud providers (Azure, certain Hetzner plans) block outbound port 25 by default. Check with your provider and request an exception. This affects both inbound delivery (external servers connecting to your Stargate) and outbound relay (Stargate delivering to MX targets).
Email Authentication (DKIM / ARC / SPF / DMARC)¶
Module: HIN Mail Gateway → Domains → [domain] → Email authentication Applies to: Domain administrators configuring outbound signing and inbound verification for a mail domain
The Email authentication section controls how to proves the authenticity of mail, and how strictly it validates authenticity on mail - DKIM/ARC/SPF/DMARC verification. It also generates the DNS TXT records that must be published so external mail servers can verify your domain's mail.
The section is reached via:
The panel has five sub-sections:
- DKIM
- ARC
- SPF
- DMARC
- DNS records to publish
Changes are only applied after clicking Save button at the bottom of the page
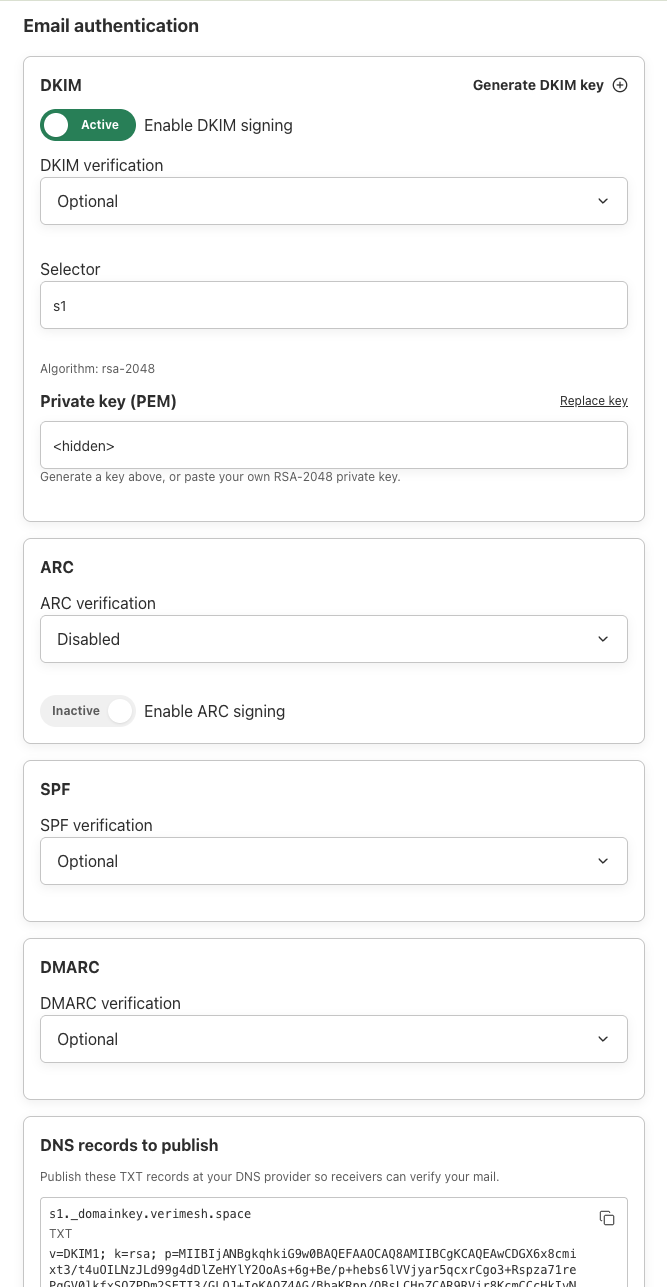
what each protocol does¶
| Protocol | Direction | Purpose |
|---|---|---|
| DKIM (DomainKeys Identified Mail) | Outbound signing / Inbound verification | Cryptographically signs outgoing messages with a private key, tied to a DNS-published public key, so receivers can confirm the message wasn't altered in transit and genuinely originated from this domain |
| ARC (Authenticated Received Chain) | Signing inbound verification for next relay | Preserves the original DKIM/SPF authentication results as a message passes through intermediaries (e.g. mailing lists, forwarding services) that would otherwise break DKIM signatures |
| SPF (Sender Policy Framework) | Inbound verification | Checks that the sending mail server's IP address is authorized to send mail for the sender's domain, based on a DNS record published by that domain |
| DMARC (Domain-based Message Authentication, Reporting & Conformance) | Inbound verification | Ties DKIM and SPF results together and tells receiving servers what to do |
Getting DKIM and DMARC right for your own domain protects your deliverability and brand from spoofing. The verification settings (DKIM, ARC, SPF, DMARC verification dropdowns) instead control how strictly the gateway trusts these signals on inbound mail from other domains.
DKIM¶
| Field | Description |
|---|---|
| Enable DKIM signing | When Active, the gateway signs all outbound mail from this domain with the configured private key. Turn this on before publishing the DKIM DNS record |
| Generate DKIM key (button, top right) | Generates a new RSA-2048 key pair for this domain and populates the Private key (PEM) field |
| DKIM verification | Controls how strictly ан еmail is checked against the sender's published DKIM record |
| Selector | The DKIM selector (e.g. s1) used to publish and look up the public key at <selector>._domainkey.<domain>. Change this only if you need to run multiple keys in parallel (e.g. during a key rotation) — each selector needs its own DNS TXT record |
| Private key (PEM) | The RSA private key used to sign outbound mail. You can either click Generate DKIM key to create one, or paste your own RSA-2048 private key in PEM format |
How to set up DKIM for a new domain¶
- Click Generate DKIM key (or paste an existing RSA-2048 PEM key you manage externally)
- Leave the Selector at the default (
s1) unless you have a reason to change it - Toggle Enable DKIM signing to Active
- Click Save
- Copy the generated
s1._domainkey.<domain>TXT record from the DNS records to publish box (see §7) and add it at your DNS provider - Once the DNS record has propagated, mail signed by this domain will carry a valid DKIM signature
How to rotate a DKIM key¶
- Click Replace key next to Private key (PEM)
- Generate a new key (or paste a new one)
- Publish the new selector's TXT record in DNS before saving/enabling it in production, to avoid a window where signed mail can't be verified
- Save, then remove the old selector's DNS record once you've confirmed the new key is signing correctly
ARC¶
| Field | Description |
|---|---|
| ARC verification (dropdown) | Controls how strictly inbound ARC chains are validated |
| Enable ARC signing | When Active, the gateway adds an ARC seal to forwarded mail, preserving authentication results if the message is later relayed through another system |
| Reuse DKIM key (toggle) | When Active, ARC signing uses the same RSA key configured in the DKIM section above instead of requiring a separate key. Recommended unless you have a specific need to keep the two signatures cryptographically separate |
SPF¶
| Field | Description |
|---|---|
| SPF verification | Controls how strictly inbound mail is checked against the sending domain's published SPF record |
Note: This panel only controls verification of inbound SPF — it does not generate an outbound SPF TXT record for your own domain (no SPF entry appears in §7 "DNS records to publish"). If this domain sends mail through an external relay (e.g. Microsoft 365, as configured in Mail routing → Outbound relay), make sure that provider's SPF
include:mechanism is already published in your domain's own SPF record at your DNS provider, independently of this gateway.
DMARC¶
| Field | Description |
|---|---|
| DMARC verification | Controls how strictly inbound mail is checked against the sender's DMARC policy |
Verification value¶
| UI label | value | Behavior |
|---|---|---|
| Disabled | disable |
Not checked at all. Mechanism doesn't run |
| Optional | relaxed |
Verified and reported in Authentication-Results. Message is always accepted, pass or fail |
| Required | strict |
Verified and reported, and the message is rejected if it hard-fails. Otherwise accepted |
So yes — Disabled = don't check; Optional and Required both check and stamp the result. The only difference between the two is enforcement: Optional never rejects, Required rejects on a hard failure.
What counts as a "hard failure" for Required (per mechanism):
- DKIM — the message carries signatures and all of them fail. No signature at all = none, not a failure → not rejected.
- SPF — a hard -all fail. SoftFail/neutral/none/temp-error are reported but don't reject.
- DMARC — neither DKIM nor SPF aligns and there's an actual fail verdict. No DMARC record published = none → not rejected.
- ARC — the ARC chain fails validation. No chain = none → not rejected.
Two important notes:
- DKIM always runs internally because DMARC needs it. The DKIM setting only controls whether a dkim= result is stamped and whether DKIM failure can reject — it never changes the DMARC verdict.
- Each mechanism is independent, so you can e.g. run DMARC = Required while DKIM/SPF = Optional: bad mail gets rejected on the DMARC verdict, and you still get individual dkim=/spf= lines in the header for visibility.
DNS records to publish¶
This box shows the exact TXT records you must create at your domain's DNS provider so external mail servers can verify mail from this domain. Records shown update automatically based on your DKIM selector and DMARC policy settings above.
| Record | Host | Type | Value |
|---|---|---|---|
| DKIM public key | <selector>._domainkey.<domain> (e.g. s1._domainkey.vrgnservices.eu) |
TXT | v=DKIM1; k=rsa; p=<public key> |
| DMARC policy | _dmarc.<domain> (e.g. _dmarc.vrgnservices.eu) |
TXT | v=DMARC1; p=<policy> (e.g. p=none) |
Use the copy icon in the top-right corner of each record box to copy its exact value. Paste each one as a new TXT record at your DNS registrar/provider, using the Host/Name and Value as shown.
DNS changes can take anywhere from a few minutes to 48 hours to propagate, depending on your provider's TTL settings. DKIM/DMARC enforcement should not be tightened (e.g. enabling signing or moving DMARC policy beyond
none) until you've confirmed the records have propagated and resolve correctly.
Saving changes¶
None of the settings above take effect until you click the orange Save button at the bottom of the page. Save applies all changes across DKIM, ARC, SPF, and DMARC together — there is no per-section save.
Troubleshooting¶
| Symptom | Likely cause |
|---|---|
| Outbound mail fails DKIM at receiving servers | DKIM signing enabled but DNS TXT record not yet published/propagated, or selector mismatch between gateway and DNS. |
| ARC seal missing on forwarded mail | Enable ARC signing is off, or Reuse DKIM key is off with no separate ARC key configured. |
| Can't see the DKIM private key to copy it elsewhere | By design — once saved, the key is masked (<hidden>) and cannot be re-displayed. Use Replace key to issue a new one if you need to move it to a system that doesn't already have a copy. |
| Legitimate mail starts getting quarantined/rejected after a DMARC policy change | Some legitimate sending source isn't DKIM/SPF-aligned yet. Roll the policy back to none, identify the failing source, fix alignment, then re-tighten. |
Update HIN Gateway¶
This document explains:
- How to update a HIN Gateway instance to a newer version.
- How to roll back to a previous version.
Warning
This procedure applies only to versions 0.6.x and later.
How to Update¶
- Go to the
Settingspage and scroll to theSystem versionsection.
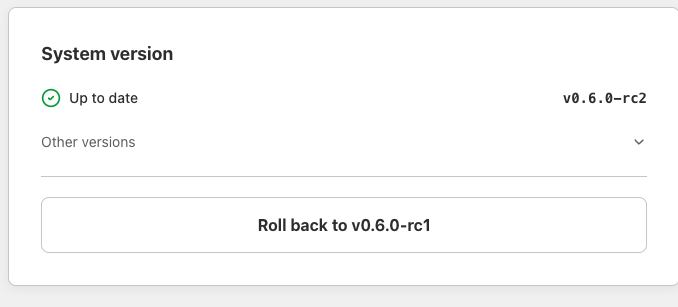
-
Click
Other versions. -
From the list of available versions, select the target version.
-
Newer versions use incremental numbering, so the target version will have a higher number than the current one.
-
Click the
Downloadbutton. This only starts the download; it does not install the update yet.
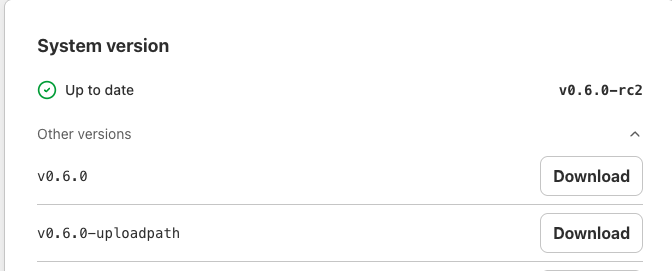
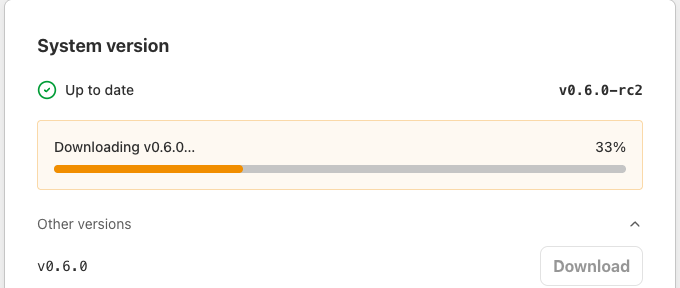
-
Once the download completes, a confirmation dialog appears with two options:
-
Restart now: restarts the machine immediately and installs the new version. Later: postpones the update. The new version is installed the next time the machine restarts.
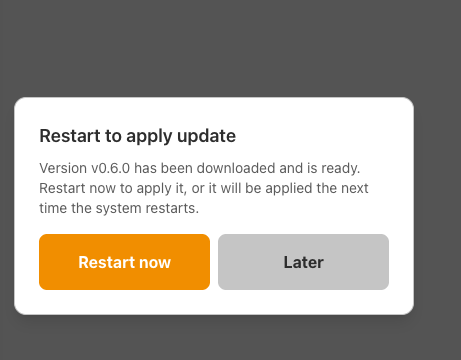
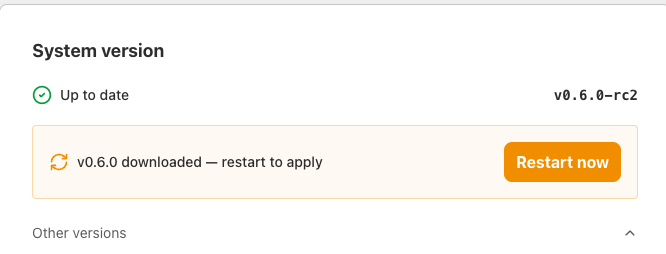
How to Roll Back¶
- Go to the
Settingspage and scroll to theSystem versionsection.
-
Click the
Roll back to vX.X.Xbutton. -
Confirm the action on the confirmation screen. The system will restart and install the previous stable version.
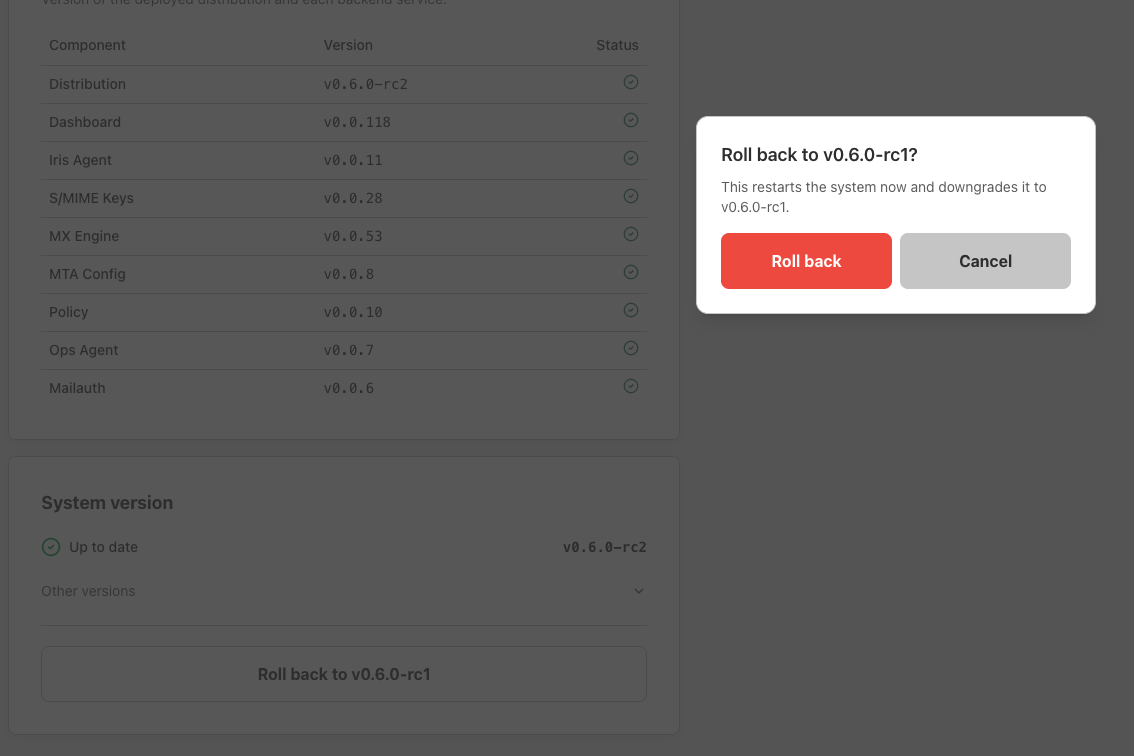
Server install
Container
Stargate Docker deployment¶
Prerequisites¶
Server Requirements:
Please refer to Recommended Requirements
- Docker will be installed automatically if missing
- Ensure there is an internet connection on the machine where you are installing Stargate services
- Ensure traffic is properly configured to reach the Stargate instance
Step 1: Configure Customer Settings¶
Tip
You can clone our repository with all data and sample configs inside with a command:
If you do not have git installed, you can always get an archive with all files inside. Download it via the following link. Download as ZIP
The installer creates customer-config.sh automatically from the bundled template on first run, so a fresh install needs no manual configuration. If you prefer to create it yourself, copy the template:
You do not need to edit it - every value is either auto-detected or configured later via the dashboard:
| Setting | How it is set |
|---|---|
SERVER_STATIC_IP |
Auto-detected from the server's primary network interface. |
CUSTOMER_NAME |
Defaults to the system hostname. |
DEPLOYMENT_NAME |
Derived from CUSTOMER_NAME (used in log labels and the Alloy hostname). |
Passwords & keys (POSTGRES_PASSWORD, S3_SECRET_KEY, VAULT_TOKEN, WG_PRIVATE_KEY) |
Generated securely on first run and saved back to customer-config.sh. |
Mail domains, the mail hostname, S/MIME certificates, and WireGuard peers are all configured at runtime via the dashboard after the stack is up - they are not part of customer-config.sh.
Behind NAT or a floating IP?
Auto-detection uses the IP of the server's primary interface. If your server is reached on a different public or floating IP (common with NAT), set SERVER_STATIC_IP to that public IP in customer-config.sh before installing, so the dashboard and Keycloak login URLs point at the reachable address. Otherwise leave it empty.
Auto-derived settings — leave empty unless you need to override:
| Setting | Derived from | Default |
|---|---|---|
MXENGINE_PUBLIC_ADDRESS |
SERVER_STATIC_IP |
http://<SERVER_STATIC_IP>:8084 |
S/MIME certificate settings:
| Setting | Description | Default |
|---|---|---|
CERT_CA_IRISAGENT_DOMAIN |
CA domain for certificate issuance via WireGuard tunnel | hintest.ch |
Note
WireGuard peer setup is performed at runtime via the dashboard (/installation page). Peer details are configured per deployment after the stack is up - they are not part of customer-config.sh.
WireGuard local settings (typically left at defaults):
| Setting | Default | Description |
|---|---|---|
WG_PRIVATE_KEY |
(auto-generated) | Generated by IRISAgent on first run, then saved to customer-config.sh |
WG_LOCAL_IP |
SERVER_STATIC_IP |
Auto-derived. Only override if you need a different tunnel address. |
WG_INTERFACE_PORT |
19818 |
WireGuard tunnel port (both TCP and UDP are exposed) |
WG_TRANSPORT_MODE |
tcp |
Transport protocol: tcp (default, works through most firewalls) or udp |
Optional settings (have sensible defaults):
| Setting | Default | Description |
|---|---|---|
POSTGRES_PASSWORD |
(auto-generated) | Auto-generated 24-character random password if empty |
S3_SECRET_KEY |
(auto-generated) | S3 secret key for object storage |
OUTBOUND_SEALER_MX_DOMAIN |
hintest.ch |
Sealer MX domain for outbound seal delivery |
POLICY_SYNC_REPO_URL |
GitHub HIN Stargate policies | Git repo URL for OPA/Rego policy sync |
LOKI_URL |
(unset) | Loki endpoint for centralized log shipping (e.g. https://loki.example.com) |
Auto-generated (do not set manually):
VAULT_TOKEN— Generated by Vault during first initialization, saved tocustomer-config.shWG_PRIVATE_KEY— Generated by IRISAgent on first run, saved tocustomer-config.sh
Step 2: Deploy to a Server¶
Tip
You can clone our repository with all data and sample configs inside with a command:
git clone https://github.com/Health-Info-Net-AG/Stargate-deployment.git && \
  cd Stargate-deployment-main
If you do not have git installed, you can always get an archive with all files inside and extract it:
Manually copy files to the server
SSH to server
Create customer config from template and fill in required settings (see Step 1)
cp customer-config-prod.example.sh customer-config.sh
nano customer-config.sh   # Fill in required settings (see Step 1)
Run installation
Step 3: What Install Does¶
The install script (install.sh) performs the following steps:
- Check dependencies — Detects Docker, Docker Compose, and
jq. If missing, installs them automatically (supports Ubuntu/Debian, RHEL/AlmaLinux/Rocky). - Load and validate
customer-config.sh— Checks required fields (SERVER_STATIC_IP,CUSTOMER_NAME,DEPLOYMENT_NAME). Auto-derives optional fields (MXEngine URL, etc.). - Generate
.envfrom customer config — Auto-generates passwords if not set. - Start all services via Docker Compose (infrastructure + applications).
- Initialize Vault — The
vault-initcontainer initializes, unseals, and creates KV-v2 secret mounts. Optionally writes the WireGuard private key to Vault. - Save Vault keys to
secrets/vault-keys.jsonand update.envwith the root token. The token is also saved tocustomer-config.shfor persistence across VM recreations. - Restart application services to pick up the Vault token.
- Save WireGuard private key to
customer-config.sh— extracted from Vault after IRISAgent generates it. - Set up daily backup cron job (runs at 2:00 AM).
After install completes, the stack is running but no mail domains, S/MIME certificate, or WireGuard peer are set up yet. Continue with Step 4: Onboard via the dashboard.
Step 4: Onboard via the dashboard¶
After installation, complete onboarding through the dashboard at https://<SERVER_STATIC_IP>. The dashboard walks you through three pages in order:
/installation — WireGuard peer setup¶
Performs the nonce/HIN handshake to establish a WireGuard peer connection, and saves the resulting WireGuard configuration to the IRISAgent service.
/onboarding — S/MIME certificate¶
Generates the S/MIME signing key and CSR via the smimekeys service and submits the CSR to the CA over the now-established WireGuard tunnel. (This replaces the previous script-based certificate flow.)
/mail — Mail domains and relay configuration¶
Submits hostname and the list of relay domains to the mtaconf service over its REST API. The daemon applies the configuration to Stalwart without restarting the container.
Adding or changing domains later
Re-open the /mail page in the dashboard, edit the domain list, and submit. The daemon applies the change at runtime - no script invocation, no .env edit, no service restart needed.
Step 5: WireGuard Peer Registration¶
The S/MIME CSR submission on /onboarding will fail if your Stargate instance is not yet registered as a WireGuard peer on the HIN CA side. This is the most common issue during initial setup.
The dashboard's /installation page handles the WireGuard peer registration automatically via the nonce/HIN handshake. If the automatic registration fails, manual registration can be done by providing the following values to HIN:
- WireGuard public key — extract from irisagent logs:
DEPLOYMENT_NAME— from yourcustomer-config.shSERVER_STATIC_IP— the public IP of your Stargate serverWG_INTERFACE_PORT— only if you changed it from the default19818
After peer registration is confirmed:
Re-run the /onboarding page in the dashboard to regenerate the CSR and submit it through the now-up tunnel.
To verify the tunnel before requesting the certificate:
Restart just irisagent
Check for successful WireGuard handshake
Tip
Check your firewall: Port 19818/TCP must be open both directions inbound and outbound on the Stargate server.
Step 6: Post-Onboarding Recommendations¶
Once the certificate is issued and mail is flowing, two configuration items are strongly recommended for any production deployment. Skipping them does not break encryption, but it will degrade your sender reputation, cause "we can't verify the sender" warnings in Outlook/Gmail, and can eventually lead to outbound mail being blocklisted.
Step 6.1 SPF / DKIM / DMARC for sender domains¶
The Stargate sends mail from its own public IP on behalf of your users. Without proper DNS authentication records, recipients will see "we can't verify this sender" warnings and may reject the mail.
For complete instructions on configuring SPF, DKIM, DMARC, and PTR records, see the DNS Setup Guide.
At minimum, for each domain you route through the Stargate:
- SPF: add
ip4:<STARGATE_IP>to the domain's TXT record - DMARC: publish
v=DMARC1; p=noneat_dmarc.<YOUR_DOMAIN> - PTR: set reverse DNS for the Stargate IP to match
MAIL_HOSTNAME
Step 6.2 Relay outbound mail back through your mail platform (recommended for M365 / Exchange Online)¶
By default, after the Stargate signs/encrypts an outbound mail it delivers directly to the recipient's MX. This works, but the connecting IP is your Stargate's IP - and unless that IP has years of warm reputation, it can end up on third-party blocklists (e.g. Barracuda, Abusix), causing intermittent delivery failures.
The recommended pattern is to send the signed mail back through your M365 / Exchange tenant so that the final hop to the internet is Microsoft's well-reputed infrastructure. The Stargate still signs and policy-checks every message; only the last hop changes. This mirrors the original HIN MGW "Send to MX" connector pattern.
Stargate side — per-domain relay¶
Configure per-domain relay through the dashboard's /mail page. Each domain can be mapped to its own M365 / Exchange inbound endpoint; the dashboard sends the mapping to mtaconf's REST API and Stalwart is reconfigured at runtime.
After mxengine signs the mail, Stalwart will hand it back to your tenant on port 25 with TLS instead of delivering directly to the recipient's MX. See Exchange-integration.md for the full per-domain syntax.
M365 / Exchange Online side¶
You essentially recreate the same connector + transport rule set as the old HIN MGW (the original HIN MGW O365 manual is the reference - the same five rules apply). The minimum is:
- Inbound connector - accept mail from the Stargate, identified by TLS certificate (the cert subject must match a domain accepted in your tenant). A self-signed cert on the Stargate will be rejected by this connector - use a valid CA-issued cert (Let's Encrypt is fine).
- Outbound connector "Send to MX" - delivers to the recipient's MX, activated only by transport rule.
- Transport rule
set_header- tags outbound mail with a header likeoutgoing: outgoing_<domain>before it leaves O365 the first time, so the return trip can recognize it. - Transport rule
outgoing_to_mx- matches theoutgoing_<domain>header on mail coming back from the Stargate and routes it via the "Send to MX" connector. - Transport rule
mgw_bypass_antispam- bypasses spam filtering on mail coming back from the Stargate.
mxengine does not strip arbitrary headers, so the outgoing_<domain> tag set by set_header survives the round-trip and triggers outgoing_to_mx correctly.
Why this pattern matters
With the relay-back configuration, the public sender to the internet is Microsoft. Combined with correct SPF/DKIM/DMARC (section 6.1), recipients see a Microsoft IP with spf=pass and dkim=pass aligned to your domain - which is the cleanest reputation profile you can give them.
See Exchange-integration.md for full step-by-step instructions including screenshots.
Subsequent Starts (after reboot)¶
The installer enables a stargate systemd unit, so the stack starts
automatically on boot. To start it manually:
This runs start.sh, which:
- Starts infrastructure services
- Unseals Vault using stored keys
- Starts application services
(./scripts/start.sh still works directly if you prefer.)
Stop Services¶
(or ./scripts/stop.sh directly)
This stops containers but preserves all data.
Data Persistence¶
All data is stored in Docker volumes and persists across restarts.
| Service | Volume | Data |
|---|---|---|
| PostgreSQL | postgres_data |
All databases (smimekeys, policy, irisagent, mxengine) |
| Vault | vault_data |
Encryption keys, secrets, S/MIME keys |
| SeaweedFS | seaweedfs_data |
Object storage (messages, attachments) |
| Stalwart | stalwart_data |
Mail server state |
Safe Operations (data preserved)¶
Stop and start:
Or using the scripts directly:
Do not use docker compose commands directly
Always use systemctl or the provided scripts (start.sh / stop.sh) to manage the deployment. Running docker compose up, docker compose down, or docker compose restart directly will not unseal Vault, leaving dependent services unable to start. The start.sh script handles the Vault unseal procedure automatically.
Vault Sealing Behavior¶
Vault becomes sealed when its container restarts. This is a security feature.
The start.sh script (and the systemd service) automatically unseal Vault using the keys stored in secrets/vault-keys.json. This is why you must always use the provided scripts or systemd service to manage the stack.
 Destructive Operations (data deleted)¶
Warning
These commands DELETE ALL DATA - use with caution!
You can only restore data if you perform backup operations before and save the backup in a safe place.
Scripts Reference¶
| Script | Purpose |
|---|---|
install.sh |
First-time installation (Docker, Vault). Domain/cert/peer setup happens in the dashboard afterwards. |
update.sh |
Update service images (preserves Vault token, recreates containers) |
start.sh |
Start services and unseal Vault |
stop.sh |
Stop containers (data preserved) |
backup.sh |
Full backup (database, Vault keys, config, certificates) |
restore.sh |
Restore from backup archive (works on fresh machine) |
purge.sh |
Delete ALL data (requires confirmation) |
health-check.sh |
Comprehensive health check of all services (exit 0 = healthy, 1 = failures) |
init-vault.sh |
Vault initialization (used by vault-init container, not called directly) |
init-keycloak.sh |
Keycloak admin password setup (used by keycloak-init container, not called directly) |
gather-app-versions.sh |
Collects app versions from /liveness endpoints for node-exporter (runs in version-collector container) |
Configuration Files¶
| File | Purpose |
|---|---|
customer-config-prod.example.sh |
Template for customer settings (copy to customer-config.sh) |
customer-config.sh |
Customer-specific settings (created from template, fill in before install) |
.env |
Generated environment file (created by install.sh) |
secrets/vault-keys.json |
Vault unseal keys and root token (back up securely!) |
secrets/signing-key.csr |
Generated CSR for S/MIME certificate |
Support¶
Support
For any questions or issues related to the deployment and operation of the Stargate appliance, please contact HIN support.
Please include relevant information such as the customer name, appliance version, and screenshots/logs where applicable, to help us process your request efficiently.
Stargate Docker advanced configuration¶
Data Layout¶
All writable state - generated config, secrets, backups, logs, and every service's own data - lives under /var/data, not inside the docker-compose/ checkout:
| Path | Contents |
|---|---|
/var/data/vereign/.env |
Generated environment file (do not edit by hand) |
/var/data/vereign/customer-config.sh |
Your install-time settings (copied from customer-config-prod.example.sh) |
/var/data/vereign/secrets/ |
Vault unseal keys, WireGuard private key, S/MIME CSR |
/var/data/vereign/tls/ |
Generated TLS certificate/key served by Caddy |
/var/data/vereign/keycloak/ |
Generated Keycloak realm/config |
/var/data/vereign/apisix/ |
Generated APISIX config |
/var/data/vereign/update.log |
Output of the last update.sh run |
/var/data/backups/ |
Backup archives (.tar.gz) |
/var/data/<service>/ |
Per-service data volumes: postgres, vault, seaweedfs, stalwart, clamav, loki, alloy, textfile_collector, dashboard_cache |
The docker-compose/ tree (scripts, docker-compose.yml, config templates) is read-only at runtime - a bootc image layer on VM appliances - and nothing under it is ever written to. docker-compose/scripts/init-data-layout.sh creates the /var/data tree and sets per-service ownership; it runs automatically during install.sh and is safe to re-run.
Testing with a different root
Set the STARGATE_DATA_DIR environment variable to point at a different root instead of /var/data - useful for local testing without touching the real path. Every script and docker-compose.yml itself resolve their data paths from it.
Prefer the wrapper scripts for anything that (re)creates containers
Because .env no longer lives next to docker-compose.yml, a bare docker compose up -d run from inside docker-compose/ falls back to default credentials instead of your real ones. Use ./scripts/start.sh, ./scripts/update.sh, ./scripts/stop.sh, etc. - they already pass --env-file /var/data/vereign/.env - or add --env-file /var/data/vereign/.env yourself to a manual docker compose command. Read-only commands (docker compose ps, logs, exec) are unaffected either way.
Backups¶
Automatic Backups¶
- Daily backups run at 2:00 AM via cron (set up during install)
- Backups stored in
/var/data/backups/as timestamped.tar.gzfiles - Old backups (>7 days) are automatically cleaned up
What's Included in Backups¶
- Full PostgreSQL dump (all databases with users and permissions)
- Individual database dumps (for partial restore if needed)
- Vault keys (
vault-keys.jsonfor unsealing) - Customer configuration (
customer-config.shwith WireGuard key) - S/MIME CSR and certificates (any
.crt,.pem,.cerfiles) - Backup manifest (
manifest.jsonwith metadata)
Manual Backup¶
Creates a compressed archive in /var/data/backups/YYYYMMDD_HHMMSS.tar.gz.
Restore from Backup¶
To restore on a new machine or after a purge. Copy the backup archive to the new machine and execute:
The restore script will:
- Stop any running services
- Extract and validate the backup
- Install Docker if needed
- Restore customer configuration
- Start infrastructure services (PostgreSQL, Vault, MinIO)
- Restore the database
- Unseal Vault with backed-up keys
- Start application services
Partial Restore (single database)¶
If you only need to restore one database:
Extract backup¶
Restore a specific database¶
cat /tmp/20260130_143022/database/mxengine.sql | docker exec -i stargate-postgres psql -U postgres -d mxengine
Updating Stargate¶
Update Deployment Scripts and Configuration¶
The Stargate deployment repository receives updates to scripts (install.sh, start.sh, health-check.sh, restore.sh, etc.), configuration templates, and documentation. To apply these updates:
1. Create a backup before updating¶
2. Fetch and apply the latest changes¶
The repository is the single source of truth for tracked files, so update by resetting to the latest revision. This replaces tracked files (scripts, docker-compose.yml, config templates) with the repository's versions:
3. Restart services to pick up any script or config changes¶
Note
Your customer-config.sh, .env, and secrets/ directory live under /var/data/vereign/, outside this repository checkout entirely, so a git reset --hard never touches them - your configuration and credentials are preserved. Always put customisation in customer-config.sh, never by editing tracked files such as docker-compose.yml: a hard reset - and the automatic updates triggered from the dashboard - will revert any tracked-file edits. This is intentional; keeping every deployment identical to the repository is what lets updates apply reliably and without manual conflict resolution.
If the update includes changes to the config template, compare it with your existing config to see if new variables were added:
Update Service Images¶
Application image versions are pinned directly in the tracked docker-compose.yml and travel with the deployment's release tag - each release is a known-good, tested combination of all service versions. Updates are driven from the dashboard's update page (or the CLI equivalent, ./scripts/update.sh --release <tag>): applying a release checks out that tag - whose docker-compose.yml carries the matching image versions - and recreates the affected services for you.
To update:
- Open the dashboard and go to the update page.
- Select the target release.
- Confirm - the dashboard applies the release manifest and recreates the changed services.
Do not manually change versions
Image versions live in docker-compose.yml (a repository-tracked file), not in customer-config.sh or .env - those no longer hold *_VERSION values. Do not hand-edit an image tag: versions are released and tested together as a set, hand-picking one produces an untested combination, and any edit to a tracked file is reverted by the next update anyway. Always move between releases from the dashboard's update page (or ./scripts/update.sh --release <tag>).
Cleanup Old Images¶
After updates, remove unused images to free disk space:
Rollback¶
To roll back, select an earlier release on the dashboard's update page and apply it - the same mechanism runs in reverse, pinning the previous tested set. Do not roll back by editing versions by hand.
Configuration¶
The .env file (/var/data/vereign/.env) is generated by install.sh from customer-config.sh (/var/data/vereign/customer-config.sh). Domain, certificate, and WireGuard settings are managed at runtime by the dashboard (/installation, /onboarding, /mail) — they are not held in .env. To customize the install-time settings, edit customer-config.sh and re-run install.sh.
Key sections in the generated .env:
## PostgreSQL (auto-generated if empty in customer-config.sh)
POSTGRES_USER=postgres
POSTGRES_PASSWORD=<auto-generated>

## Vault (auto-populated after initialization)
VAULT_TOKEN=<auto-generated>

## S3 Object Storage (SeaweedFS)
S3_ACCESS_KEY=minioadmin
S3_SECRET_KEY=<auto-generated>

## Mail Outbound Path
MXENGINE_PUBLIC_ADDRESS=http://203.0.113.50:8084
OUTBOUND_SEALER_MX_DOMAIN=hintest.ch

## WireGuard
WG_LOCAL_IP=203.0.113.50
WG_INTERFACE_PORT=19818
WG_TRANSPORT_MODE=tcp
Warning
Do not edit .env directly. Changes will be overwritten on re-run of install.sh. For runtime configuration (domains, hostname, peers, S/MIME), use the dashboard.
Service URLs¶
| Service | URL/Port |
|---|---|
| Dashboard | https://localhost |
| smimekeys-client | http://localhost:8081 |
| policy | http://localhost:8082 |
| irisagent | http://localhost:8083 |
| mxengine HTTP | http://localhost:8084 |
| Stalwart SMTP | localhost:25 |
| APISIX Gateway | http://localhost:9080 |
| Keycloak | https://localhost:8180 |
Health Checks¶
All services expose a /liveness endpoint:
curl http://localhost:8081/liveness  # smimekeys-client
curl http://localhost:8082/liveness  # policy
curl http://localhost:8083/liveness  # irisagent
curl http://localhost:8084/liveness  # mxengine
Monitoring¶
Prometheus Metrics¶
All application services expose Prometheus metrics on port 2112 (internally), mapped to different host ports:
| Service | Metrics Port | Metrics URL |
|---|---|---|
| smimekeys-client | 2113 |
http://localhost:2113/metrics |
| irisagent | 2114 |
http://localhost:2114/metrics |
| policy | 2115 |
http://localhost:2115/metrics |
| mxengine | 2116 |
http://localhost:2116/metrics |
| node-exporter | 9100 |
http://localhost:9100/metrics |
Prometheus Scrape Config Example¶
scrape_configs:
  - job_name: 'stargate-smimekeys'
    static_configs:
      - targets: ['<host>:2113']
  - job_name: 'stargate-irisagent'
    static_configs:
      - targets: ['<host>:2114']
  - job_name: 'stargate-policy'
    static_configs:
      - targets: ['<host>:2115']
  - job_name: 'stargate-mxengine'
    static_configs:
      - targets: ['<host>:2116']
  - job_name: 'stargate-node'
    static_configs:
      - targets: ['<host>:9100']
Quick Metrics Check¶
## Check all metrics endpoints
curl -s http://localhost:2113/metrics | head -20  # smimekeys-client
curl -s http://localhost:2114/metrics | head -20  # irisagent
curl -s http://localhost:2115/metrics | head -20  # policy
curl -s http://localhost:2116/metrics | head -20  # mxengine
curl -s http://localhost:9100/metrics | head -20  # node-exporter
Log Collection (Alloy → Loki)¶
Alloy collects logs from application containers and ships them to Loki.
Containers monitored:
- stargate-apisix
- stargate-keycloak
- stargate-dashboard
- stargate-smimekeys-client
- stargate-policy
- stargate-policy-sync
- stargate-irisagent
- stargate-mxengine
Configuration in .env:
## Loki push URL
LOKI_URL=https://loki.example.com

## Hostname label for logs (auto-set to DEPLOYMENT_NAME)
ALLOY_HOSTNAME=stargate-acme
Labels added to logs:
environment=<DEPLOYMENT_NAME>- Identifies the deploymenthost=<ALLOY_HOSTNAME>- Identifies the host (same as deployment name)container=<container-name>- Container nameservice=<service-name>- Service name (e.g., smimekeys-client, policy)level=<log-level>- Extracted from JSON logs if available
Query logs in Grafana:
{environment="stargate-acme"} |= "error"
{environment="stargate-acme", service="mxengine"}
{environment="stargate-acme", level="error"}
Verify Alloy is working:
Note: The VM's public IP must be whitelisted in Loki's ingress configuration.
Stalwart MTA + mtaconf¶
Stargate uses Stalwart as the mail transfer agent and mtaconf as the configuration daemon. The dashboard sends domain and relay configuration to mtaconf's REST API, which pushes it to Stalwart via the management CLI.
Mail Flow Architecture¶
External Mail Server
         │
         ▼ (port 25)
┌─────────────────────────────────────────────────────┐
│ stalwart (stargate-stalwart)                        │
│                                                     │
│  Port 25 (smtp listener)                            │
│    │                                                │
│    ▼                                                │
│  content_filter → smtp:[mxengine]:1587              │
│    │                                                │
└────┼────────────────────────────────────────────────┘
     │
     ▼ (port 1587)
┌─────────────────────────────────────────────────────┐
│ MXEngine (stargate-mxengine)                        │
│                                                     │
│  Port 1587 (SMTP input)                             │
│    │                                                │
│    ▼                                                │
│  Sign/encrypt/process mail                          │
│    │                                                │
│    ▼                                                │
│  Deliver back to stalwart for relay                 │
│    │                                                │
└────┼────────────────────────────────────────────────┘
     │
     ▼ (port 10026)
┌─────────────────────────────────────────────────────┐
│ stalwart (stargate-stalwart)                        │
│                                                     │
│  Port 10026 (reinject listener)                     │
│    │                                                │
│    ▼                                                │
│  transport → relay to destination MX                │
│    │                                                │
└────┼────────────────────────────────────────────────┘
     │
     ▼ (port 25)
Destination Mail Server (via MX lookup)
Antivirus scanning: Inbound mail is scanned by ClamAV (stargate-clamav), wired into Stalwart as a milter at the SMTP DATA stage on both the public (:25) and reinject (:10026) listeners. Infected mail is rejected at the SMTP level; if ClamAV is unreachable the message is deferred rather than delivered unscanned (fail-closed). ClamAV's signature database lives in the clamav_data volume and is kept current by freshclam in the background.
Seal callback flow (inbound): When a remote sealer needs to deliver a sealed message, it calls MXENGINE_PUBLIC_ADDRESS (default: http://<SERVER_STATIC_IP>:8084). The http:// protocol is correct - TLS is not required because the seal payload is already encrypted.
Mail Relay Configuration¶
All mail configuration that varies per deployment (mail domains, hostname, relay host, per-domain relay maps, allowed networks) is set through the dashboard's /mail page at runtime. The dashboard POSTs the configuration to mtaconf's REST API, which applies it to Stalwart without restarting the container.
There is no per-domain config in customer-config.sh or .env - operators add or change domains through the UI.
Mail Routing (Migrating from Old MGW)¶
Key difference from the old HIN-MGW
In the old MGW, you had to manually configure a target server per domain. In Stargate, mail routing is decided by DNS MX records by default - Stalwart resolves each domain's MX at delivery time. The dashboard's /mail page lets you override this per-domain (e.g. to relay back through your M365 / Exchange tenant) without touching DNS.
Default - automatic via DNS MX:
For each of your domains, make sure there is an MX record in DNS pointing to the corresponding Exchange (or other mail) server:
domain1.com    MX 10  exchange1.domain1.com
domain2.com    MX 10  exchange2.domain2.com
domain3.com    MX 10  exchange3.domain3.com
This works for any number of domains - each domain can point to a different mail server, and Stalwart will route accordingly.
If Stargate is the only MX record for a domain, Stalwart will filter it out and have no delivery target. Add a second MX record pointing to your mail server with a higher priority (= lower number) so Stalwart uses it as the delivery target:
example.com    MX 10  exchange.example.com      ← delivery target (mail server)
example.com    MX 20  stargate.example.com      ← inbound gateway (Stargate)
Alternative - explicit per-domain relay (sender-based):
For relay-back through M365 / Exchange Online, configure per-domain relay targets through the dashboard's /mail page. Mail from senders not in the map falls back to MX lookup.
Ports¶
| Port | Purpose |
|---|---|
25 |
Main SMTP listener (external connections) |
10026 |
Reinjection port (mxengine → stalwart, internal only) |
1587 |
MXEngine SMTP input (stalwart → mxengine, internal only) |
8080 |
Stalwart management API + mtaconf REST API (internal only) |
Using Exchange?
See Exchange-integration for the full Exchange Online / On-Premises connector and transport rule setup.
Verification¶
Check Stalwart status
Check logs
Test connection to port 25
Test internal port 10026 (from mxengine container)
Updating the mtaconf image¶
Like every service, the mtaconf image version is part of a release and is updated through the dashboard - not by editing its tag by hand. Select the target release on the dashboard's update page to apply it.
Stargate Troubleshooting¶
Mail not being processed by mxengine:
- Check content_filter is configured: verify mtaconf logs show successful push
- Verify mxengine is reachable:
docker exec stargate-stalwart nc -zv mxengine 1587
Mail stuck after mxengine processing:
- Check mxengine outbound config: OUTBOUND_SMTP_HOST=stalwart, OUTBOUND_SMTP_PORT=10026
- Verify port 10026 listener is active in Stalwart
- Check allowed relay networks include Docker network (172.x.x.x/16)
Greylisting errors (450 4.7.1):
- This is normal! The destination server is temporarily rejecting mail
- Stalwart automatically retries after a configurable delay
- Check queue via management API
Microsoft blocking IP (S3140):
- Your server's IP has poor reputation with Microsoft
- Request delisting at: https://sender.office.com
- May take 24-48 hours to take effect
DNS Lookup Failures:
- Use the dashboard's
/mailpage to set an explicit relay host or per-domain relay map (skips MX-based discovery)
Connection Refused on port 25:
- Ensure port 25 is not blocked by the firewall
- Check if another service is using port 25:
ss -tlnp | grep :25
WireGuard (Agent-to-Agent Communication)¶
IRISAgent uses WireGuard to establish secure encrypted tunnels between Stargate instances for delivering sealed messages.
How It Works¶
Each Stargate instance uses its server's real static public IP as the WireGuard tunnel address. This guarantees uniqueness across all deployments without manual coordination.
block
columns 5
  block:Stargate["Your Stargate (203.0.113.50)"]:2
    columns 1
    A
    space
    A --> B
    A["IRISAgent (203.0.113.50:19818)"]
    B["Sealed message delivery via WG tunnel"]
  end

  blockArrowId1<["WG Tunnel (TCP)"]>(x):1

  block:mxengine["HIN Test (5.102.144.182)"]:2
    columns 1
    C
    space
    C --> D
    C["IRISAgent (5.102.144.182:19818)"]
    D["Receive sealed message"]
  end
WireGuard Configuration¶
WireGuard settings in customer-config.sh:
## ==============================================================================
## Server IP — used as WireGuard tunnel address and MXEngine callback URL
## ==============================================================================
SERVER_STATIC_IP="203.0.113.50"       # Your server's real static public IP

## ==============================================================================
## WireGuard local settings (typically left at defaults)
## ==============================================================================
WG_PRIVATE_KEY=""                     # Auto-generated by IRISAgent, then saved back to config
WG_INTERFACE_PORT="19818"             # Default WireGuard port
WG_TRANSPORT_MODE="tcp"               # "tcp" (default) or "udp"
Info
WG_LOCAL_IP is auto-derived from SERVER_STATIC_IP. You do not need to set it separately.
Peer Connection Setup¶
WireGuard peer details (public key, endpoint, allowed IPs, etc.) are configured at runtime through the dashboard's /installation page. There is no WG_PEER_* block in customer-config.sh anymore — the peer is set up after the stack is up.
For first-time setup with the HIN Test environment:
- Bring up the stack with
./scripts/install.sh. - Open the dashboard, follow
/installationto start the nonce / HIN handshake. - Open the IRISAgent logs (
docker compose logs irisagent) and copy thewireguard public key:line. Send it together withDEPLOYMENT_NAMEandSERVER_STATIC_IPto Vereign (kalin.canov@vereign.com) so they can register your peer on the CA side. - After Vereign confirms registration, complete
/onboardingin the dashboard to issue the S/MIME certificate.
For any additional peer (peer-to-peer between two Stargates), exchange public keys + endpoints with the other party and add the connection through the IRISAgent API:
curl --location 'localhost:8083/v1/connections' \
--header 'Content-Type: application/json' \
--header 'Accept: application/json' \
--data '{
  "allowedIps": "<IP of new peer>/32",
  "description": "<short description>",
  "endpoint": "<IP of new peer>:19818",
  "externalId": [
    "<domain of new peer>"
  ],
  "name": "<Name of new peer>",
  "presharedKey": "",
  "publicKey": "<public key of new peer>",
  "status": "completed",
  "transport": "tcp",
  "wireguardIp": "<IP of new peer>",
  "wireguardPort": 10080
}'
WireGuard Verification¶
Check IRISAgent WireGuard interface
Check connection in database
docker exec stargate-postgres psql -U postgres -d irisagent \
  -c "SELECT connection_id, name, endpoint, wireguard_ip, transport, status FROM connections;"
Check connection external IDs (used for routing)
docker exec stargate-postgres psql -U postgres -d irisagent \
  -c "SELECT connection_id, external_id FROM connection_external_ids;"
Test WireGuard connectivity (check tunnel status from host)
Check IRISAgent logs for tunnel activity
WireGuard Troubleshooting¶
No WireGuard interface:
- Check IRISAgent logs:
docker logs stargate-irisagent - Verify
WG_LOCAL_IPis set in.env(auto-derived fromSERVER_STATIC_IP— should be this server's static public IP)
Peer not reachable:
- Verify remote endpoint is accessible:
nc -zv <endpoint_host> <endpoint_port> - Check firewall allows TCP+UDP port 19818
- Verify public keys match on both ends
- If TCP has issues, try setting
WG_TRANSPORT_MODE="udp"in customer-config.sh
Connection not in database:
- Re-run the dashboard's
/installationpage to re-establish the peer connection - Check irisagent logs:
docker logs stargate-irisagent
Policy Sync¶
The policy-sync service automatically syncs OPA/Rego policies from a Git repository to the PostgreSQL database.
How Policy Sync Works¶
block
columns 8
  A:2 space B:2 space C:2
  A["Git Repository

      policies/
        alpha/
        outbound/
        ..."]
    A-->B
    B["policy-sync:

      - Clone/Pull repo
      - Parse .rego files
      - Upsert to database
      - Runs every 1h"]
    B-->C
    C["PostgreSQL

      - policy database
      - policies table"]
Policy Sync Configuration¶
Settings in customer-config.sh:
## Git repository containing policies (pre-configured with HIN Stargate policies)
POLICY_SYNC_REPO_URL="https://github.com/Health-Info-Net-AG/Stargate-policies.git"

## Optional: Authentication for private repos
POLICY_SYNC_REPO_USER=""
POLICY_SYNC_REPO_PASS=""

## Optional: Specific branch (default: main)
POLICY_SYNC_REPO_BRANCH=""

## Optional: Subfolder within repo containing policies
POLICY_SYNC_REPO_FOLDER=""

## Sync interval (default: 1h)
POLICY_SYNC_INTERVAL="1h"
Policy Sync Verification¶
Manual Trigger¶
To force an immediate sync:
Vault¶
Vault Mounts¶
Vault's API/UI port (8200) is not published to the host; access Vault via the CLI inside the container (see Manual Vault Operations below).
The following KV-v2 secret engines are created:
secret-smimekeys-clientsecret-policysecret-irisagentsecret-mxenginesecret-mtaconf
Manual Vault Operations¶
Databases¶
PostgreSQL databases created:
smimekeys_clientpolicyirisagentmxengine
Connect to PostgreSQL¶
Or connect externally
Policies (Rego)¶
MXEngine uses OPA/Rego policies stored in PostgreSQL to determine mail delivery strategy.
Recommended: Use policy-sync to automatically sync policies from a Git repository. See Policy Sync section.
View Current Policy¶
Policy Location¶
- MXEngine config:
POLICY_OUTBOUND: "outbound/delivery" - Database:
policydatabase,policiestable - Managed by:
policy-syncservice (syncs from Git repository)
Logs¶
Troubleshooting¶
Certificate issuance failed / WireGuard tunnel not established¶
This is the most common issue after initial installation. The S/MIME certificate cannot be issued because the WireGuard tunnel to the HIN CA is not established.
Symptoms:
- The dashboard's
/onboardingpage reports CSR submission failure - smimekeys-client logs show:
issue certificate error: certcatunnel: error sending request: irisagent: ... context deadline exceeded
Root causes (check in order):
- Peer not registered on HIN CA - Your WireGuard public key must be registered on the HIN side. Provide HIN with:
Along with your DEPLOYMENT_NAME, SERVER_STATIC_IP, and WG_INTERFACE_PORT (if changed from 19818).
-
Firewall blocking port 19818 - Ensure
19818/TCPis open both inbound and outbound on the Stargate server. -
Wrong hostname - If the Stalwart hostname is still set to the template default (
mail.example.com), update it via the dashboard's/mailpage.
After the issue is resolved:
Re-open the dashboard's /onboarding page to regenerate the CSR and resubmit it through the now-up tunnel.
See Step 5: WireGuard Peer Registration for the full process.
Vault is sealed after restart¶
Run the start script which handles unsealing:
Cannot pull images¶
Login to the registry:
Service won't start¶
Check logs:
Reset everything¶
Warning
These commands DELETE ALL DATA - use with caution!
You can only restore data if you perform backup operations before and save the backup in a safe place.
Files Structure¶
The deployment is split across two trees: the read-only repository checkout (docker-compose/) and the writable data root (/var/data, overridable via STARGATE_DATA_DIR - see Data Layout above). Nothing is ever written under docker-compose/.
docker-compose/ (read-only)¶
docker-compose/
├── config
│   ├── apisix
│   │   ├── apisix.yaml.template
│   │   └── config.yaml
│   ├── keycloak
│   │   └── realm-stargate.json
│   ├── nats
│   │   └── nats.conf
│   ├── nginx
│   │   ├── dashboard.conf
│   │   └── keycloak.conf
│   ├── alloy
│   │   └── config.alloy          # Alloy log shipping config
│   └── vault
│       └── vault.hcl             # Vault configuration
├── customer-config-prod.example.sh     # Config template (copied to /var/data/vereign/customer-config.sh)
├── docker-compose.yml             # Main compose file
├── init
│   └── postgres
│       └── 01-create-databases.sql
└── scripts
    ├── backup.sh                  # Full backup (DB, Vault, config, certs) -> /var/data/backups
    ├── gather-app-versions.sh     # Collects app versions for node-exporter metrics
    ├── health-check.sh            # Comprehensive health check of all services
    ├── init-data-layout.sh        # Creates the /var/data tree and sets per-service ownership
    ├── init-keycloak.sh
    ├── init-vault.sh              # Vault initialization (used by vault-init container)
    ├── install.sh                 # First-time installation (Docker, Vault). Domain/cert/peer setup happens in the dashboard afterwards.
    ├── purge.sh                   # Delete all data (destructive!)
    ├── restore.sh                 # Restore from backup archive
    ├── send-logs-to-support.sh    # Paste logs online and get a link that you will provide to support
    ├── start.sh                   # Start services + unseal Vault
    ├── stop.sh                    # Stop containers (preserves data)
    ├── test-readonly-tree.sh      # Asserts nothing above ever gets written to
    └── update.sh
/var/data (writable)¶
/var/data/
├── vereign
│   ├── .env                       # Environment variables (generated by install.sh)
│   ├── customer-config.sh         # Customer-specific settings (copied from the template)
│   ├── secrets/                   # Created on first run
│   │   ├── vault-keys.json        # Vault unseal keys (BACK THIS UP!)
│   │   └── signing-key.csr        # S/MIME certificate signing request
│   ├── tls/                       # Generated TLS cert/key served by Caddy
│   ├── keycloak/                  # Generated Keycloak config
│   ├── apisix/                    # Generated APISIX config
│   └── update.log                 # Output of the last update.sh run
├── backups/                       # Full backups
│   └── *.tar.gz
├── postgres/
├── vault/
├── seaweedfs/
├── stalwart/
├── clamav/
├── loki/
├── alloy/
├── textfile_collector/
└── dashboard_cache/
Quick Health & Log Checks¶
Run the comprehensive health check
This checks:
- All container statuses (running, healthy)
- Liveness endpoints (smimekeys-client, policy, irisagent, mxengine)
- Vault seal status
- PostgreSQL connectivity and all 4 databases
- MinIO health
- WireGuard tunnel status and peer handshakes
- Stalwart MTA (running, port 25, port 10026)
- Prometheus metrics endpoints
- Disk and memory usage
For manual log inspection:
Check logs (last 10 lines)
docker logs stargate-smimekeys-client --tail 10
docker logs stargate-policy --tail 10
docker logs stargate-irisagent --tail 10
docker logs stargate-mxengine --tail 10
Follow logs in real-time
Check all container statuses
Follow all containers logs in real-time
docker ps -a --format '{{.Names}}' | xargs -I {} sh -c 'docker logs --timestamps -f {} 2>&1 | sed "s/^/[{}] /"'
Provide logs to support¶
You can provide logs to our support via pastebin.hin-infra.ch, and CLI command:
Upload all containers logs:
Use our script:
Or execute manually:
docker ps -a --format '{{.Names}}' | xargs -I {} sh -c 'docker logs --timestamps {} 2>&1 | sed "s/^/[{}] /"' | curl https://pastebin.hin-infra.ch/ --data-binary @-
Tip
This operation can hit our upload limits - 20 Mb.
Use our script:
Or execute manually:
This is default
--tail 500 is the default value for our script, but you can still provide it.
Use our script:
Or execute manually:
Upload specific container logs:
Tip
This operation can hit our upload limits - 20 Mb. If it happens, try to reduce the log amount by setting a time limit or number of lines.
After that, you will receive a unique link in the format https://pastebin.hin-infra.ch/<20 symbols> that you can provide to support / ticket.
Warning
The expiration time is set to 30 days. If some parts of the logs or the logs themselves need to be saved for a longer period, please make sure you keep a copy of them.
Helm Deploy¶
Info
Coming soon
This file contains instructions for Helm deploy of the HIN MGW instance.
Migrating a Compose Deployment to a bootc Appliance¶
This guide walks through moving an existing standard-Compose Stargate installation (a git clone on a plain VM) onto a new bootc appliance VM - the immutable, image-based deployment that runs the same Compose stack read-only from /usr with all state on a dedicated /var/data Data Disk.
Migration reuses the same backup/restore tooling used for disaster recovery: back up the old VM, provision the new appliance, and restore the archive onto it. The one step no script can do for you is re-pointing the CA-side WireGuard registration at the new VM's public IP - budget time for that with your HIN contact.
Restore replaces ALL data on the target
restore.sh resets Vault, PostgreSQL, and object storage on the machine it runs on, then re-imports everything from the archive. Only run it against the new appliance, never against a VM you still need.
Overview¶
- On the old VM: back it up with
./scripts/backup.sh --label pre-bootcand copy the archive off the machine. - Provision and boot the bootc appliance - it fresh-installs itself and comes up healthy but empty.
- Copy the archive onto the appliance's restore drop zone,
/var/data/restore/. - Run
restore.sh --yesagainst the archive - this resets the appliance's fresh install and re-imports the old VM's data. - Update the CA-side WireGuard peer registration to the appliance's new public IP (required manual step, done with your HIN contact).
- Verify the stack is healthy, mail flows, and certificate issuance works.
Step 1: Back up the old VM¶
On the VM you are migrating from:
cd stargate-deployment/docker-compose   # or /root/stargate-deployment/docker-compose
./scripts/backup.sh --label pre-bootc
backup.sh prints the archive's full path in its own summary output (Archive: ...) - read it from there rather than assuming a location. Depending on how old the install is, the archive lands either under /var/data/backups/ (already relocated per the Data Layout doc) or the older docker-compose/backups/ path. Either way, the printed path is authoritative - use the exact filename it prints, not a guessed one.
The label is appended as a suffix to the timestamp, e.g. 20260814_153000_pre-bootc.tar.gz - the commands below use *_pre-bootc.tar.gz accordingly.
Copy the resulting .tar.gz off the old machine to somewhere safe (your workstation, a jump host, or object storage) before decommissioning it:
Note
The archive contains Vault unseal keys, Vault KV secrets, the WireGuard private key, and database dumps - all unencrypted. backup.sh already chmod 600s it; keep that permission intact wherever you stage it next.
Step 2: Provision and boot the bootc appliance¶
Deploy the bootc appliance image through your usual channel (see the VM Images catalog and the platform-specific install guides under Server install > VM deployment). On first boot the appliance provisions itself automatically: Docker is already baked in, install.sh runs once to generate a fresh customer-config.sh/.env, and the Compose stack comes up healthy - but with no customer data. There is no S/MIME certificate, no configured mail domain, and no WireGuard peer for this new instance yet.
Wait until the appliance reaches that healthy-but-empty baseline before continuing:
Step 3: Copy the archive to the restore drop zone¶
init-data-layout.sh creates /var/data/restore/ on every install (including the appliance's own first boot) as the designated drop zone for restore archives. Copy the archive there:
Step 4: Run the restore¶
On the appliance:
--yes (or -y) skips the interactive confirmation prompt, which is required here since restore.sh refuses to run non-interactively without it.
This replaces all data on the appliance: it stops the running (fresh) stack, resets /var/data/{vault,postgres,seaweedfs}, then re-imports from the archive - the full PostgreSQL dump, Vault unseal keys and KV secrets, S3/object-storage contents, S/MIME CSR and certificates, and customer-config.sh (including the WireGuard private key). IP-derived settings such as KEYCLOAK_PUBLIC_URL, DASHBOARD_PUBLIC_URL, and MXENGINE_PUBLIC_ADDRESS are re-derived from the new appliance's own IP, not copied from the old VM. On success, restore.sh moves the consumed archive to /var/data/restore/restored/ so a re-run won't trigger on it again.
Step 5: CA-side WireGuard re-registration (required manual step)¶
The appliance has a new public IP. restore.sh restores the old WireGuard private key (so the tunnel's identity is unchanged), but the corresponding peer record on the CA side - endpoint, allowed IPs, and WireGuard IP - still points at the old VM's IP address. Until that record is updated, the WireGuard tunnel to HIN will not come up, and certificate issuance will fail.
This step cannot be automated by the appliance or the customer
Contact your HIN network operations / account contact and provide the new public IP (and the WireGuard port, if changed) so they can update the peer registration - endpoint, allowed IPs, and WireGuard IP - to match the new appliance. Do this as part of the migration window; mail flow and certificate renewal are blocked until it's done.
Step 6: Verify¶
Confirm:
- All containers report
healthy. - The WireGuard tunnel is up and handshaking (shown by
health-check.sh -v). - A test message flows through the gateway end to end (send through the appliance, confirm sealed delivery at the recipient).
- Certificate issuance succeeds - check the S/MIME certificate status in the dashboard, or confirm the CSR/certificate exchange over the tunnel completed.
Pre-staged migration (becomes turnkey once the bootc first-boot hook lands)¶
Instead of waiting for the appliance to fresh-install and then running Steps 3-4 by hand, you can drop the backup archive into /var/data/restore/ before first boot completes (for example, by staging it on the Data Disk during provisioning). Today this still requires manually invoking restore.sh --yes once the appliance's own first-boot install has finished, exactly as in Steps 3-4 above - the first-boot sequence does not yet look for a pre-staged archive on its own.
A planned first-boot hook (tracked in the almalinux-bootc project's Data Disk plan) will make this automatic: if an archive is already present in /var/data/restore/ at first boot, the appliance will run restore.sh --yes <archive> in place of the fresh install.sh, skipping the empty-baseline install entirely since there's nothing to reset yet. Once that lands, a pre-staged migration collapses to Steps 1-2 (back up, stage the archive, boot) plus the still-manual Step 5 (CA-side WireGuard re-registration), which remains a required step regardless of how the restore was triggered.
VM deployment
Stargate Azure deployment using an image¶
Deploy Stargate on Azure
Azure Port 25 (SMTP) Requirements¶
Warning
Before beginning installation on Microsoft Azure, review the following requirements related to outbound SMTP connectivity on port 25. Skipping this step may result in email delivery failures after installation.
Whether port 25 is available depends on your Azure subscription type:
 Enterprise Agreement (EA) or MCA-E - Outbound SMTP on port 25 is not blocked. Note that external domains may still reject emails - this is outside Azure's control.
- Enterprise Dev/Test - Blocked by default, but can be removed. To request removal, go to Diagnose and Solve > Cannot send email (SMTP-Port 25) in the Azure Virtual Network resource in the Azure portal.
 All other subscription types - Blocked and cannot be unblocked.
Reference: Troubleshoot outbound SMTP connectivity in Azure
Get the image file¶
- Download the latest VHD image file. Please refer to VM Catalog
Upload the Azure VHD image file¶
- Navigate to https://portal.azure.com/#home
- Click Storage accounts.
- Select the storage account to use or create a new one.
- Click Block service and then Containers.
- Select the Container to upload the file to or create a new one if you do not have a Container.
- Click Upload and choose the VHD image file.
- Make sure that the Blob type is Page Blob.
Create the image¶
- Navigate to https://portal.azure.com/#home
- Click Images.
- Click Create.
- Choose the Resource group to be used or create a new one.
- Type a Name for the image.
- Choose OS type Linux and VM generation Gen 2
- At Storage blob, click browse and select the newly uploaded VHD image.
- Click Review and create.
- Click Create.
Create a VM¶
- Navigate to https://portal.azure.com/#home
- Click Virtual Machines.
- Click Create, and choose Virtual Machine from the drop-down menu.
- Choose the Resource group.
- Type a Name for the VM.
- At Image, click "See all images", click "My Images" and choose the new image that was created.
- Choose the VM size.
- Choose authentication type.
- Click Next: Disks
- Select OS disk size at least 20 GiB. Please refer to Server Requirements.
- Click Review + create
- Click Create
Find the public IP address of the new VM and add inbound firewall rules¶
- Navigate to https://portal.azure.com/#home
- Click Virtual Machines.
- Click on the new VM.
- You can see the public IP address under "Primary NIC public IP"
- Scroll down to Networking and click on it
- Click + Create port rule, Inbound port rule, Destination port ranges 25, Protocol TCP, name it SMTP. Repeat for the other required inbound port — 19818 (WireGuard). See Server Requirements → Inbound Network Access for the full list.
Attach the Data Disk first
Before the first boot, attach a second, blank disk of at least 30 GB. On first boot the appliance formats it as the Data Disk (VEREIGN-DATA, mounted at /var/data) and keeps all config and data there; without it the boot fails and rolls back. See Installation guide → Step 4.
Install HIN Gateway¶
After the VM has been successfully created, proceed with the installation and onboarding steps as described in the provided instructions
Support
For any questions or issues related to the deployment and operation of the Stargate appliance, please contact HIN support.
Please include relevant information such as the customer name, appliance version, and screenshots/logs where applicable, to help us process your request efficiently.
Stargate VMware ESXi deployment using an image¶
Deploy Stargate on VMware
Get the image file¶
- Download the latest OVA (or OVF and VMDK if you prefer) image file. Please refer to VM Catalog
Navigate to the ESXi web UI¶
- Click Virtual Machines
- Click Create/Register VM
- Choose "Deploy a virtual machine from an OVF or OVA file"
- Click Next
- Type a name for the VM
- Click Next
- Click to select files and choose the OVA image file (or OVF and VMDK if you prefer)
- Click Next
- Choose a storage to use
- Click Next
- Choose Network and Disk for provisioning
- Click Next
- Click Finish
Data Disk included
The OVA already contains the appliance's Data Disk (VEREIGN-DATA, mounted at /var/data) — there is no extra disk to attach. See Installation guide → Step 4.
Install HIN Gateway¶
After the VM has been successfully created, proceed with the installation and onboarding steps as described in the provided instructions
Support
For any questions or issues related to the deployment and operation of the Stargate appliance, please contact HIN support.
Please include relevant information such as the customer name, appliance version, and screenshots/logs where applicable, to help us process your request efficiently.
Proxmox deployment using an image¶
Deploy Stargate on Proxmox
Get the image file URL¶
- Please refer to VM Catalog for a list of images with URLs.
- Copy URL to clipboard, for example
https://images.hin.ch/vm-images/hingateway_v0.0.0.x86_64.qcow2
Import the image file in Proxmox¶
- In Proxmox WebUI, navigate to the Storage menu and click Import
- Click Download from URL, paste the copied URL and click "Query URL".
- Click Download and wait for "TASK OK" to appear at the end of the output log.
- Close the Task Viewer Download window.
Create a VM¶
- Click "Create VM"
- Type a name for the VM
- Click "Next"
- Choose "Do not use any media"
- Click "Next"
- Click "Next"
- Click the "Trash icon" next to "scsi0" to remove it.
- Click "Import" and under "Select Image", choose the newly imported image file.
- Click "Next"
- Select 4 CPU cores and choose your CPU Type (or use "host"). Please refer to Server Requirements.
- Click "Next"
- Select 8192 MiB Memory. Please refer to Server Requirements.
- Click "Next"
- Click "Next"
- Wait until the VM creation process finishes and then click on the new VM, click "Console", click "Start Now"
Attach the Data Disk first
Before the first boot, attach a second, blank disk of at least 30 GB. On first boot the appliance formats it as the Data Disk (VEREIGN-DATA, mounted at /var/data) and keeps all config and data there; without it the boot fails and rolls back. See Installation guide → Step 4.
Install HIN Gateway¶
After the VM has been successfully created, proceed with the installation and onboarding steps as described in the provided instructions.
Support
For any questions or issues related to the deployment and operation of the Stargate appliance, please contact HIN support.
Please include relevant information such as the customer name, appliance version, and screenshots/logs where applicable, to help us process your request efficiently.
Windows 11 Pro deployment using an image¶
Deploy Stargate on Windows Pro (non-Pro versions do not support Hyper-V)
Install Hyper-V¶
- Click the Start button, then type "Turn Windows features on or off"
- Click on that button
- Check Hyper-V and click "OK"
- After the installation completes, click "Restart now" and wait for Windows to boot again
Note: We recommend deploying the VM using Hyper-V Generation 2
Get the image¶
- Download the .vhdx image file. Please refer to VM Catalog
Import the image file and create a VM with it¶
- Click the "Start" button and type "Hyper-V Quick Create"
- Click on that icon
- Choose "Local installation source"
- Uncheck "This machine will run Windows"
- Click "Change installation source", navigate to the downloaded .VHDX image and click on it
- Click "Create virtual machine"
- Click "Edit settings"
- Under "Memory", choose "RAM" 8192 MB. Please refer to Server Requirements.
- Under "Processor", choose "Number of virtual processors" 4. Please refer to Server Requirements.
- Click "OK"
- Click "Connect"
- Click "Start"
Attach the Data Disk first
Before the first boot, attach a second, blank disk of at least 30 GB. On first boot the appliance formats it as the Data Disk (VEREIGN-DATA, mounted at /var/data) and keeps all config and data there; without it the boot fails and rolls back. See Installation guide → Step 4.
Install HIN Gateway¶
After the VM has been successfully created, proceed with the installation and onboarding steps as described in the provided instructions
Support
For any questions or issues related to the deployment and operation of the Stargate appliance, please contact HIN support.
Please include relevant information such as the customer name, appliance version, and screenshots/logs where applicable, to help us process your request efficiently.
Stargate Deployment on Cloudscale Using an Image¶
Get the Image File URL¶
- Refer to the VM Catalog for available images with URLs.
- Copy the
qcow2URL to your clipboard.
Import the Image File in Cloudscale¶
- In the Cloudscale WebUI, navigate to the "Custom Images" menu and click "Import a Custom Image".
- Set an appropriate Image Name.
- Define a Slug, e.g., "stargate".
- Paste the Stargate image URL into the Download URL field.
- Set Source Format to the upload format, recommended:
qcow2. - Configure additional settings as needed.
- Click Import.
Create a VM¶
- Navigate to Servers and click Launch a new Server.
- Enter your preferred FQDN or hostname.
- Under Operating System, select Custom Images and choose your imported image.
- Under Compute Flavor, select Flex-4-2 or Flex-8-2 depending on expected load (can be adjusted later). See Server Requirements for details.
- Under Storage Capacity, set at least 30 GB. Please refer to Server Requirements.
- Under Server Location, select your preferred zone.
- Under Network Management, enable only IPv4 if the Stargate instance must be internet-accessible (e.g., for Office 365).
- Under Access Security, select your SSH key (usable with the
almalinuxuser). - Under Password, set any secure password you prefer.
Without a password, SSH password authentication is disabled
You must still use the initial password provided by HIN for your first login. However, if you do not set a new password, cloud-init will disable SSH password authentication for all users, allowing SSH access only via public key authentication.
- Click Launch.
Attach the Data Disk first
Before the first boot, attach a second, blank disk of at least 30 GB. On first boot the appliance formats it as the Data Disk (VEREIGN-DATA, mounted at /var/data) and keeps all config and data there; without it the boot fails and rolls back. See Installation guide → Step 4.
Install HIN Gateway¶
After the VM has been successfully created, proceed with the installation and onboarding steps as described in the provided instructions
Support
For any questions or issues related to the deployment and operation of the Stargate appliance, please contact HIN support.
Please include relevant information such as the customer name, appliance version, and screenshots/logs where applicable, to help us process your request efficiently.
VM Images Catalog¶
Here you can find a current VM Catalog for different platforms. Please do not forget to check the SHA-256 hash of downloaded images. You can use the https://images.hin.ch/vm-images/SHA256SUMS file to compare it.
How to perform SHA256 hash check locally
You can calculate the SHA256 hash of downloaded files with the following command and then compare it with the values in the table below.
Open Terminal and execute:
As a more advanced variant, you can execute the following command and paste the predefined checksum as SHA256_VALUE and the file name as IMAGE_NAME:

| Image Name | Image Type | Image Size | Link | SHA256 Checksum |
|---|---|---|---|---|
hingateway-v0.6.1.x86_64.mf |
 |
4.0K / 364 bytes |
Download | 755f7645304bc61012d5a4970a1700f033553a872cc562926fb9d9ec052e4589 |
hingateway-v0.6.1.x86_64.ova |
 |
3.2G / 3429335040 bytes |
Download | a63cbec510511f736a5df5326c8d0528997f181220e24415a2f37cb5bfd82597 |
hingateway-v0.6.1.x86_64.ovf |
 |
12K / 9322 bytes |
Download | 878128433cdd49fd2198611fca204ff9b0ebae91dcdadc1b6e0e17cb29831b4d |
hingateway-v0.6.1.x86_64.qcow2 |
 |
3.3G / 3458072576 bytes |
Download | c60497fb6d215df343c456a88315058c539337d50cf062d3dcc5dd0e89c0737b |
hingateway-v0.6.1.x86_64.raw |
 |
30G / 32212254720 bytes |
Download | ece449d140bb475910fc9d79108cb929b7e8004a0046e8de0a9019998967d57a |
hingateway-v0.6.1.x86_64.raw.gz |
 |
3.2G / 3410152384 bytes |
Download | 6195b21b4e79c89929b1beea5f9fe8d200f339435f1f8bd69f0e14d788e411ca |
hingateway-v0.6.1.x86_64.vhd |
 |
31G / 32212255232 bytes |
Download | a6f030f1598e12f187be60c65ae34b1c201da8afc1351ddbead1360979269017 |
hingateway-v0.6.1.x86_64.vhd.gz |
|
3.2G / 3410152459 bytes |
Download | 92b138f5b03c03ab4dcb8ff64769181414a00f8a82c595a269435ef661835e1c |
hingateway-v0.6.1.x86_64.vhdx |
 |
4.6G / 4857004032 bytes |
Download | 80856d27a9d0d03ec44b4330d5357bcc4e9f857847f9103a4344d567f42c3b66 |
hingateway-v0.6.1.x86_64.vmdk |
 |
3.2G / 3425249280 bytes |
Download | 8f4de40dcf9f920275b9a37ec126a9cd4f12f22b74a0cf5b26b6f18fb2a3a936 |
SHA256SUMS |
 |
4.0K / 979 bytes |
Download | d375123bfe3a749990b435cd6c8c89e2fa6edd099ae878b3bf107950a0c07e31 |
Troubleshooting & Diagnostics¶
A structured guide to diagnosing a Stargate appliance from the command line: what to check, where the logs are, and safe recovery actions.
Where the scripts are
The helper scripts live in the deployment directory under scripts/. Commands below use the full path for VM images: /usr/share/stargate-deployment/docker-compose/scripts/. If you installed elsewhere, substitute your own install directory (the folder that contains docker-compose.yml and scripts/).
docker compose ... commands must be run from the deployment directory:
Where the writable state is
The docker-compose/ tree above (scripts, docker-compose.yml, config templates) is read-only at runtime. All writable state - .env, customer-config.sh, secrets/, generated TLS/Keycloak/APISIX config, backups, and every service's own data - lives under /var/data instead (STARGATE_DATA_DIR overrides this root for testing). In particular: config/secrets are under /var/data/vereign/, backups under /var/data/backups/, and the update log at /var/data/vereign/update.log. See Data Layout for the full breakdown. Prefer the wrapper scripts (./scripts/start.sh, ./scripts/update.sh, ...) over a bare docker compose up -d, which won't pick up /var/data/vereign/.env on its own.
1. Start here: the health check¶
One command summarizes the whole appliance:
It reports pass/fail for: containers (running/healthy), liveness endpoints (smimekeys, policy, irisagent, mxengine), Vault seal status, PostgreSQL connectivity + databases, SeaweedFS, the WireGuard tunnel + peer handshakes, Stalwart MTA (ports 25 / 10026), Prometheus metrics endpoints, and disk / memory.
Tip
Run this first. A single FAIL line usually points you straight at the section below.
2. Where the logs are¶
| Layer | Command | What it shows |
|---|---|---|
| Boot / first-install / auto-start | sudo journalctl -u stargate -n 200 --no-pager |
The systemd service that runs start.sh on boot and the first-boot install |
| Update runs | cat /var/data/vereign/update.log |
Output of the last dashboard/host-triggered update.sh |
| A single service | docker logs stargate-<service> --tail 100 |
e.g. stargate-dashboard, stargate-mxengine, stargate-keycloak |
| Follow one service live | docker logs -f stargate-mxengine |
Real-time |
| All containers live | docker ps -a --format '{{.Names}}' \| xargs -I{} sh -c 'docker logs --timestamps -f {} 2>&1 \| sed "s/^/[{}] /"' |
Merged, prefixed by container |
| Web log viewer | Dozzle at https://<SERVER_IP>:8190 (Keycloak login) |
Browse all container logs in a UI |
To hand logs to HIN support, use the upload script: it collects the last N log lines from every service (plus host and version info), uploads them, and prints a link to share - see Provide logs to support:
/usr/share/stargate-deployment/docker-compose/scripts/send-logs-to-support.sh --tail 5000     # last 5000 lines from each service
# other options:  --since 1h   |   --until 5m   |   --all   (no argument = --tail 500)
The upload is capped at 20 MB, so on a busy appliance prefer --tail/--since over --all.
3. Containers not running or restarting¶
Read the Status column:
| Status | Meaning | Action |
|---|---|---|
Up ... (healthy) |
Running fine | - |
Up ... (no health) |
Running; no healthcheck defined | Check its docker logs if you suspect trouble |
Restarting |
Crash-looping | docker logs stargate-<svc> - fix the root error (config, secret, dependency) |
Exited (0) |
One-shot init finished OK (e.g. *-init, vault-data-fixer) |
Normal |
Exited (1+) |
Failed | docker logs stargate-<svc> - the last lines show why |
Created |
Never started - a dependency didn't come up | Check what it depends_on (usually Postgres/Vault); fix that first |
Restart a single service (safe, non-destructive):
docker compose up -d <service>          # recreate one service
docker compose restart <service>        # just restart it
Startup order
Services wait on their dependencies (depends_on + healthchecks). During a full restart, brief connection refused / database system is starting up lines while Postgres/Vault come up are normal and clear within a minute.
4. Diagnose by symptom¶
Dashboard or Keycloak won't load / can't log in¶
- Both are fronted by Caddy: Dashboard on
:443, Keycloak on:8180. - Check the chain:
docker logs stargate-caddy,stargate-dashboard,stargate-keycloak,stargate-apisix. - Keycloak must be healthy before the dashboard works:
docker compose ps keycloak. - TLS warning in the browser is expected (self-signed cert) - accept and proceed.
- Login redirects failing usually mean the public URL doesn't match how you reach the box - verify
KEYCLOAK_PUBLIC_URL/DASHBOARD_PUBLIC_URLin.envpoint at the IP/host you actually use.
WireGuard tunnel down / certificate issuance fails¶
This is the most common issue - certificates fail when the tunnel is down, so always fix the tunnel first.
/usr/share/stargate-deployment/docker-compose/scripts/health-check.sh -v      # shows WireGuard peer + handshake status
docker logs stargate-irisagent | grep -iE "handshake|peer|cert|wireguard"
- Confirm the firewall allows
19818(UDP and TCP) inbound/outbound. - Verify the peer is registered on the HIN side (support step) - you supply WG public key,
DEPLOYMENT_NAME,SERVER_STATIC_IP,WG_INTERFACE_PORT. - Once the tunnel shows a recent handshake, retry certificate issuance from the dashboard.
Vault sealed or init failed¶
- Vault must be unsealed for smimekeys/mxengine/policy to work. Keys live in
/var/data/vereign/secrets/vault-keys.json. - If
vault-initexited non-zero, the keys file may be missing/corrupt - check its logs; re-running/usr/share/stargate-deployment/docker-compose/scripts/init-vault.shre-attempts unseal.
Do not delete /var/data/vereign/secrets/vault-keys.json
Losing it means losing access to all stored secrets. Keep a backup.
PostgreSQL / database connectivity¶
- Transient
the database system is starting up (57P03)right after a restart is normal - services reconnect automatically. - Persistent auth failures usually mean
POSTGRES_PASSWORDin.envdrifted from the data volume - see the update/secrets notes, and avoid editing it by hand.
Mail not flowing¶
-
Inbound arrives on
:25(Stalwart). Many cloud providers block port 25 by default:If
25is blocked, request an exception from your provider. - Outbound / sealing goes Stalwart → mxengine (:8084seal callback, SMTP:1587):docker logs stargate-mxengine. - Mail loops show as the same message cycling - check that your domain's MX does not resolve back to this appliance's own IP. - See Mail relay setup and DNS setup for the expected routing.
An update failed¶
docker logs stargate-ops-agent --tail 40      # the update orchestrator
cat /var/data/vereign/update.log              # the update script output
- The ops-agent checks out the target release tag (whose
docker-compose.ymlpins the image versions), then runsupdate.shon the host. - After it finishes, confirm versions applied:
/usr/share/stargate-deployment/docker-compose/scripts/gather-app-versions.sh(or checkdocker compose psimage tags). - If a service is stuck after an update,
docker compose up -d <service>to recreate it.
Update starts but nothing happens (updating from an older version). If the ops-agent log stops at pulling deployment repo ... and the update never proceeds, the repository on the VM most likely has local edits to a tracked file (commonly a hand-patched docker-compose.yml). That makes the ops-agent's git checkout refuse to run, so the update stalls. Force-reset the repository to the latest revision, then re-run the update. Git is the single source of truth; this discards local edits to tracked files only - customer-config.sh, .env, and secrets/ live under /var/data/vereign/, outside the repository checkout, and are always preserved:
cd /usr/share/stargate-deployment
git fetch origin
git checkout -f main
git reset --hard origin/main
cd docker-compose
/usr/share/stargate-deployment/docker-compose/scripts/update.sh
update.sh regenerates .env, pulls the images, and recreates the affected services - you do not need to restart Stargate manually. When it completes, retry the update from the dashboard; it will now proceed.
Warning
Do not use git pull here. On a working tree with local edits it aborts with "local changes would be overwritten", which forces a git stash / merge-conflict / manual-recovery detour. The git checkout -f + git reset --hard sequence above avoids that entirely and is the safe, repeatable way to bring the repo current.
Dozzle (log viewer) not reachable¶
- URL is
https://<SERVER_IP>:8190; it requires a Keycloak login (same realm as the dashboard) via oauth2-proxy. - It only runs when
DOZZLE_ENABLED="true". Check:docker compose ps dozzle oauth2-proxy. - Ensure the firewall allows
:8190inbound. See Monitoring and Logs.
Onboarding: entering the activation code returns an error¶
If the activation code is rejected, check in order:
- Wrong code - it wasn't copied in full (a truncated copy-paste, an extra space, or a missing character). Re-copy the complete code and re-enter it.
- Code already used - it was already consumed by a previous onboarding. Request a fresh code.
- WireGuard / connectivity to HIN - the
irisagenttunnel isn't up, so the code can't be validated against HIN. See WireGuard tunnel down above (/usr/share/stargate-deployment/docker-compose/scripts/health-check.sh -v,docker logs stargate-irisagent). - No domain tied to the registration - the customer's HIN registration has no domain associated with it, so there is nothing to activate. This is resolved on the HIN side.
Onboarding: activation code accepted, but no domains are listed¶
Most likely cause: the WireGuard tunnel is not established - usually a wrong public IP or a firewall port not open. Without the tunnel the appliance cannot fetch the domain list from HIN.
- Verify
SERVER_STATIC_IPincustomer-config.shmatches the real public IP. - Confirm
19818(UDP and TCP) is open inbound/outbound. - Confirm the peer is registered on the HIN side for this IP (support step).
docker logs stargate-irisagentshould show a recent handshake; if not, fix the tunnel first (see WireGuard tunnel down above).
Changing the server IP address (initial setup only)¶
If the server IP was wrong or unset at first boot, reset cleanly and reinstall:
/usr/share/stargate-deployment/docker-compose/scripts/purge.sh                 # destroys ALL data - see warning below
nano /var/data/vereign/customer-config.sh    # set SERVER_STATIC_IP=<NEW IP>
/usr/share/stargate-deployment/docker-compose/scripts/install.sh
The TLS certificate and several service URLs are derived from the IP at first boot, so a purge + reinstall regenerates them for the new address.
Only before onboarding
purge.sh permanently deletes all data - databases, Vault, and the S/MIME keys. This is safe only on a fresh, not-yet-onboarded appliance. Never run purge.sh to change the IP of a live/onboarded gateway - it causes data loss and mail that can no longer be decrypted. For a production IP change, contact support.
5. Storage & disk¶
df -h /                              # is the disk full?
docker system df                     # space used by images / containers / volumes
du -sh /var/lib/docker/volumes/*     # per-volume usage (Postgres, SeaweedFS, Loki, ...)
- Container logs are capped (json-file, 100 MB × 5 per container) so they shouldn't fill the disk, but images and volumes can.
- Reclaim space safely:
docker image prune -af(removes unused images only). Avoiddocker system prune --volumes- it deletes data volumes. - Object storage is SeaweedFS (
stargate-seaweedfs):docker logs stargate-seaweedfs --tail 50.
6. VM resources¶
free -h                              # memory (min 8 GB)
nproc                                # CPUs (min 4)
docker stats --no-stream             # per-container CPU/RAM
uptime                               # load average
Host metrics are also exported for Prometheus on :9100/metrics (see Monitoring). If the box is swapping or pegged, expect healthchecks to flap and updates to be slow.
7. Network & ports¶
Quick reachability check for the key inbound ports:
| Port | Service | Direction |
|---|---|---|
25 |
Stalwart SMTP (inbound mail) | inbound |
443 |
Dashboard (HTTPS) | inbound |
8180 |
Keycloak | inbound |
8190 |
Dozzle (optional) | inbound |
19818 |
WireGuard (UDP and TCP) | in/outbound |
Outbound access is needed to the container registry, the S/MIME CA (over the WireGuard tunnel), and any remote Loki you configured. See the full port table on the home page and Applications overview.
8. Recovery actions¶
Ordered least- to most-disruptive:
docker compose up -d <service>       # recreate one stuck service
sudo systemctl restart stargate      # restart the whole stack (via start.sh)
/usr/share/stargate-deployment/docker-compose/scripts/stop.sh  &&  /usr/share/stargate-deployment/docker-compose/scripts/start.sh
Backups & destructive recovery
/usr/share/stargate-deployment/docker-compose/scripts/backup.sh and /usr/share/stargate-deployment/docker-compose/scripts/restore.sh handle data backup/restore. /usr/share/stargate-deployment/docker-compose/scripts/purge.sh deletes all data (databases, Vault, storage) for a clean reinstall - use only as a last resort and only with a current backup. Details: Docker Advanced configuration.
9. When to contact support¶
If the health check still shows failures after the steps above, open a ticket via Support / Contact us and include:
- The appliance version (
/usr/share/stargate-deployment/docker-compose/scripts/gather-app-versions.sh) and customer name. - The health-check output (
/usr/share/stargate-deployment/docker-compose/scripts/health-check.sh -v). - A log bundle link from
/usr/share/stargate-deployment/docker-compose/scripts/send-logs-to-support.sh(see Provide logs to support). - What you were doing when it broke, and any screenshots.
Update Verimesh Instance¶
The following instructions describe how to update a Verimesh instance from v0.5.1 to v0.5.3.
Note: You will need to login to the VM using the Linux administrator account.
Update Steps¶
- Edit the .env file and update the ops-agent version to v0.0.3.
- Edit the customer configuration and update the ops-agent version to v0.0.3 there as well.
- Switch to the main branch:
git checkout main - Pull the latest changes:
git pull - Update the ops-agent container:
docker compose up -d ops-agent - Log in to the Dashboard.
- Navigate to Settings.
- In the Update section at the bottom of the page, enter the target version (v0.5.3) and start the update process.
Setup updated keycloak¶
Note: This instructions is valid if you are running on VM image v0.5.1 and then you updated to newer version.
After the latest Keycloak update, a breaking change causes authenticated users to be unexpectedly redirected to the login page when navigating to specific application routes (e.g., Peers, Peer Certificates).
To resolve this, the following manual configuration must be completed in the Keycloak UI.
Resolution Steps¶
-
Open Keycloak in your browser at
https://<VM IP address>:8180/admin/master/console/- The
:8180port is required - Keycloak is served on port 8180. Opening the IP with no port reaches the dashboard (:443) instead, which redirects you to the stargate-realm login where the admin user does not exist (this is the usual cause of "invalid username or password" / "wrong realm" here). - Log in against the master realm (the
/admin/master/console/path selects it) with usernameadmin(theKEYCLOAK_ADMIN_USERvalue - lowercase) and theKEYCLOAK_ADMIN_PASSWORDvalue from the machine's/var/data/vereign/.env(read it from the Linux console).
- The
-
In the admin console, switch the realm selector (top-left) from master to stargate:
- Go to Clients → dashboard
- Navigate to the Client scopes tab → click dashboard-dedicated
- Select Configure a new mapper → Audience
-
Set the following configurations:
- Name: apisix-audience
- Included client audience: apisix (select from dropdown)
- Included custom audience: (leave empty)
- Add to access token: On
- Add to token introspection: On
- Add to ID token / lightweight token: Off
-
Click Save
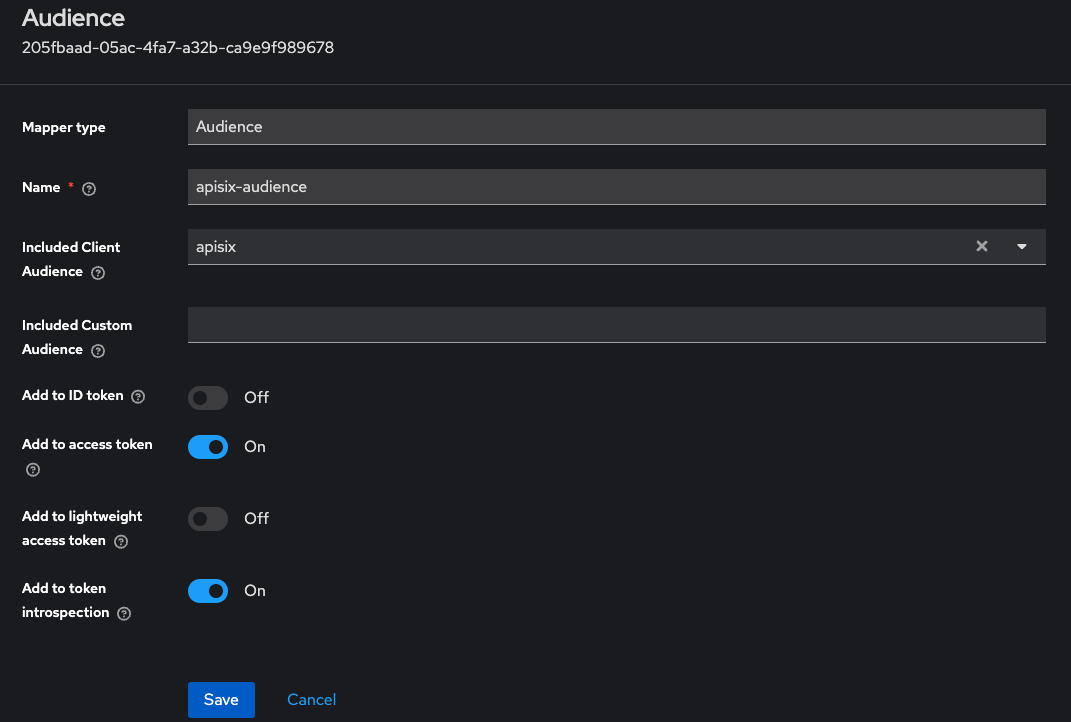
## Keycloak Reset Password
Resetting a Stargate User Password in Keycloak¶
Follow the steps below to reset the password of a Stargate user through the Keycloak administration console.
-
Connect to the HIN Gateway VM
-
Open the VM console, or connect to the HIN Gateway VM via SSH.
-
Retrieve the Keycloak administrator credentials
-
Open the
/var/data/vereign/.envfile -
Locate the following variables:
KEYCLOAK_ADMIN_USERKEYCLOAK_ADMIN_PASSWORD
-
Open the Keycloak Admin Console
- In a browser, navigate to:
http://<VM-IP>:8180/admin/master/console -
Replace
<VM-IP>with the IP address of the HIN Gateway VM. -
Sign in to Keycloak
- Enter the administrator username and password retrieved from the
.envfile. -
keep the same administrator password if you change it you must store it securely
-
Select the Stargate realm
-
From the realm selector in the Keycloak Admin Console, select Stargate.
-
Find the user
- Navigate to Users.
-
Search for and select the Stargate user whose password needs to be reset.
-
Reset the user's password
- Select the option to reset the user's password.
- Enter the new password and confirm the change.
Do not change or reset the Keycloak administrator password as part of this procedure. Any changes of admin password can lead to potention lockdown of keyclaok without anyone be able to access it!
Release Notes¶
v0.6.1¶
Released on 4 September 2026.
This maintenance release strengthens HIN Gateway security, corrects email-header handling and improves update and migration guidance.
What’s new and improved¶
- Security: Restricted external access to internal service ports and strengthened authentication settings and permissions.
- Updates and rollback: Added instructions for updating HIN Gateway and returning to a previous version, available in English, German, French and Italian.
- Migration guidance: Updated email checks before and after migration and added translations of the multi-domain guidance.
Fixes¶
- Corrected the handling of HIN-specific email headers.
- Added the missing VMware data-disk image to the v0.6.0 downloads.
v0.6.0¶
Released on 31 August 2026.
This release adds multi-domain migration support, domain-level relay configuration, email authentication(such as DIKM and ARC) and improvements to installation, security and stability.
What’s new and improved¶
- Multi-domain setups: Multiple domains can now be configured or migrated to a single HIN Gateway. The updated guidance covers complete and phased migrations, including rollback scenarios
- Domain based configuration: Relay configuration per domain is now available
- Email authentication: DKIM and ARC signing, as well as DKIM, ARC, SPF and DMARC verification, can now be configured for each domain. The required DNS records are shown directly in the HIN Gateway
- Installation and migration: Updated guidance now covers new installations, single-domain and multi-domain migrations, Exchange integration, mail routing, networking and TLS testing
- Appliance migration: A documented process is available for moving an existing Docker Compose installation to the image-based HIN Gateway appliance
- Backup and restore: Persistent data now uses a consistent location, with safer restore handling and warnings when backup and target versions differ
- Diagnostics and security: Health checks, logging and diagnostic collection have been improved. Installation and recovery scripts now provide better protection for credentials and backup data
Fixes¶
- Improved first-time initialization of Vault and WireGuard settings
- Improved service startup on slower virtual machines
- Fixed edge cases affecting backup and restore operations
- Fixed inaccurate health-check results and configuration fallback handling
Important information for appliance migrations¶
When moving an existing Docker Compose installation to the image-based appliance, follow the dedicated migration guide. Restoring a backup replaces all data on the target appliance. If its public IP address changes, HIN must update the central WireGuard registration.
v0.5.3¶
Released on 29 July 2026. Hotfix applied on 5 August 2026.
This release improves email delivery, certificate handling, the dashboard and troubleshooting. There are no changes to SEAL.
Hotfix, 5 August 2026¶
Fixed an issue in the certificate import process where the domain was not correctly linked to the corresponding HIN Gateway peer.
The fix was applied to the central services. Local virtual machine installations were not affected and did not require an update.
What’s new and improved¶
- Separate relays can now be configured for senders and recipients.
- Emails to recipients outside the HIN network can be sent through the configured SMTP relay.
- The previous hourly email-processing limit has been removed.
- Sender and recipient matching has been improved for incoming and outgoing emails.
- Domain ownership is now checked before an S/MIME certificate is issued.
- Peer certificates can now be searched and sorted.
- TLS certificates can be generated directly from the dashboard.
- Search and pagination have been added to the peer overview.
- Searching through logs is now easier.
- A warning is shown when the private key has not been imported.
- Error messages and diagnostic information have been improved.
Fixes¶
- Improved certificate selection when sending encrypted emails.
- Fixed the handling of encrypted messages signed with revoked or untrusted certificates.
- Fixed an issue with session refresh tokens.
- Fixed several errors in the setup and domain-management forms.
- Fixed country-code selection and field validation.
- Fixed an issue when regenerating an activation code.
- Fixed the processing of certain S/MIME signer information.
- Fixed missing connection information in tunnel delivery logs.
- Network settings are now correctly reset after the virtual machine’s IP address changes.
v0.5.1¶
Our initial release.
Contact us¶
Support
For any questions or issues related to the deployment and operation of the Stargate appliance, please contact HIN support by email, phone:


You can find more information in our Contact page: https://support.hin.ch/de/kontakt.cfm
Please include relevant information such as the customer name, appliance version, and screenshots/logs where applicable, to help us process your request efficiently.